I love our new world of always-on technology because it can provide empirical, digital evidence that validates the squishy, fuzzy experience of being human. It can prove you’re not crazy. That there is a reason for feeling the way you’re feeling.
I don’t have a good segue into this next paragraph, but one of the things I hate most about myself is I don’t think fast enough on my feet. It’s why I prepare so meticulously when I know in advance that I need to make an important point or defend my position. When an argument becomes heated, when I’m unexpectedly challenged without supporting evidence ready and within reach, I go full Costanza.
Given an hour to craft my argument, I can eviscerate the other side in a scathing email that makes my case. But on the fly, I fumble and back down in the face of a more aggressive opponent.
That doesn’t happen often, but it did today. And I could feel my body reacting, fumbling, and shutting down in real-time as it always does. Fight or flight? I noped right out of there. I packed up my bag and went home for the day.
The difference this time, since the last occurrence, is I was wearing my watch.
Were the stress and my body’s reaction real? Or imagined? (Does it matter?)
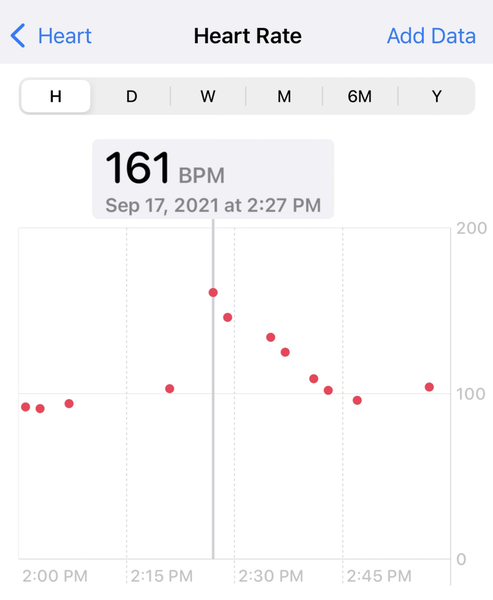
A 161 bpm heart rate during a contentious conference call sure seems to validate how I felt.
To me, that’s fascinating. The direct connection between a piece of aluminum strapped to your wrist and the emotions overwhelming your brain. A tenuous but verifiable link between digital and analog. An opportunity to recognize something tangible and make a change.
So when I arrived home today, I silenced and shut down every device and scheduled some vacation time for next week. In my out-of-office auto-reply, I even lied and said that I would be away without access to the internet or a cell phone.
Later, after sunset, I held my daughter’s hand and walked around our backyard in the pitch black for an hour. Me in my house shoes. Her with bare feet. We talked about the usual things that are top-of-mind to a six-year-old.
Why is it cold at nighttime but not really when it’s Summer?
Can wolves hear me with their long ears if I howl quiet?
What was that noise?
Where do bees go when it’s dark?
Where do ants live?
If I get a flashlight, will that scare away the lightning bugs or make them come closer?
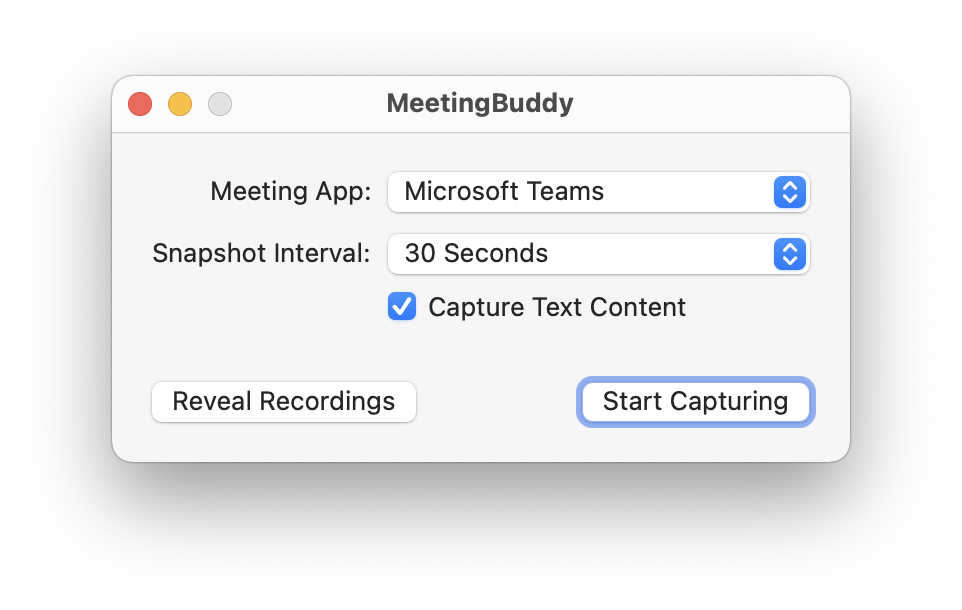
A few weeks ago I built a niche little app idea dubbed MeetingBuddy. You choose a target app from a pre-defined list (or pick any app on your Mac) and a time interval and MeetingBuddy starts screenshotting that app’s windows.
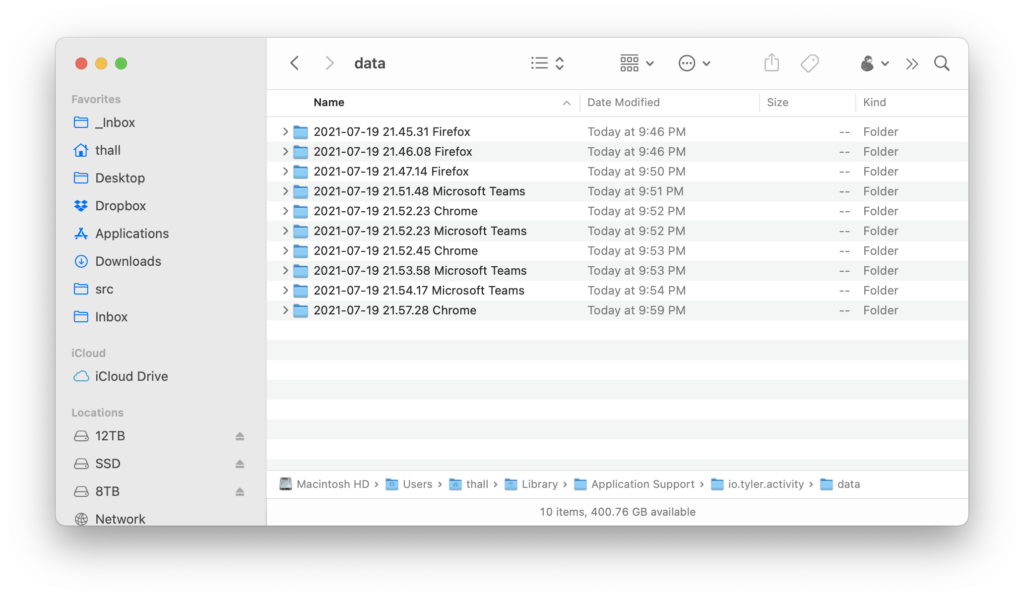
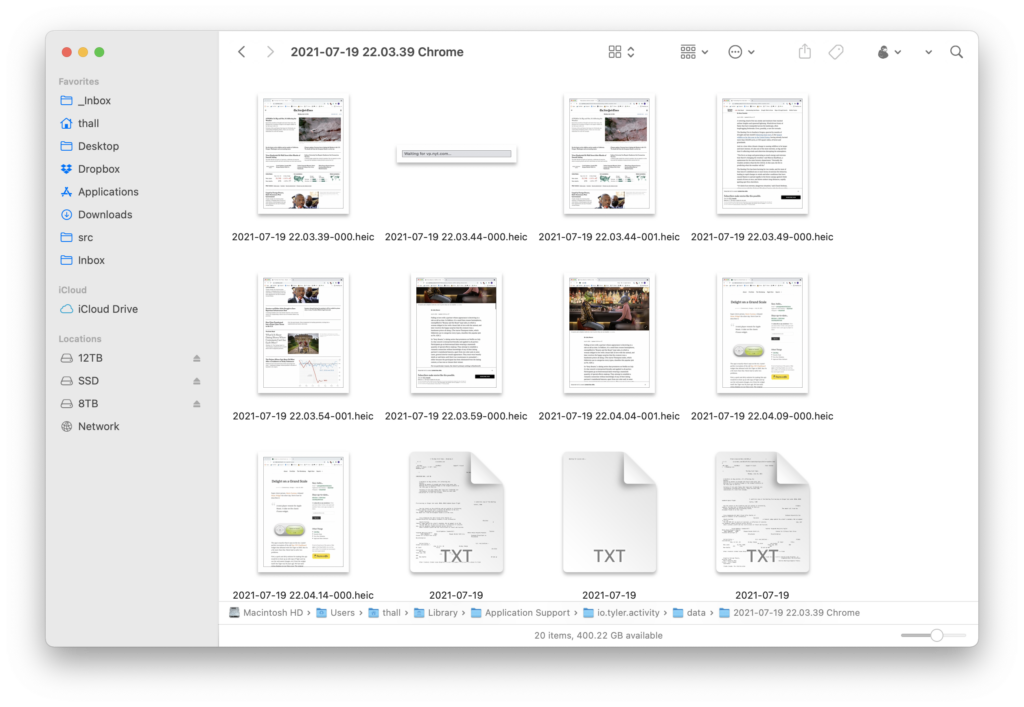
Each recording session goes into its own folder
where all of the screenshots are organized by date. But! while this is all going on, MeetingBuddy is also OCR-ing any text found in the screenshots and storing that alongside each image in a sidecar file.
You end up with a folder of recordings for each session. Images and their corresponding text contents.
Why is this useful? Honestly, I’m not exactly sure that it is just yet. But here’s what I’ve been using it for.
I’ll start a recording session when I’m doing research. As I browse the web and look through source material, MeetingBuddy is like an assistant taking searchable notes of everything I see. You’ve always been able to search your browser history, but this lets you (to a limited degree) search the contents of your browser history during those periods of focused research as well.
The reason MeetingBuddy is called MeetingBuddy is because I originally intended for it to help me remember online meetings better. And it does! At work, we’re rarely on camera during our video calls, but we share designs and slide decks constantly. I used to scramble to screenshot the video window when I wanted to remember something. Now it’s automatic. At the end of the day when I’m collating my notes from earlier, I can save any worthwhile screenshots and discard the rest.
And whether you keep the screenshots and text files in folders on your Mac, or if you dump them into a digital brain like DEVONthink, it’s super easy to search and cross-reference the text of what was on screen with the full image.
I don’t yet know if MeetingBuddy will go anywhere, but if nothing else, it’s given me an excuse to learn some new macOS APIs I hadn’t dealt with before.
Here’s a demo:
And if you’d like to try MeetingBuddy, you can download it here. I can’t even begin to describe how completely unpolished it is. I haven’t run it on any Mac other than my own, but it should work. Probably. (And, suffice to say, MeetingBuddy collects zero information about what you record. All text processing and image capture is done locally on your Mac.)
Last March, I released Three Things Today. It’s a one-trick-pony Mac app that lets you schedule out your three main goals for each day on a calendar. It’s built around my two basic assumptions for getting work done:
There is only enough time to do three significant things each day. One goal in the morning, one after lunch, and another near the end of the day.
Your day will never go as planned, fires will happens, things will be delayed or droppped entirely. That’s OK. Accept that reality, plan for it to happen, don’t punish yourself.
The point of today’s post is that while I’ve been using Three Things myself for a year now, a very nice person was kind enough to email me last week and let me know that the version posted online had expired. My bad.
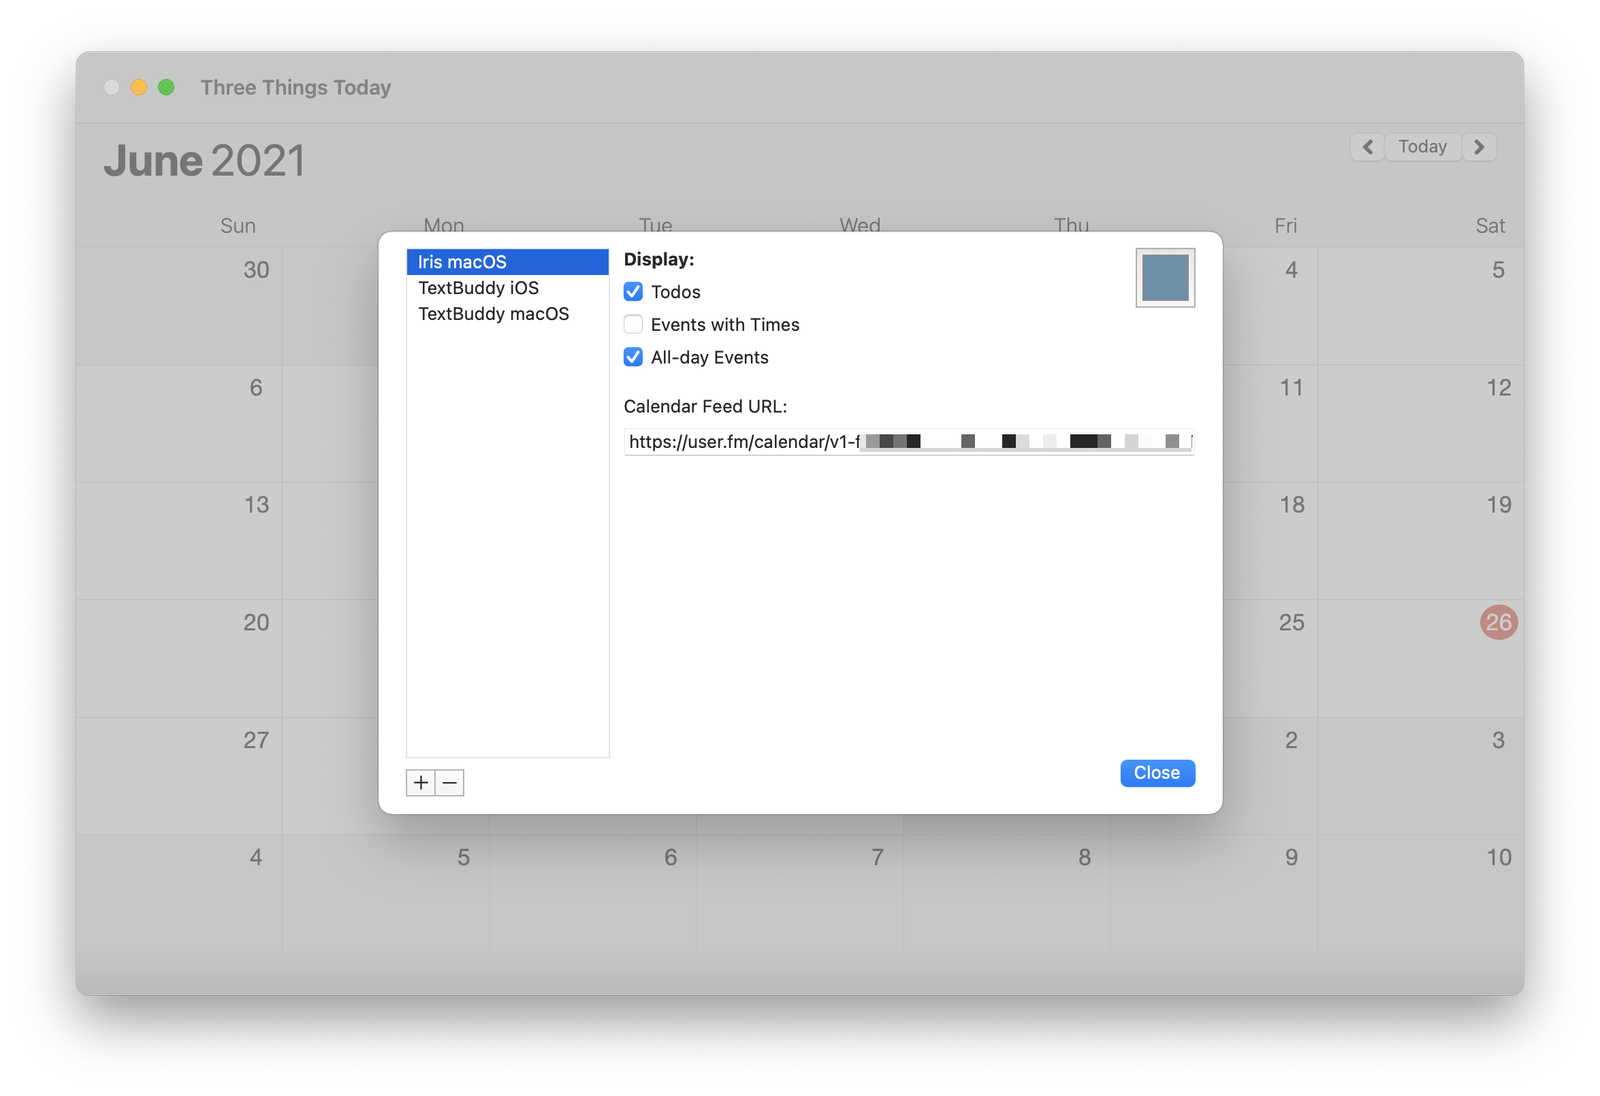
Also, this new version comes with an experimental new feature: iCalendar syncing!
You can add a public iCalendar (.ics) feed to Three Things, and it will display all day events / tasks within the app.
Why is this useful? For me, I’ve subscribed Three Things to the calendar feeds for my Trello boards that I track my software projects with. Most of my Trello cards (tasks) are undated, but in the rare case one has a due date, it will automatically appear in Three Things. More importantly, Three Things will enforce rule #1 and make sure I don’t overcommit myself on that day accidentally.
Safari is already less compatible, so if the user interface is going to be worse, too, I just don’t see the point. The main other thing keeping me there is 2FA auto-fill.
I’m very, very close to writing a KeyboardMaestro macro to grab the latest 2FA code from Messages.app to work around this.
I was mostly joking.
Until I thought, why not?
Here it is. Just launch the macro, and it grabs the new two-factor code that was just texted to you. Then inserts it into your non-Safari browser.
And here’s how it works…
My first instinct was to try and copy the text of the most recent conversation in Messages.app and then pipe that through a regular expression to parse out the two-factor code.
For very boring reasons that aren’t very interesting, I’ll just say that I spent two days a few years ago trying to hack together something similar using Messages’ AppleScript interface. It wasn’t very good back then, so I didn’t even attempt going down that road tonight – especially since it’s a Catalyst app now.
Instead, I decided to just try “clicking” my way through the UI with KeyboardMaestro. Something along the lines of…
Activate Messages.app
Click a known x,y coordinate from the top-left corner of the window to select the first non-favorite conversation.
Double-click a known x,y coordinate from the bottom-left corner of the window to select a word in the last message of that conversation.
Type ⌘A to select all the text in that message.
⌘C to put it on the clipboard.
Parse out the code.
Paste the code onto the clipboard to use.
That sort of worked. But it wasn’t very reliable. Mostly because Messages.app takes so long to wake up sometimes. If its window hasn’t been displayed in a while, it can take a not-insignificant amount of time to appear. And then switching to the newest conversation is similarly slow.
As much as I tried to work around this by adding delays in the UI script or other KeyboardMaestro tricks, it was too fragile to be reliable in my testing. I needed another approach.
Here’s what ended up working.
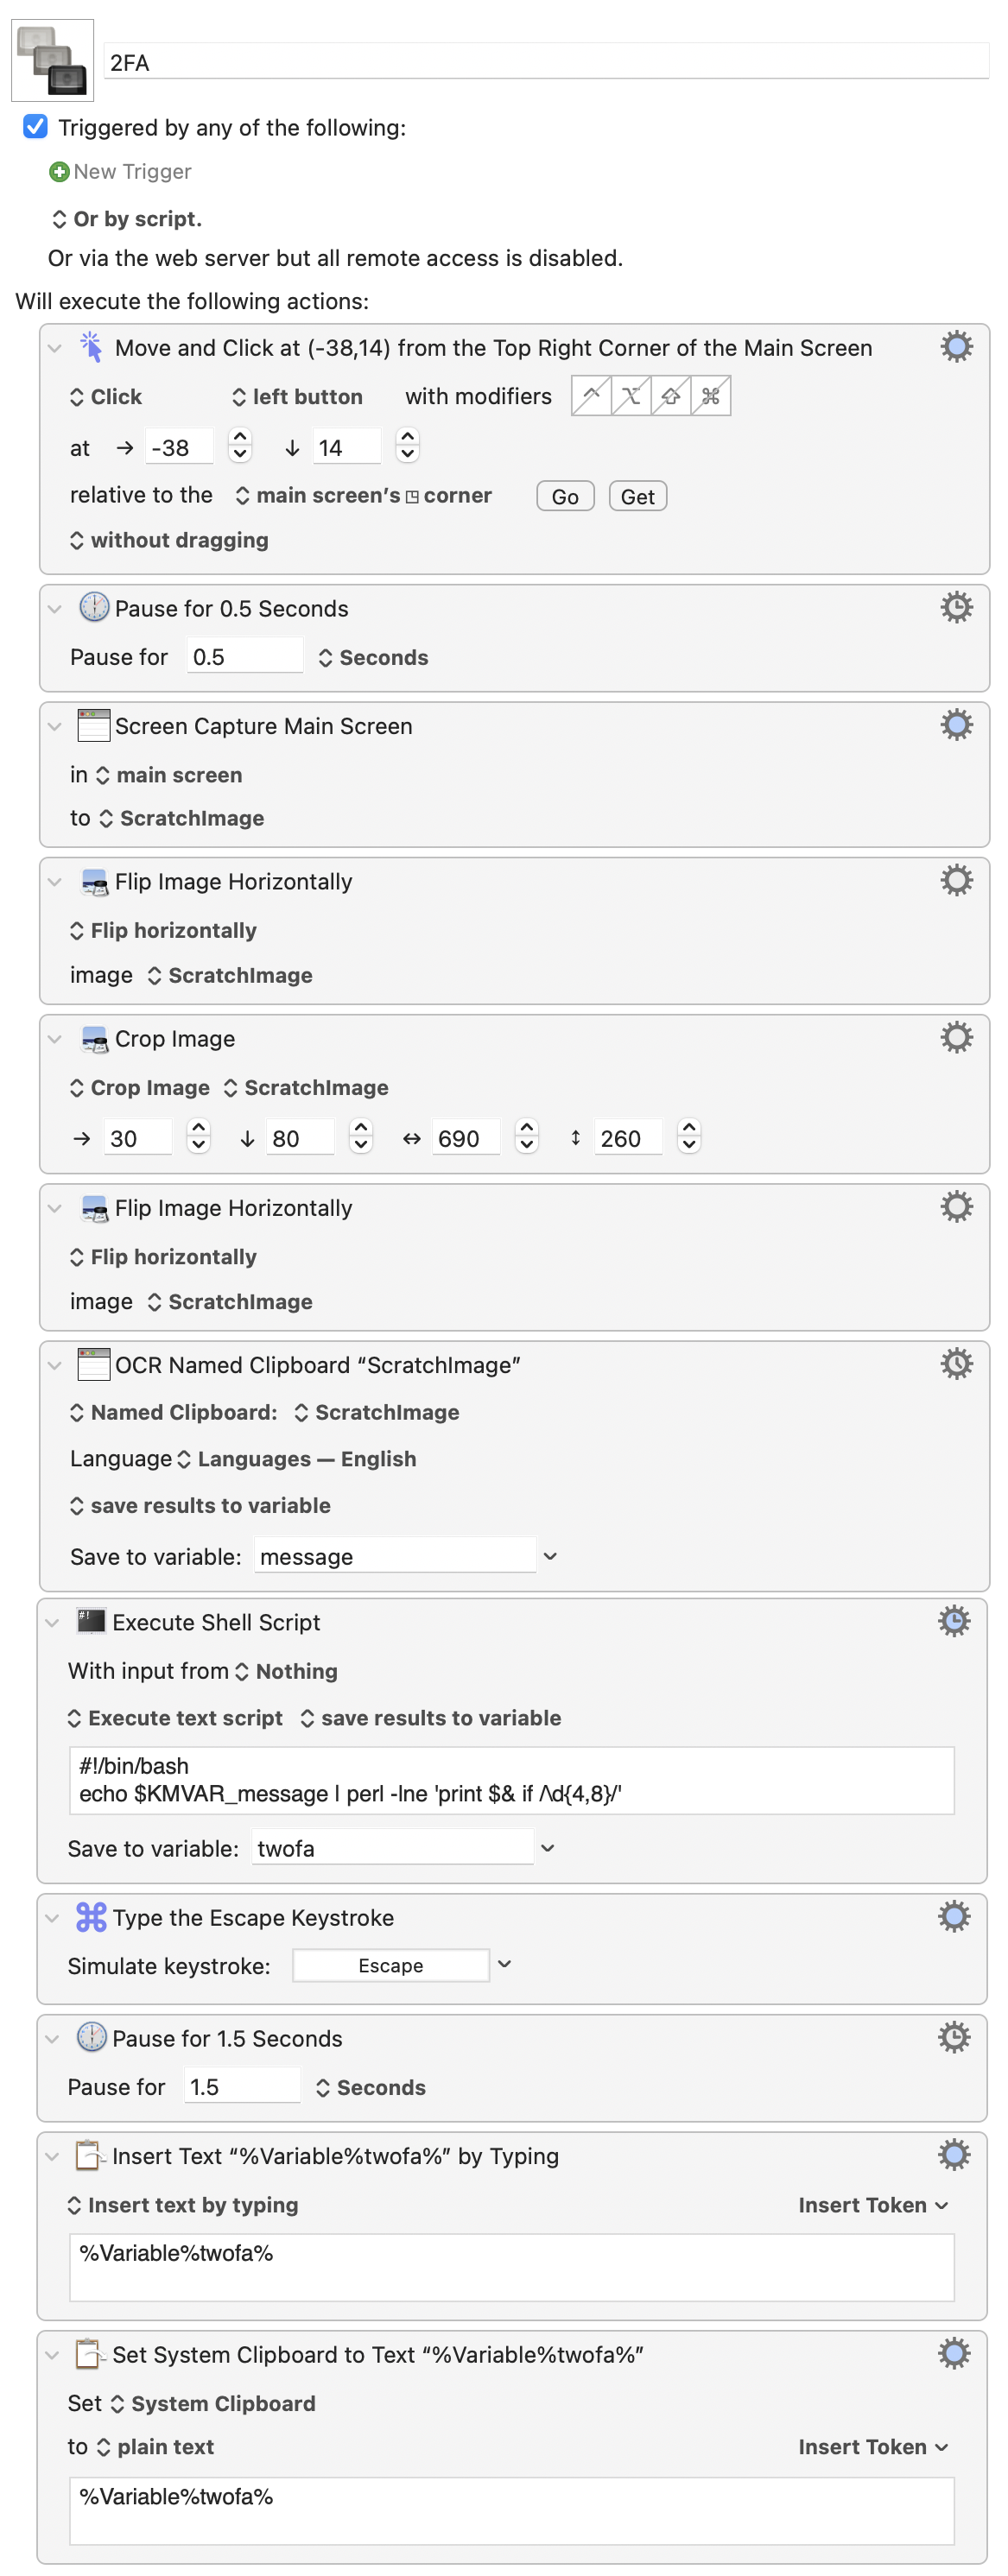
Click the menubar’s clock to activate Notification Center. (By the way, it took me a full damn month after installing Big Sur before I realized what Apple had done with the Notification Center icon and that it was still accessible without needing to use the two-finger-swipe-from-right trackpad gesture.)
Wait for the reveal animation to finish.
Take a screenshot.
Flip the image horizontally. (Because KM’s crop action only works from the top-left corner of an image.)
Crop out the known size/position of the first notification message. (All message bubbles are the same size no matter their contents.)
Flip the image horizontally (back to the original orientation).
OCR the text contained in that cropped image, which should hopefully contain our two-factor code.
Wait for the collapse animation to finish. (This delay is longer because I found I had to wait for the animation to finish and then an additional delay for the active application to regain keyboard focus a moment later.)
Type the code into the current app (probably your non-Safari browser).
I haven’t tested this yet on multi-monitor systems.
The image crop dimensions assume you’re using a retina display.
The regular expression will probably fail for you, but it works for Google and my bank.
This is all a dumb hack that isn’t actually meant to be taken seriously but illustrates the internet’s collective knee-jerk response to not wanting to use the new Safari.
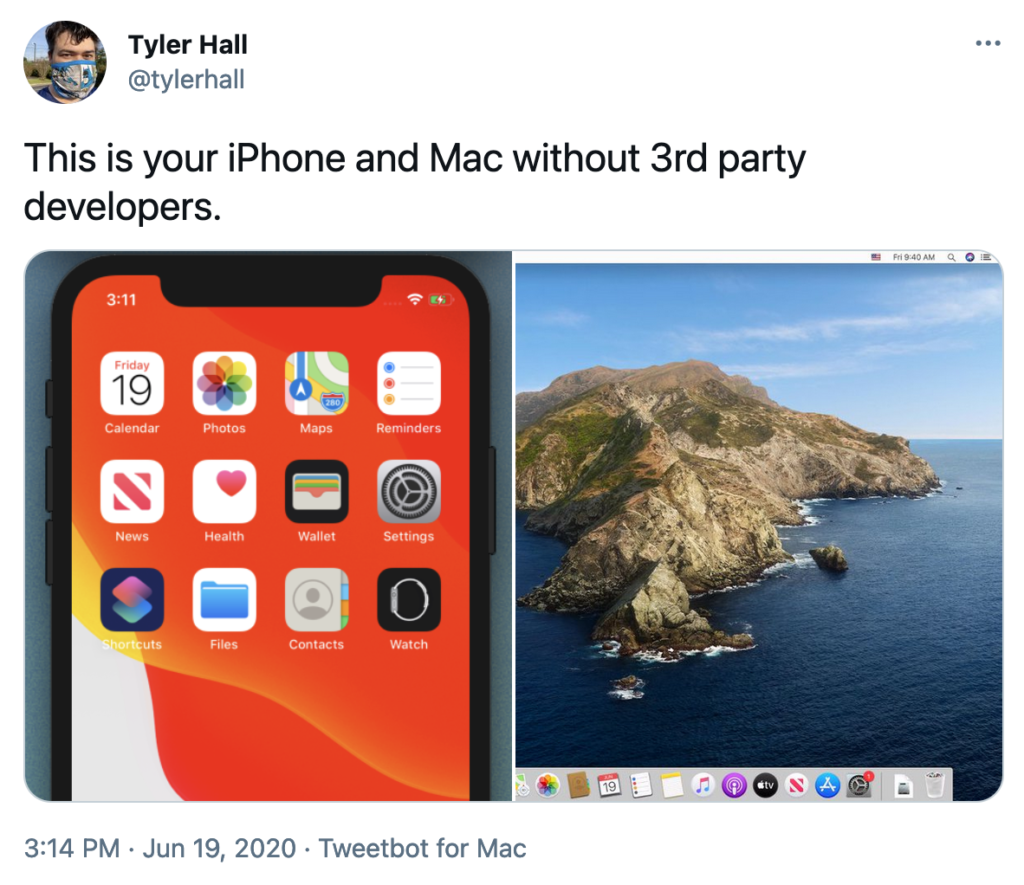
Since Apple will stand on a virtual stage tomorrow and tell us how much they love, value, and appreciate third-party developers, here is an alphabetical list of iOS apps that I depend on – from solo developers, small companies, and giant world-eating ones, too.
(And these are not affiliate links because Apple sure put a stop to that.)
I want to be crystal clear about the value these apps (and many others) provide. Without them, I would not own an iPhone. Or an iPad. Or an Apple Watch. I would not have purchased an iPad Magic Keyboard. Or any number of first-party Apple Watch bands.
I would not own three Apple TVs. (Well, only one is still in use. The other two are in a closet after being swapped out for Android TV last Summer. But that’s another blog post.)
I would not pay for iCloud storage each month. My seven-year-old son would not use his chore money to pay for Apple Arcade.
And because modern life relies so much on connected ecosystems, if I didn’t use any of the above hardware, dare I say, I would not still be using a Mac, either.
As the head of IT for my family and extended family (is there a better way to phrase that?), I would question if any of them would own iPhones, iPads, Apple Watches, Mac laptops, and pay for iCloud, Apple Music, and even Apple Fitness+.
Lawyer: What about references to locking customers into devices? Cook: It means making all the product work so well together people don’t want to leave. Lawyer: Is there anything Apple could do to lock people into iOS? Cook: Not that I’m aware of.
And I agree with Cook. I could switch to Windows and Android. I wouldn’t like it, but I could make the switch.
Except for all those third-party apps. I couldn’t give those up without significant effort – if it would even be possible to find replacements for each.
Third-party apps are what keep me locked into Apple’s lucrative don’t-call-it-a-walled-garden.
In any healthy software ecosystem, third-party developers and the platform vendor are a symbiotic relationship. To pretend otherwise is fanciful gaslighting.
Cook: I view it differently than you do, Your Honor. I view that we are creating the entire amount of commerce on the store
I view it differently than you do, Mr. Cook. I view that developers are creating the entire incentive for consumers to purchase your hardware.
If you don’t mind, I’d like to interrupt my not-so-regularly-scheduled posts about silly macOS workflows and tech complaining for a not-so-humble-brag.
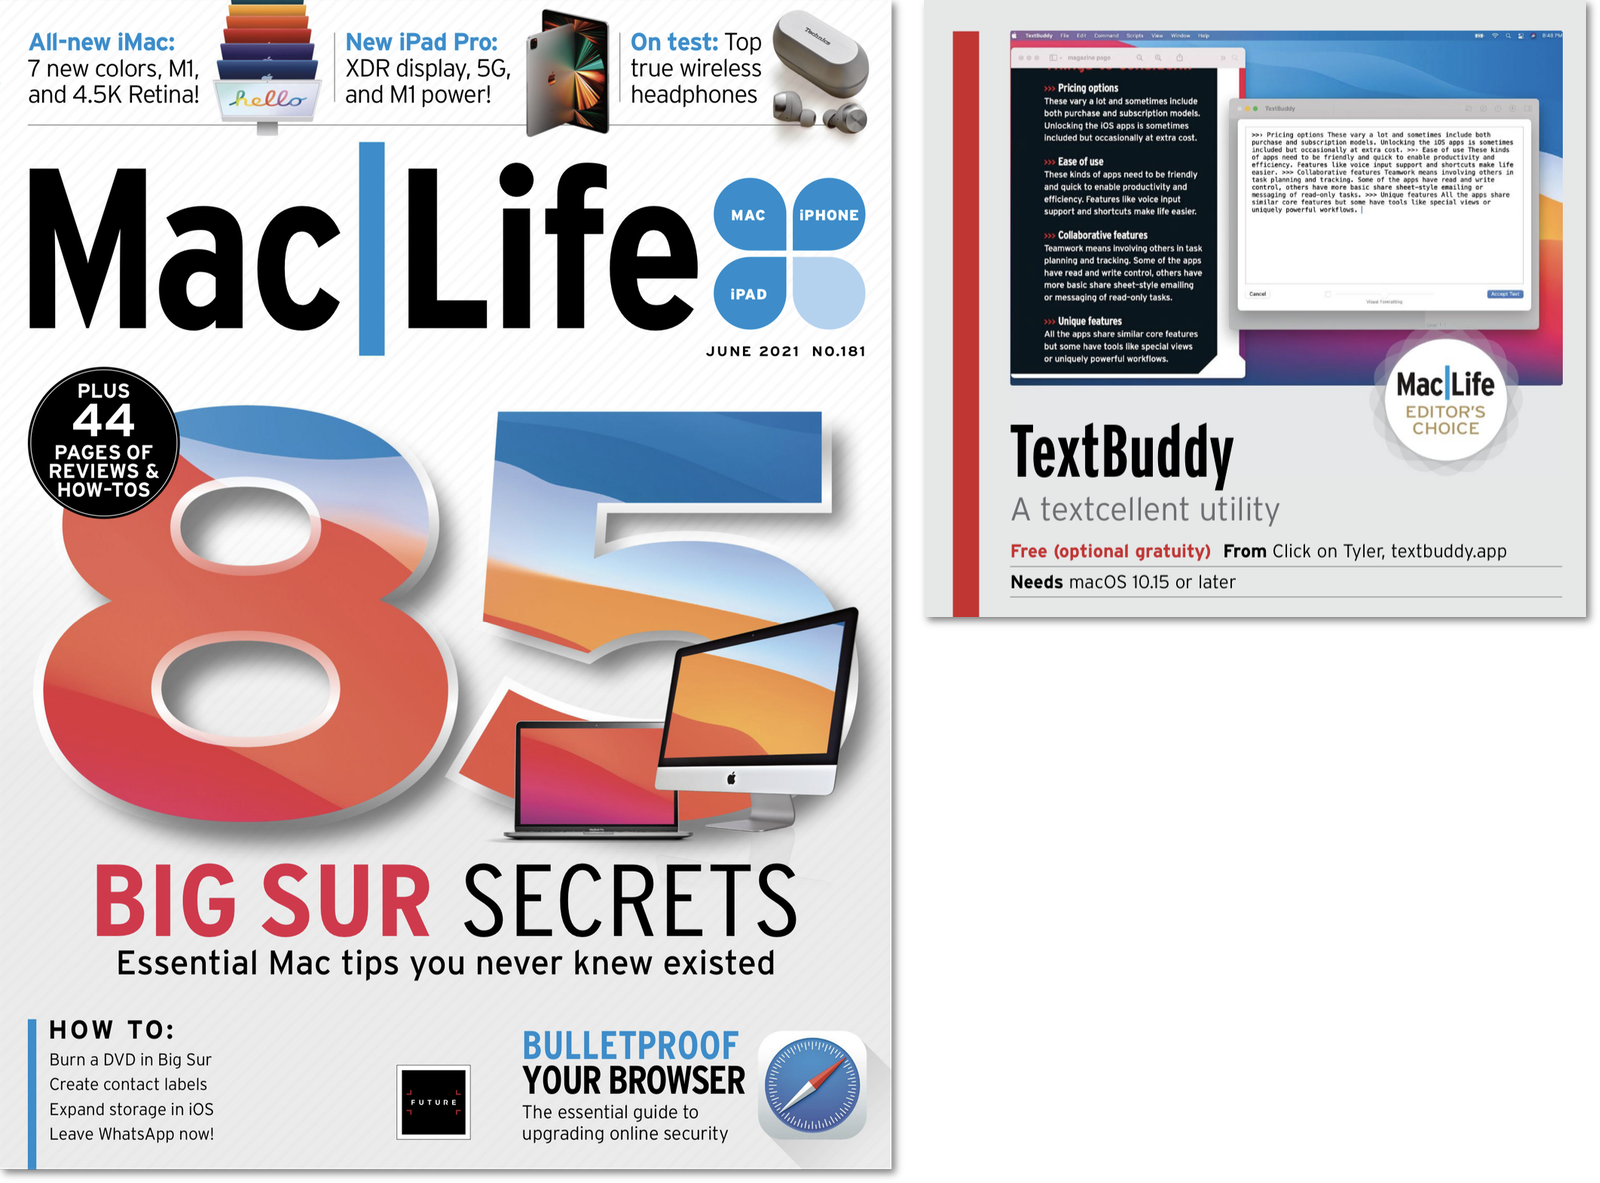
The bottom line. A marvel. If you work with text, you need this app.
As a nerdy kid who grew up in the 90s browsing the magazine section of Waldenbooks for the latest issues of Macworld, boot, and Next Generation, seeing one of my apps in a print magazine is a huge thrill.
(Hopefully, it won’t take another twelve years to happen again.)
The timing of this post is entirely accidental, but it arrives almost one year to the day since the last time I wrote about work meetings. And the reason I’m writing about this topic today is that I’ve been so swamped with work meetings the past few months, I’ve neglected to write anything here. I finally decided there’s no better way to get back on the horse and force out a blog post than write about what’s top of mind.
So this is about how my note-taking workflow for meetings has evolved since last year.
As I said last May, I take detailed meeting notes that are almost entirely for my benefit. They serve as a fantastic reference source but are also an insurance policy to cover my ass. I don’t mean that negatively about my workplace. Just that we move so quickly with so many different parties involved, I find having a definitive archive of conversations and decisions is invaluable to keep people (including myself) honest and projects on track.
My old workflow of automatically creating a new note for each meeting in Drafts using a standard template worked great – and still does.
But I settled on that workflow in 2019. And then 2020 arrived, and we all went home.
For a long time.
With video meetings being the new norm, I found myself grabbing screenshots of the meeting window to capture shared slides, documents we were collaborating on, and the latest screens the design team was showing off.
So now, in addition to my detailed text notes, I found myself compiling a visual archive of my team’s communication as designs changed and evolved – as Gantt charts shifted over time.
But where the hell do I store all this stuff? And how do I keep it correlated to the notes I was taking?
I tried lots of solutions. My primary requirement was to keep my notes in as much of a plain text format as possible – mostly because I don’t ever want to find myself locked into an app or ecosystem I can’t leave.
For the most part, Ulysses worked pretty OK. I could take notes and drag and drop screenshots (or other attachments) into the editor and feel good that it was storing everything as future-proof .textbundle files under the hood. But for reasons I don’t want to bore you with (because Ulysses really is a fantastic app – I’m typing this in it now), I wanted something better for accumulating reference material more than a pleasant writing environment.
It turns out, a great solution was hiding in plain sight. DEVONthink.
I’ve used DEVONthink for over a decade to archive documents (primarily PDFs), ebooks, and other long-term storage material. All the stuff that would be in a fire safe. It has incredible search capabilities that always help me find exactly the document I need. It just never occurred to me that power could be applied to my meeting notes as well.
So how am I getting my meeting notes into DEVONthink, how do they remain future-proof, and how am I also keeping those notes tied together with my newfound love of screenshotting video meetings, too?
First off, I did have to make one significant compromise (sort of). As you’ll see, my meeting notes still start as Markdown in Drafts but get converted into .rtf. Is that what I want? Meeehhhh, no. But I can live with it. There are enough tools (most of them scriptable) if I ever need to do a mass-exodus from .rtf back to plain text. Worst case, I could go RTF → HTML → Markdown or something awful like that.
Anyway, the benefits I’ve discovered with this workflow have so far outweighed my long-standing grumpy-old-man-get-off-my-lawn attitude when it comes to Plain Text All The Things™️.
Here’s my workflow.
Like last year, I have an iOS shortcut I run each morning that loops through my work calendar and creates a new note in Drafts for each event using a standard template.
Each empty note is tagged with meeting in Drafts to keep them hidden from cluttering up my day-to-day notes using a workspace filter.
Whenever a meeting starts, I switch to my Meetings workspace in Drafts, which shows all of my notes for the day. I select the appropriate note and type away.
If I need to screenshot anything during the meeting, I just ⇧⌘4, and drag the little floating capture preview into a folder on my Desktop where I keep any pictures or other attachments for that meeting.
Much like cleaning up your Inbox at the end of the day, I reserve 15 minutes before I shut down to process the notes I took that day.
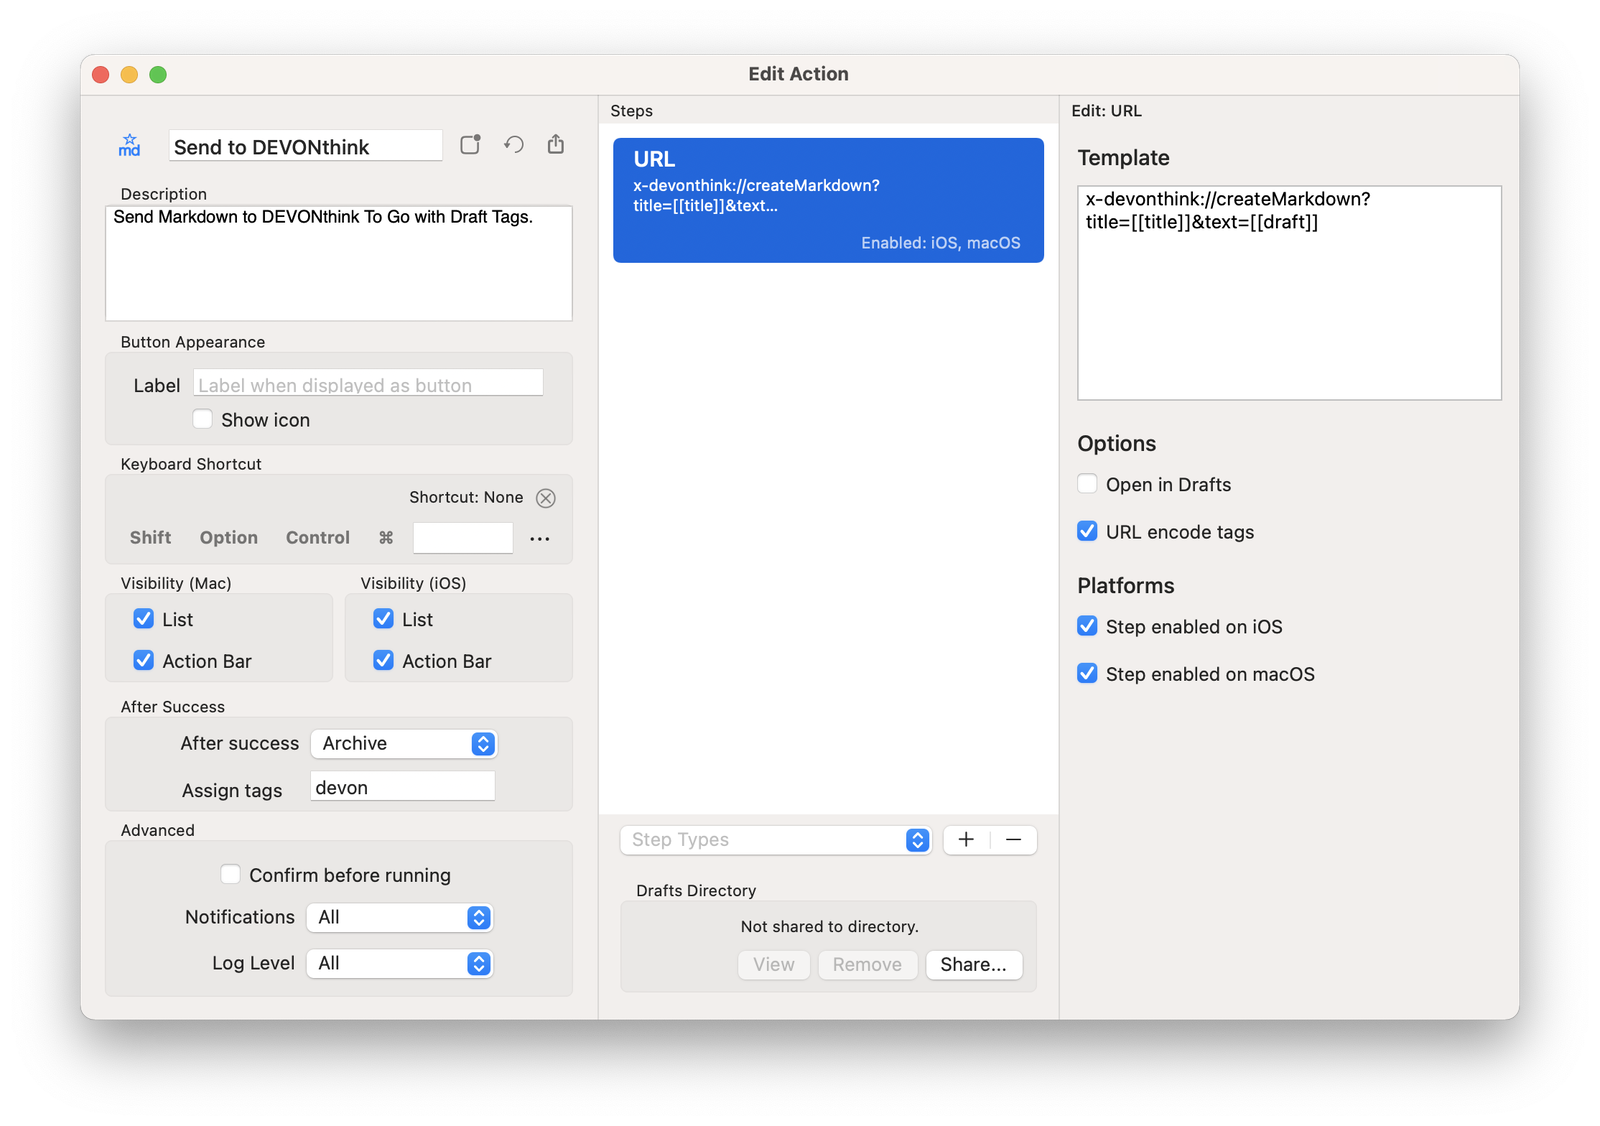
I send all of my meeting notes from Drafts into DEVONthink using a “Send to DEVONthink” action that imports them to the app as Markdown (not plain text).
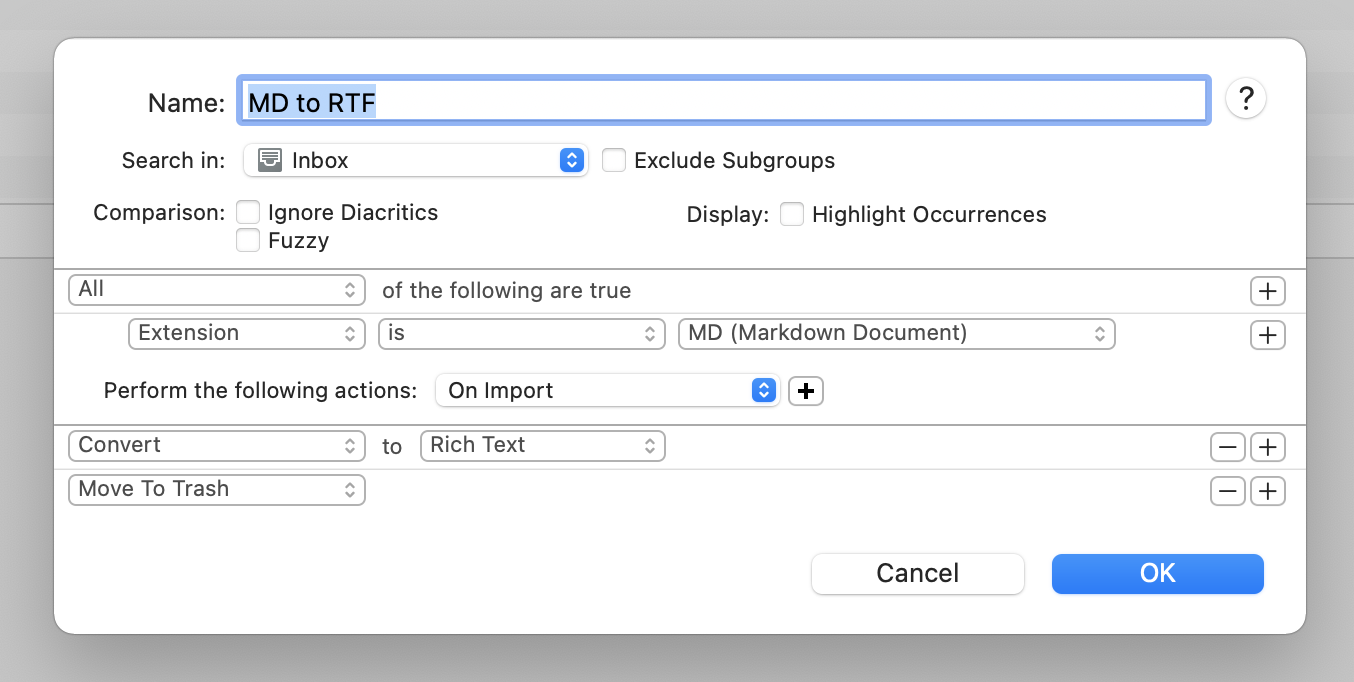
This drops them into my database’s Inbox. I have a Smart Rule in DEVONthink that automatically converts any new Markdown files into rtf.
This trashes the original Markdown file and leaves a formatted rich text document in its place.
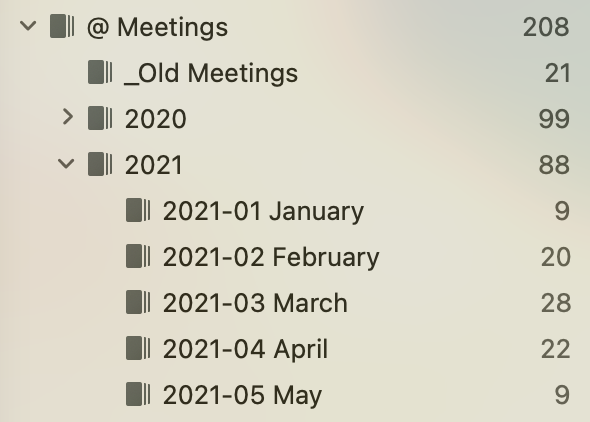
If a meeting note has no files associated with it, I file it away into the folders I use for meeting notes. (I keep them sorted into year/month folders.)
But, if a note does have attachments, that’s when the nerdy fun starts.
In DEVONthink, I select the note and run the Group Items command. This moves the note into a new folder by itself.
Next, I drag the attachments (mostly screenshots) from the meeting folder on my Desktop into that DEVONthink group.
But, wait!
As you’re going to see, I want these attachments ordered chronologically – especially if they’re screenshots – as I captured them. That way, they make sense when I review them in my notes, and they’re not out of order.
What I need to do is sort them by date created rather than filename. As I wrote about last year, I don’t trust file timestamps. It’s too easy to mess those up. I prefer to always sort by filename. So…
I built a tiny little Mac app to handle this next step. I’m sure it could be done with a shell script or some other type of macro, but this was just faster and is super convenient to run.
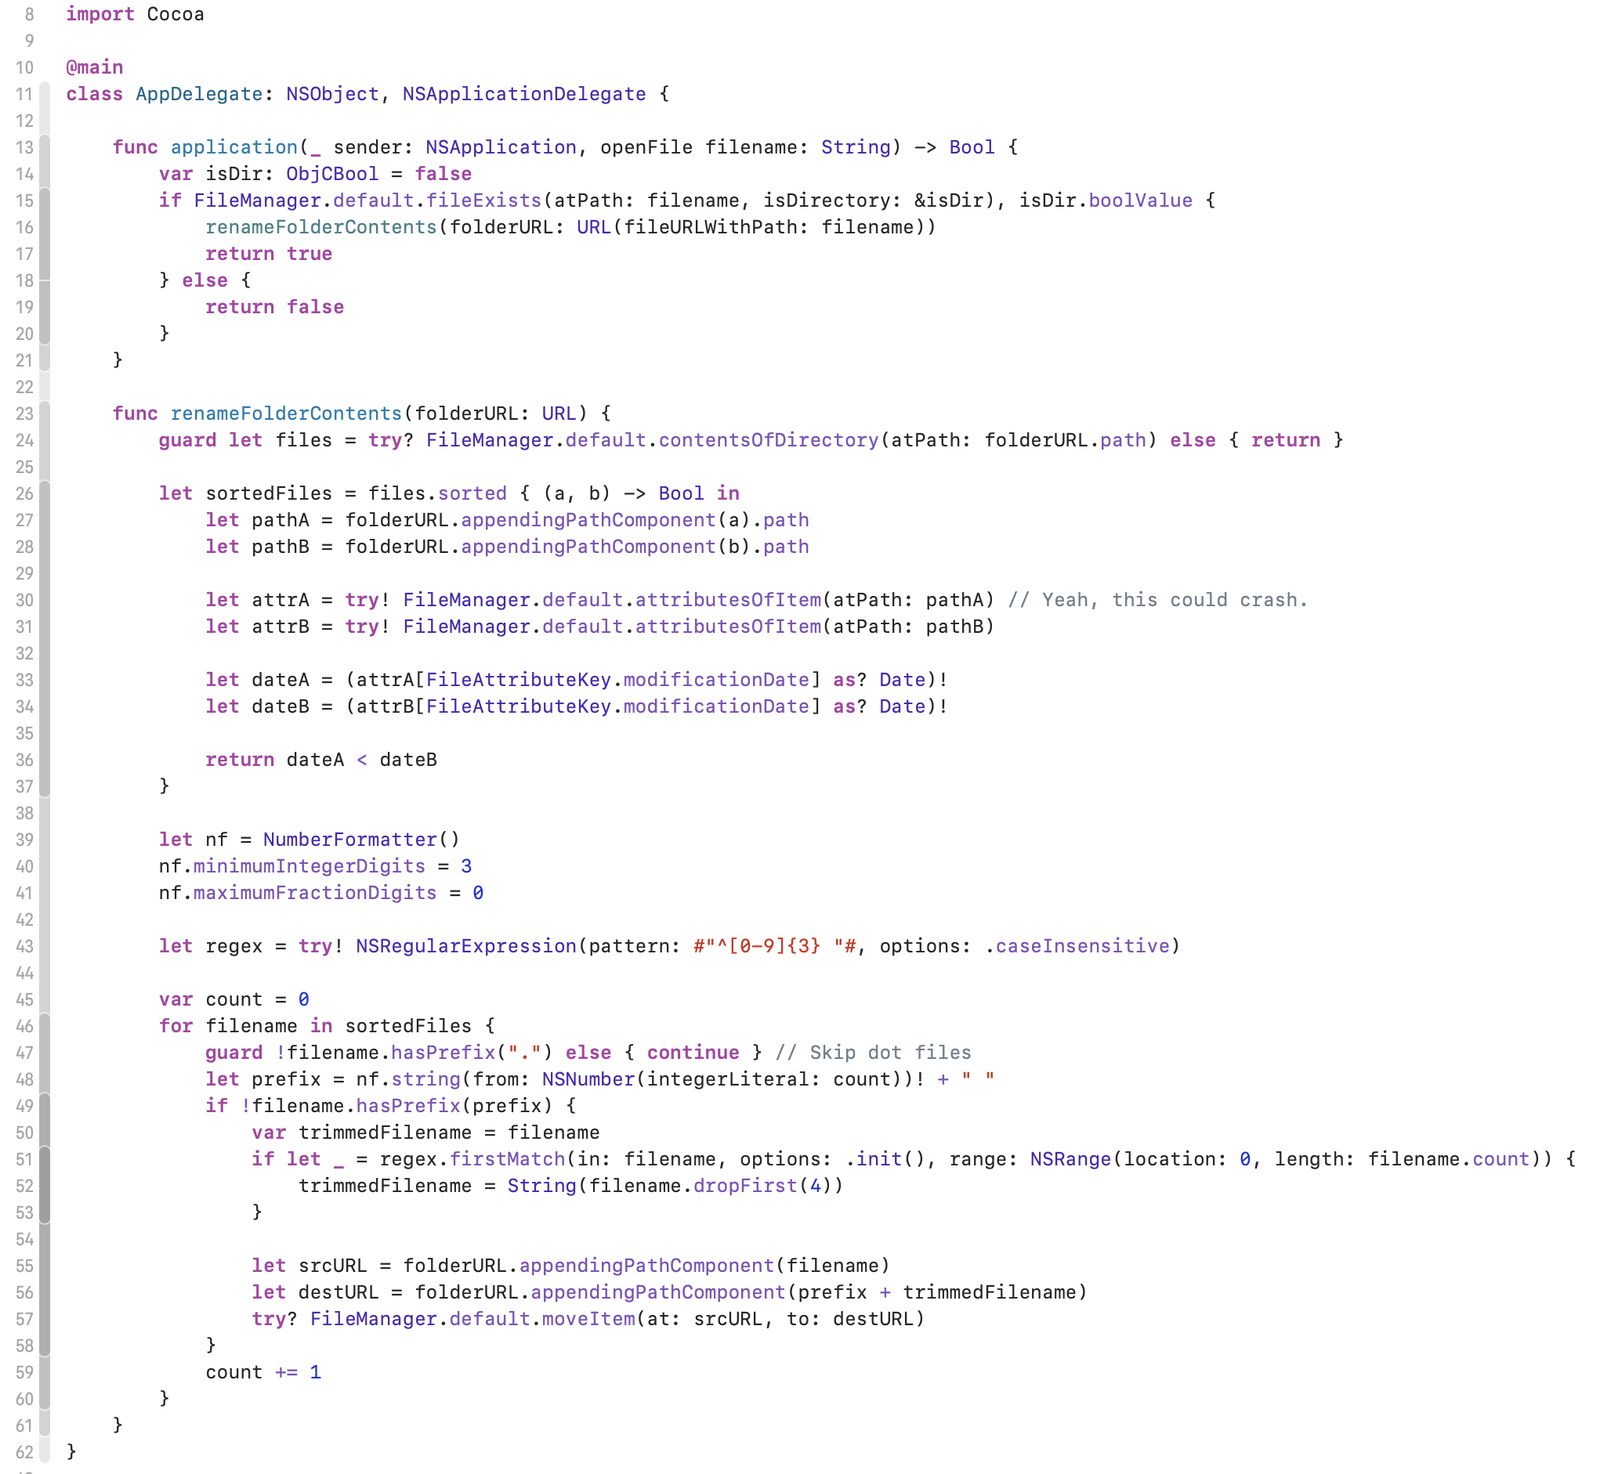
All I do is drag and drop my folder of note attachments onto this app’s Dock icon, and it renames each file by adding a numeric prefix to make sure they stay sorted by date.
It starts naming at 000 and counts up to 001, 002, etc., leaving the original filename in-tact after the numeric prefix.
Watch:
Boom. Now the files will remain sorted chronologically even if I mess up their timestamps, moving them around in the future.
Here’s the entirety of that little Mac app:
Then I drag them into the folder in DEVONthink with the note.
But here’s the real magic of this whole system. The part that makes it so powerful.
So many of the screenshots I take are presentations, slides, and other documents people are screen sharing. With DEVONthink’s full-text search capabilities, when I’m trying to find an old meeting note months from now, it would be fantastic if I could search inside those screenshots.
With DEVONthink, I can.
Let me explain what I just did.
Drag the meeting screenshots into DEVONthink alongside the meeting note.
Covert them to searchable PDFs. With this command, DEVONthink will create a PDF from each image and OCR any text inside the image and make that text both searchable and selectable/copyable within the PDF itself.
Select all the screenshots and the note.
Merge them into a single .rtfd file that contains my meeting notes and each PDF embedded inside.
What’s the point of doing this?
Now, my notes are kept together with any file attachments I captured.
ALL OF THE TEXT – whether the notes I typed during the meeting or the text contained in the screenshots – is now fully searchable in DEVONthink.
A year from now, when I’m trying to find my notes about a long-ago meeting, I can surface that reference material by searching for text that someone else was presenting on screen in addition to anything I wrote down myself.
Having this capability feels like a secret weapon or a cheat code for finding material that other people talked about beyond my personal meeting notes.
Like I said above, moving away from having all of my notes in plain text made me feel uneasy at first. But I’m confident enough in .rtf and my ability to get my data back out if I ever need to that I got past my obsessive hangups once I realized just how damn useful it is having all of my historical reference material accessible in the future.
Stick with me, folks. This is going to get super nerdy and may take a while to explain. It’s also going to cover some of my favorite topics: a custom-built Mac app, a small server-side script, Keyboard Maestro, the command line, and URL schemes.
Let’s talk about the stuff you need to do and the files, supporting documents, and reference material you need to accomplish those tasks. Here’s a quick example:
This week I need to prepare a PowerPoint slide outlining our upcoming development timeline and include it in a review deck for the executive team.
Easy, right? But what files do I need to build it?
an OmniOutliner document that lists our upcoming milestones
the PowerPoint slide template
a screenshot of those milestones plotted on a calendar
a PDF exported from Jira that totals up the development estimates my team added to each ticket
the OmniGraffle document I’m going to build this in before exporting to PowerPoint
Here’s the problem I’m trying to solve. For my own dumb, neurotic reasons, most of those files live in different places.
The calendar screenshot is in a dedicated ~/Dropbox/Photos/Screenshots/ folder where every screen capture gets saved automatically by CleanShot X.
Because I’m old-school and settled on Omni Sync Server years ago, all of my OmniOutliner and OmniGraffle documents live in ~/Documents/Omni/.
The Jira PDF is on my Desktop because I just now exported it.
And that PowerPoint template is in a folder full of branding guidelines for work.
That seems typical, right? Everyone has an organizational structure that makes sense to them.
Let’s say I find and gather all those documents to get this slide made. Two weeks go by. Oh, shit. Someone on another team needs the slide for their presentation, but with the information slightly tweaked to reflect schedule changes since I created it.
Where did I put all of those source materials? I can guess where the OmniFiles are. But which screenshot was it? And that PDF was on my Desktop two weeks ago, but where did I end up storing it? Do I even still have it?
That’s the problem I started trying to solve for myself and my workflow last Fall: The issue of keeping track of disparate files that all relate to one another through a common task or goal.
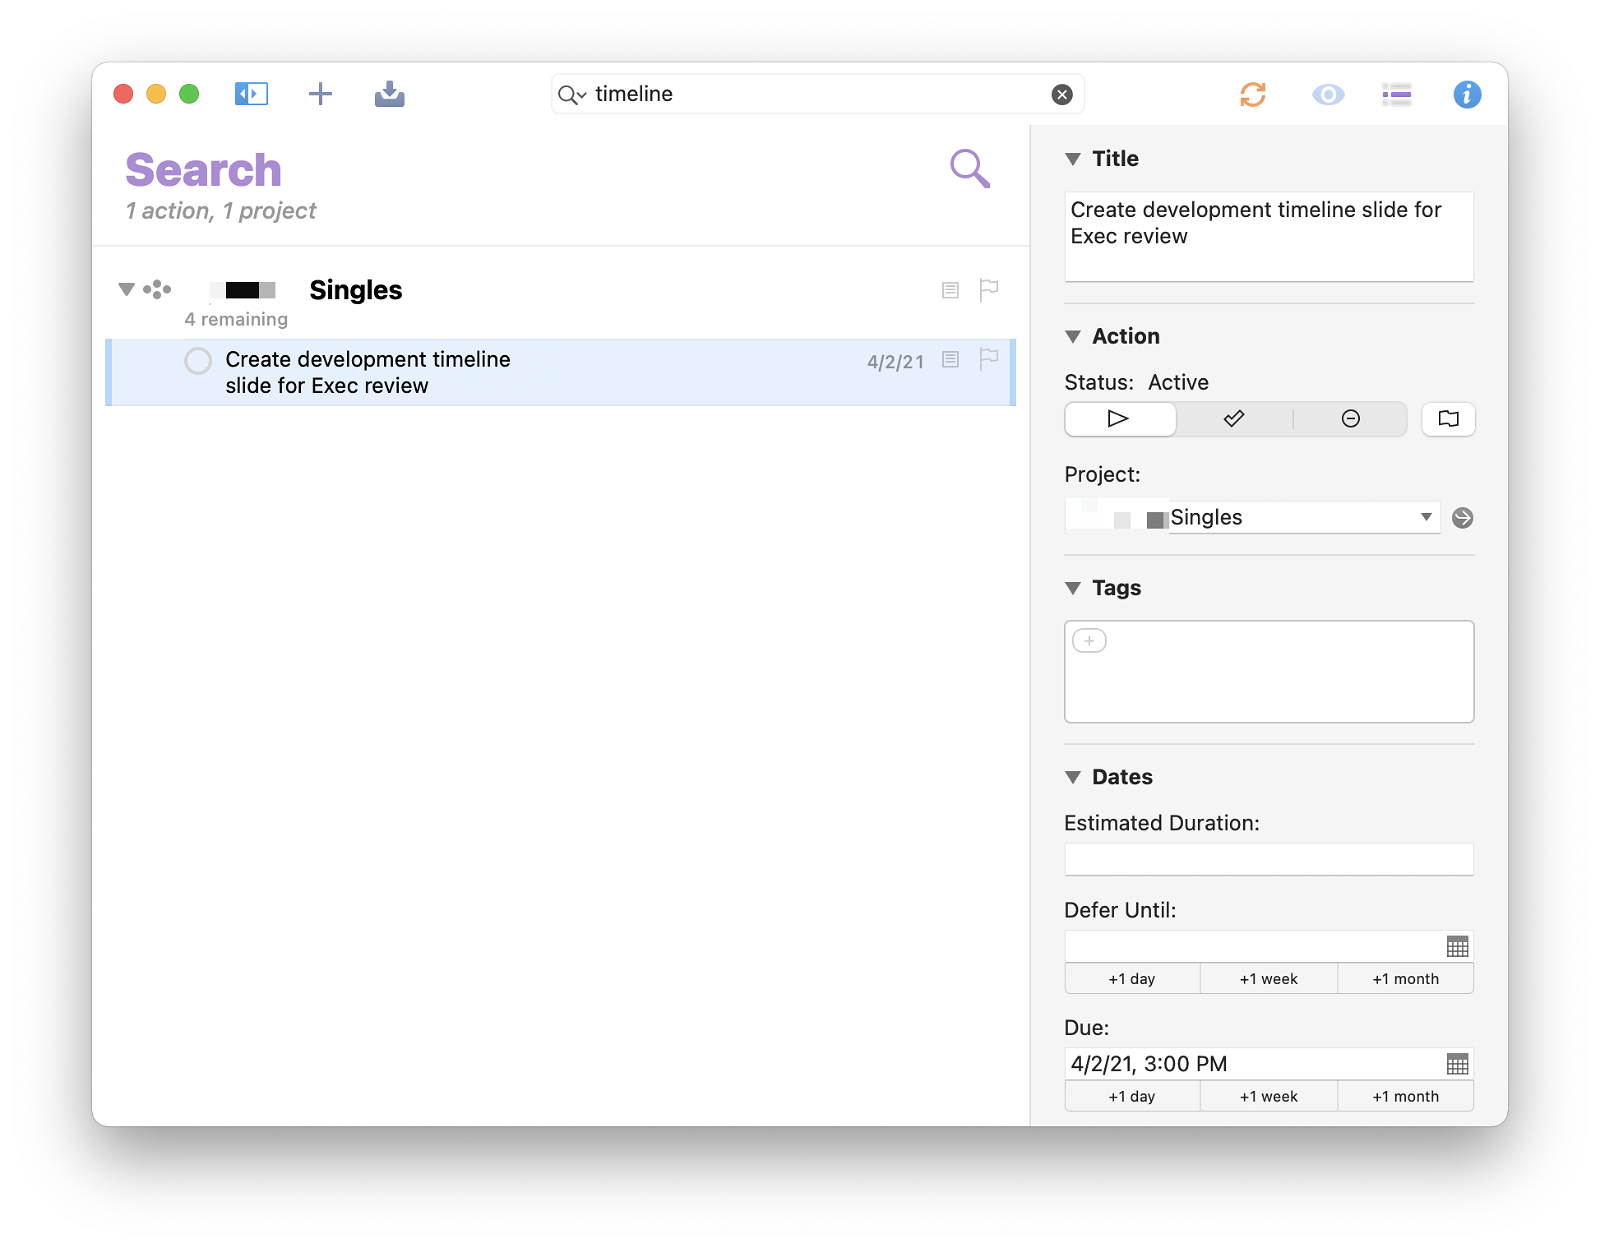
Here’s what the solution looks like from my day-to-day point of view. I’ll explain the mechanics in a bit.
What just happened?
In the notes field of that OmniFocus task, I added this URL: clog://RTH2285. (clog stands for “Catalog”.) And when I clicked on it, it revealed all of my reference files in the Finder.
One immutable URL from any app can open any number of associated files – even if they change locations.
I’ve been using this pattern to tie together related files for the past few months. I’ll catalog files as I create them or receive them (more on that in a moment) and then typically begin my working session on a task by summoning them all forward from a common starting point that contains the magic URL.
Sometimes that starting point is an OmniFocus task, as shown above. Other times it’s a note in Drafts or Ulysses. But it could be any app (or command line, as you’ll see) that can open a URL. It also (to a degree) works on iOS.
I’ll start by explaining this from my (the user’s) perspective and then describe the technical details at the end and link to where you can get the code to do this yourself.
At the heart of this workflow is what I call a catalog number. Each unique number groups a set of related files. Catalog files are in the format [a-zA-Z]{3}[0-9]+. That’s three letters followed only by digits. The first three letters are up to you. They should be uncommon enough not to produce false matches with real words (hold on to that thought).
I chose the prefix RTH (my initials) for my catalog numbers since that combination doesn’t come at the start of any common words. So, example numbers in my system might be:
RTH2378
RTH4591
RTH7730
The numeric portion can be random if you want, but I suggest that it always increments upwards as you assign new numbers. At a high level, that lets me see what order the numbers were assigned – which can occasionally be helpful.
Anyway, once you have a catalog number (again – I’ll explain more of those mechanics soon), you need to assign it to a file. About a month before starting on this system, I wrote another blog post in October titled Dot Dee Tee that explained my habit of adding the current date into my filenames as a sort of embedded reference point.
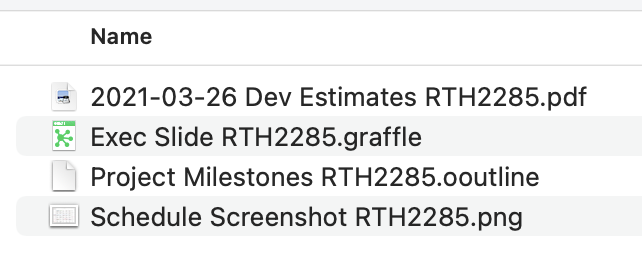
These catalog numbers are similar. The numbers go into the filename. (And file contents, too, as I’ll show.) In my PowerPoint slide task from earlier, my reference files are named:
Schedule Screenshot RTH2285.png
Exec Slide RTH2285.graffle
Project Milestones RTH2285.ooutline
Schedule Screenshot RTH2285.png
By putting the catalog number into the filenames like a tag (yes, congratulations to me, I invented tagging a mere 29 years after Finder labels, and then OpenMeta, Mavericks, etc.) I can find those files no matter where they move. It also guarantees that the catalog number won’t be lost if synced to a cloud service or zipped up into an archive format that wouldn’t otherwise handle proper filesystem tags.
As I said before, I prefer that my catalog numbers always increment up as I create them. This also makes sure I don’t reuse one if I were generating them at random. But how to keep track of which catalog number comes next? How do I even know what the current one is? Especially if I want this to work cross-device between multiple Macs and iOS devices?
Enter the world’s smallest web service.
Here’s the entire PHP script I’m hosting on my webserver:
What that does is, if I go to this URL:
https://mywebsite.com/catalog/
it prints out the current catalog number contained in the counter.txt file on my server:
RTH1005
If I load that URL again, it will show the same number.
But if I load
https://mywebsite.com/catalog/?new
it will increment and save the number and print
RTH1006
It’s just an extraordinarily simple counter hosted on a web server so I can access it from any device and stay in sync.
I hear what you’re saying. Having to load a web page just to get a new number every time is cumbersome and slightly insane. I agree. That’s where Keyboard Maestro takes over.
Wherever I am, in a text editor, the Finder, anywhere, if I type
.cat
(which stands for catalog) Keyboard Maestro will detect that phrase, make a call to my web service to retrieve the current catalog number, and replace what I just typed with the number.
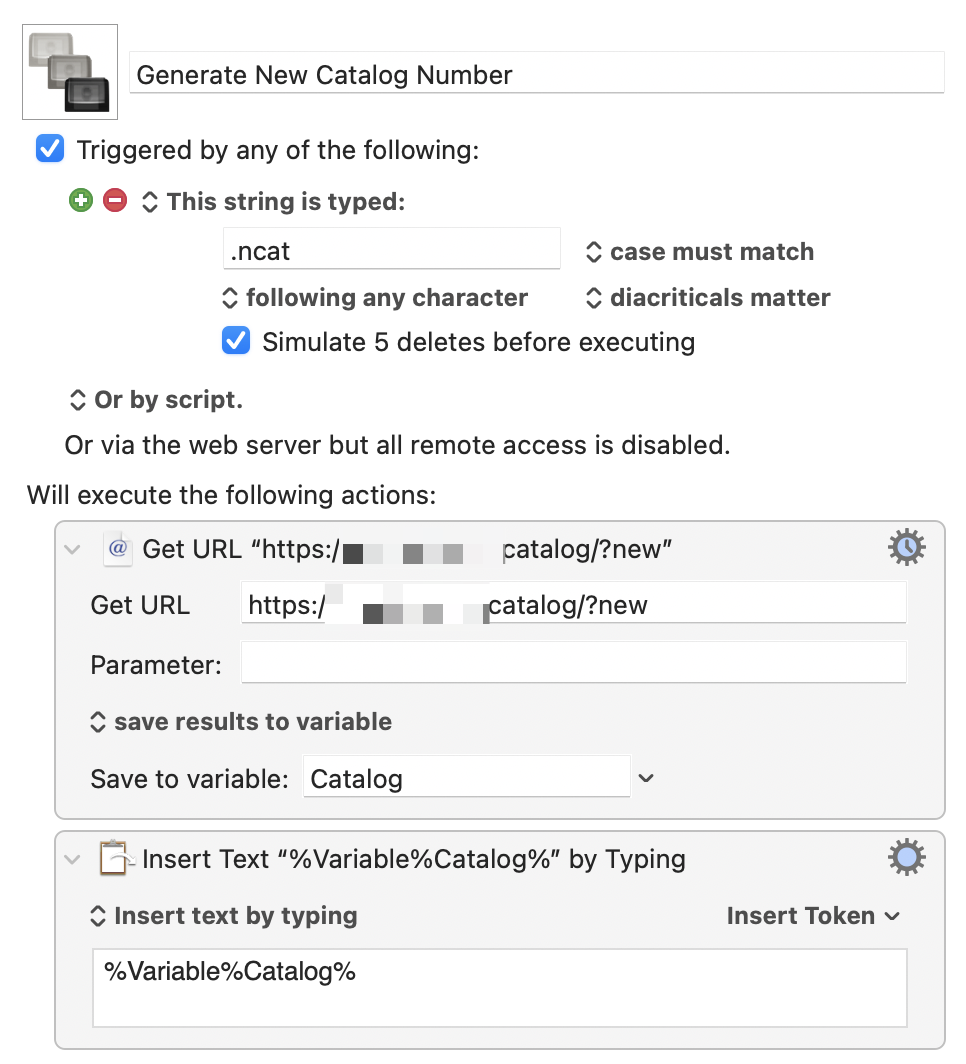
If I type
.ncat
(which stands for new catalog) the same thing happens. Keyboard Maestro increments the number and returns the new one.
Here’s a real example of tagging a file in Finder.
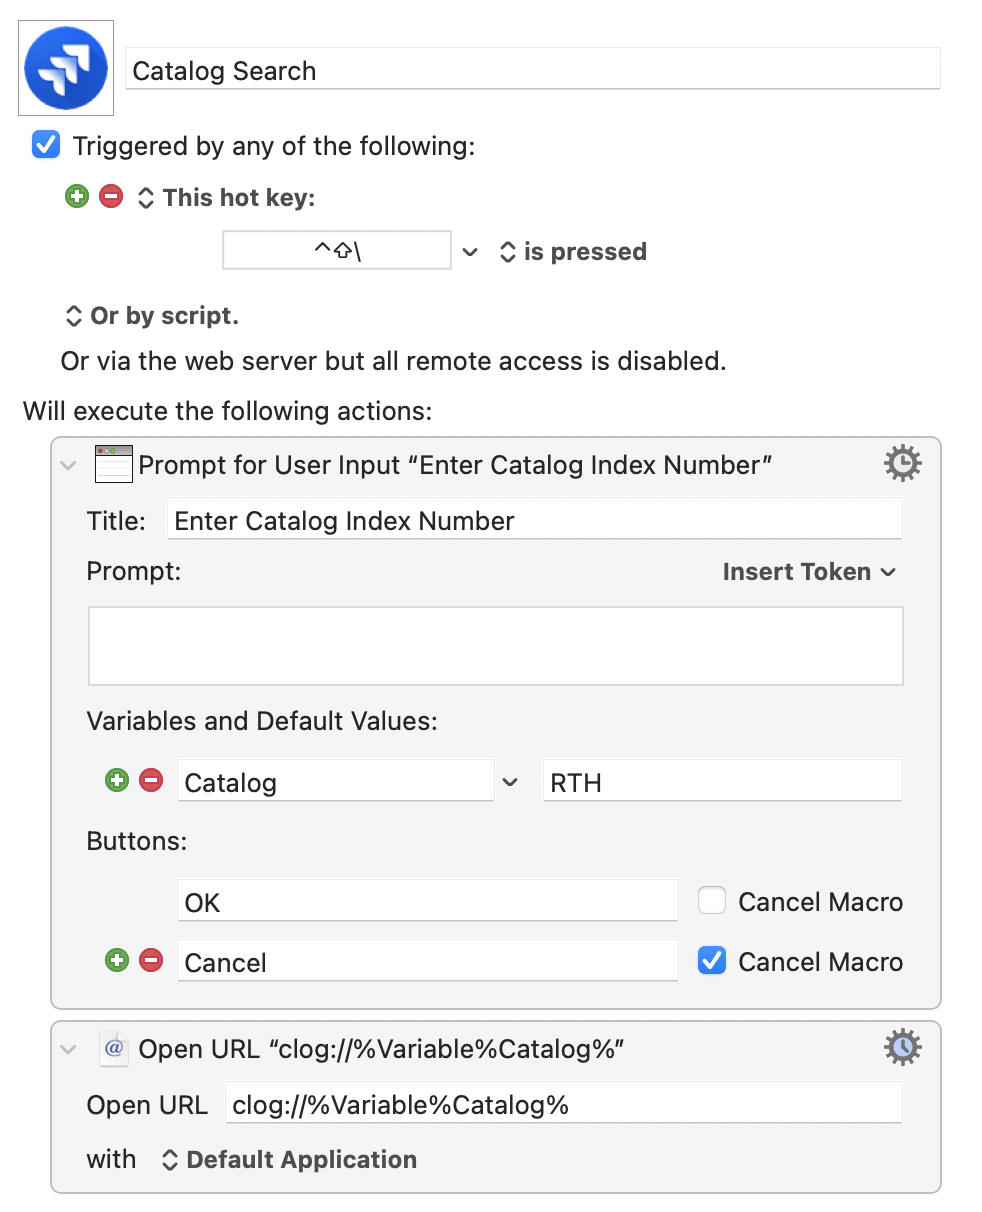
When I want to summon a group of related files, if I’m not in an app where I can click the magic URL, I can again use Keyboard Maestro. This time, instead of tagging a file, it prompts me for the catalog number to create and open the particular URL on the fly and reveal my files.
Ok.
All of my related files are grouped with a shared catalog number.
The current and following catalog numbers are kept in-sync using a straightforward web page to track the current and next number to use.
Just put the catalog number into the filename for safekeeping.
And a URL in the format of clog://RTH12345 will somehow reveal all of those files for me so I can get to work.
How?
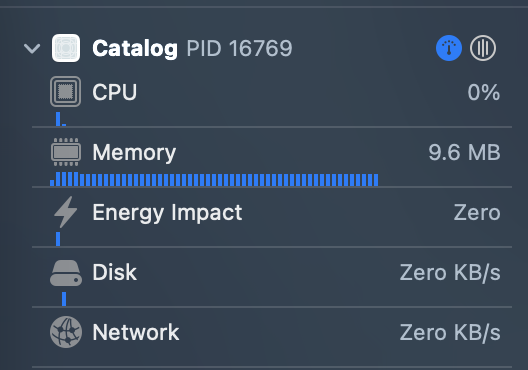
The lynchpin in all of this is a tiny little Mac app that has no UI. It just runs in the background. The whole thing is less than 100 lines of code and takes about 10MB of RAM. (Not GB. Not hundreds of MB. 9.6MB. Like I said, tiny. (By today’s standards.) It doesn’t really do anything.)
It registers the clog:// URL scheme with macOS. And when one of those URLs is opened and matches the correct ABC12345 pattern, it will run a quick Spotlight search for any matching filenames. If found, it reveals each of them in Finder.
That’s it.
There’s also a command-line version. Which lets you reveal files like this
There’s a hidden option that will find files that have the catalog number inside their contents instead of just a matching filename. For example, if you are in the habit of keeping an archive of plain-text Markdown notes, you can put catalog numbers inside the Markdown files, and the system will find those.
To do this, you need to end the URL with a Z . Why the letter Z? Just because it’s easy to type on a US English keyboard. So, instead of
clog://RTH2285
you would use
clog://RTH2285Z
and that will instruct the Catalog app to have Spotlight look inside your files.
As for iOS, there are two integration points.
Using catalog numbers in your apps
Finding matching documents
I’ve set up two Shortcuts and put them in widgets on my home screen. One that grabs the current catalog number and copies it to the clipboard. And the other generates a new one. Then, I can paste them into whatever app or document I’m working with.
Typically, those documents get synced to my Mac. If so, then they’re available there. But I can also search on iOS as well (to an extent).
If you have files in iCloud Drive, you can pull down Spotlight, enter the catalog number, and jump over to the Files app showing your documents.
The same thing works if you keep your files in Dropbox, Google Drive, etc.
So that’s the odd system I’ve been using to jump between tasks and all of their supporting documents. It’s served me well for a while now, along with still using my filename + date strategy, and now I’m open-sourcing the Mac app and PHP script that glue it all together.
I wish I had a better name for the project other than FinderCatalog, but as the old saying goes…


