Backing Up Everything (Again)

This will take a while. Bear with me.

I’m obsessive about backing up my data. I don’t want to take the chance of ever losing anything important. But that doesn’t mean I’m a data hoarder. I like to think I’m pragmatic about it. And I don’t trust anyone else to do it for me.

From around 2006 to 2012, I kept a Mac mini attached to our TV with a Drobo hanging off the back. It had all our downloaded movies on it. And every night it would automatically download the latest releases of our favorite TV shows from Usenet so my wife and I could watch them with Plex the next day. It worked great, and all the media files were stored redundantly across multiple hard drives with tons of storage space. (Would it survive a house fire? No. But files like that weren’t critical.) But with the rise of streaming services and useful pay-to-watch stores like iTunes, now I’d rather just pay someone else to handle all of that for me. So, I don’t keep any media files like that locally any longer.

But my email? My financial and business documents? My family’s photo and home video archive? I’m really obsessive about that.

For most of my computing life, all of that data was small enough to fit on my laptop or desktop’s hard drive. In college, I remember burning a CD (not a DVD) every few months will all of my school work, source code, and photos on it for safe keeping. The internet wasn’t yet fast enough to make backing up to a cloud (were clouds even a thing back then?) feasible, so as my data grew I just cloned everything nightly to a spare drive using SuperDuper and Time Machine. It worked for the most part. Sure, I still worried about my house catching fire and destroying my backups, but there really wasn’t an alternative other than occasionally taking one of the backup drives to work or a friend’s house.

But then the internet got fast, really fast, and syncing everything to the cloud became easy and affordable. I was a beta user of Gmail back in 2004. I was an early paid subscriber of Dropbox since around 2008. All of my data was stored in their services and fully available on every computer and – eventually – mobile device. At the time, I thought I had reached peak-backup.

I was wrong.

Now we have too much data. My email is around 20GB. My family’s photo library is approaching 500GB. That’s more data than will fit on my laptop’s puny SSD. It will fit on my iMac, but it leaves precious available space for anything else. I could connect external drives, but that gets messy and further complicates my local backup routine. (Yes, Backblaze is a good, potential solution to that.)

Another problem is that most of our data now is either created directly in the cloud (email, Google Docs, etc) or is immediately sent to it (iPhone photos uploaded to iCloud and/or Google Photos), bypassing my local storage. If you trust Google (or Apple) to keep your data safe and backed up, that’s great. I don’t. I’ve heard too many horror stories about one of Google’s automated AI systems flagging an account and locking out the user. And with no way to contact an actual human, you’re dead in the water along with all your data. Especially if you lose access to your primary email account, which is the key to all your other online accounts.

So, I need a way to backup my newly created cloud data, too. This is getting complicated.

First step. My email. This is easy. Five years ago I setup new email addresses for my personal and business accounts with Fastmail. They’re amazing. I imported my 10+ years worth of email from Google (sadly, my pre-2004 college email and personal accounts are lost to the ether), setup a forwarding rule in Gmail, and with the help of 1Password, changed all of my online services to use my new email. It took about a month to switch everything over, but now the only email coming to my old Gmail address is spam. Fastmail keeps redundant backups of my email. And I have full IMAP copies available on multiple computers in case they don’t. And if something ever goes wrong, unlike Google where their advertisers are the customer – and I’m the product – I pay Fastmail every month and can call up a live human to talk to.

Source code. I’m a paying GitHub customer. Everything’s stored and backed up there. But still, what if they screw up. I ran a small, self-hosted server with GitLab on it for a while instead of GitHub and set it to backup all my code nightly to S3. That worked great. But, I like GitHub’s UI and feature set better. Plus, it’s one less server I have to manage. So, where do I mirror my code to? (Much of my code is checked out locally on my computer, but not all of it.)

Back in 2006, my boss at the web agency I was working at told me about rsync.net. They provide you with a non-interactive Unix shell account that you can pipe data to over SFTP, rysnc, or any other standard Unix tool. You pay by the GB/month, and they scale to petabyte sizes for customers who need that. So, I signed up and used them to backup all of my svn (remember svn?) repos. With the rise of git and switch to GitHub, I cancelled my account and mostly forgot about them.

But, aha!, I now have new data storage problems. Rsync.net could be a great solution again. So, I re-signed up and setup my primary web server to mirror all of my GitHub repos over to them each night. Here’s the script I’m using…

Next up, important documents. Traditionally, I’ve kept everything that would normally go in my Mac’s “Documents” folder in my Dropbox account. That worked great for a long time. But once I started paying Google for extra storage space for Google Photos (more on that later), it felt silly to keep paying Dropbox as well. So, after 10+ years as a paid subscriber, I downgraded to a free account and moved everything into Google Drive. Sure, it’s not as nice as Dropbox, but it works and saves me $10 a month.

Like I said above, I mostly trust Google, but not entirely. So, let’s sync my Google Drive’s contents to rsync.net, too. Edit your Mac’s crontab to add this line…

30 * * * * /usr/bin/rsync -avz /Users/thall/Google\ Drive/ [email protected]:google-drive

Also, I keep all of the really important paperwork that would normally be in a fire safe in my garage in a DEVONthink library so I can search the contents of my PDFs. It’s synced automatically with iCloud and available across my mobile devices. But still, better back that up, too.

45 * * * * /usr/bin/rsync -avz /Users/thall/FireSafe.dtBase2 [email protected]:

So, that’s all of my data except for the big one – my family’s photo and home video archives.

For a long time I kept all my family’s archives in Dropbox. I even made an iOS app dedicated to browsing your library. I could have stuck everything in Apple’s Photos.app where it’s available on my devices via iCloud, but that’s tied to my Apple ID. My wife wouldn’t be able to see those photos. Plus, any photos she took on her phone would get stored in her iCloud account and not synced with the main family archive. So, we used the Dropbox app, signed-in to my account, to backup our phones’ photos.

But, like I said earlier, our photo and video library become to big to comfortably fit in Dropbox. Plus, Google Photos had just been released and it was amazing. Do I like the thought of Google’s AI robots churning through my photos and possibly using that data to sell me advertisements? No. But, their machine-learning expertise and big-data solutions make it really hard to resist. So, I spent a week and moved everything out of Dropbox into Google Photos.

Now everything is sorted into albums, by date, and searchable on any device. I can literally type into their search box “all photos of my wife’s grandmother taken in front of the Golden Gate bridge” and Google returns exactly what I’m looking for. It’s wonderful.

My wife’s phone has the Google Photos app installed with my account on it so every photo she takes gets stored in a shared account we can both access and view on all our devices.

But what’s the recurring theme of this blog post? That’s right. I don’t fully trust any cloud provider to be the only source of my data. Someone clever said “the cloud is just someone else’s computer.” That’s exactly correct. If your data isn’t in at least two different places, it’s not really backed up.

But how do I backup my 500GB+ of photos that are already in Google’s cloud? And then how do I keep new items recently added synced as well?

As usual, I tried to find a way to make it work with rsync.net. I found a great open-source project called rclone. It’s a command line tool that shuffles your files between cloud providers or any SFTP server with lots of configurable options and granularity.

First off, even if rclone does do what I need, I can’t just run it on my Mac. My internet is too slow for the initial backup. I need to use it on one of my servers so I have a fast data center to data center connection between Google and rsync.net.

Getting it setup on one of my Ubuntu servers at Linode was a simple bash one-liner. Configuring it to then work with my Google and rsync.net accounts was just a matter of running their easy-to-use configuration wizard.

Note: rclone doesn’t support a connection to Google Photos. Instead, you need to login to Google Drive on the web and enable the “Automatically put your Google Photos into a folder in My Drive” option in Settings. (And also tell your Google Backup & Sync Mac app not to sync that folder locally – unless you have the space available – I don’t.) Then, rclone can access your Google Photos data via a special folder in your Drive account.

With everything configured, I ran a few connection tests and it all worked as expected. So, I naively ran this command thinking it would sync everything if I let it run long enough:

rclone copy -P "GoogleDrive:Google Photos" rsync:GooglePhotos

Things started out fine. But eventually, due to Google API rate limits, it was quickly throttled to 300KB/sec. That would have taken MONTHS to transfer my data. And, the connection entirely stalled out after about an hour. I even configured rclone to use my own, private Google OAuth keys, but with the same result. So, I needed a better way to do the initial import.

Google offers their Takeout service. It lets you download an archive of ALL your data from any of their services. I requested an archive of my Google Photos account and eight hours later they emailed me to let me know it was ready. Click the email link to their website, boom. Ten 50GB .tgz files. Now what to do with them?

I can’t download them to my Mac and re-upload them – that’s too slow. Instead, I’ll just grab the download URLs and use curl on my server to get them, extract them, and sync them over.

I don’t have enough room on my primary web server – plus I don’t want to saturate my traffic for any customers visiting my website. So, spin up a new Linode, attach a 500GB network volume, and we’re in business. Right? Nope.

The download links are protected behind my Google account (that’s great!) so I need a web browser to authenticate. Back on my Mac, fire up Charles Proxy and begin the downloads in Safari. Once they start, cancel them. Go to Charles, find the final GET connection, and right-click to copy the request as a curl command including all of the authentication headers and cookies. Paste that command into my server’s Terminal window and watch my 500GB archive download at 150MB(!!)/sec.

(Turns out, extracting all of those huge .tgz files took longer than actually downloading them.)

Finally, rsync everything over to my backup server.

And that’s where I currently am right now. Waiting on 500GB worth of photos and videos to stream across the internet from Linode in Atlanta to rsync.net in Denver. It looks like I have about six more hours to go. Once that’s done, the initial seed of my Google Photos backup will be complete. Next, I need a way to backup anything that gets added in the future.

Between the two of us, my wife and I take about 5 to 10 photos a day. Mostly of our kids. Holidays and special events may produce a bunch more at once, but that’s sporadic. All I need to do is sync the last 24 hours worth of new data once every night.

rclone is the perfect tool for this job. It supports a “–max-age=24h” option that will only grab the latest items, so it will comfortably fit within Google’s API rate limits. Once again, setup a cron job on my server like so:

0 0 * * * rclone copy --max-age=24h "GoogleDrive:Google Photos" rsync:GooglePhotos

And, that’s it. I think I’m done. Really, this time.

All of my important data – backed up to multiple storage providers – and available on all of my and my family’s devices. At least until the whole situation changes yet again.

A few more notes:

All of my web server configuration files are stored in git. As are all of my websites’ actual files. But, I still run an hourly cron job to backup all of “/var/www” and “/etc/apache2/sites-available” to rsync.net since it’s actually such a small amount of data. This lets me run one command to re-sync everything in the event I need to move to a new server, without having to clone a ton of individual git repos. (I know I need to learn a better devops technique with reproducible deployments like Ansible, Puppet, or whatever the cool tech is these days. But everything I do is just a standard LAMP stack (no containers, only one or two actual servers), so spinning up a new machine is really just a click in the Linode control panel and couple apt-get commands and dropping my PHP files into a directory.)

My databases are mysqldump’d every hour, versioned, and archived in S3.

All of the source code on my Mac is checked out into a single parent directory in my home folder. It gets rscyn’d offsite every hour, just in case. Think of it as a poor man’s Time Machine in case git fails me.

I do a lot of work in The Omni Group‘s apps – OmniFocus, OmniOutliner, and OmniGraffle. All of those documents are stored in their free WebDAV sync service and mirrored on my Mac and mobile devices.

All of my music purchases have gone through iTunes since that store debuted however many years ago. I can always re-download my purchases (probably?). Non-iTunes music ripped from CDs long ago, and my huge collection of live music, is stored in iTunes Match for a yearly fee. A few years ago when I made the switch to streaming music services and mostly stopped buying new albums, I archived all of my mp3s in Amazon S3 as a backup. I need to set a reminder to upload any new music I’ve acquired as a recurring task once a year or so.

Also, I have Backblaze running on my desktop and laptop doing its thing. So yeah. I guess that’s yet another layer of redundancy.

A Simple, Open-Source URL Shortener

tl;dr One evening last week, I built pretty much the simplest URL shortening service possible. It’s simple, fast, opinionated, keeps track of click-thru stats, and does everything I need. It’s all self-contained in a single PHP script (and .htaccess file). No dependencies, no frameworks to install, etc. Just upload the file to your web server and you’re done. Maybe you’ll find it useful, too.

Anyway…

I run a small software company which sells macOS and iOS software. Part of my day-to-day in running the business is replying to customer support questions – over email and, sometimes, SMS/chat. I often need to reply to my customers with long URLs to support documents or supply them with custom-URL-scheme links which they can click on to deep-link them into a specific area of an app.

Long and non-standard URLs can often break once sent to a customer or subsequently forwarded around. I’ve used traditional link shortening services before (like bit.ly, etc), but always worried about my URLs expiring or breaking if the 3rd party shortening service goes out of business or makes a system change. Even if I upgraded to a paid plan which supports using a custom domain name that I own, I’m still not fully in control of my data.

So, I looked around for open-source URL shortening projects which I could install on my own web server and bend to my will. I found quite a few, but most were either outdated or overly-complex with tons of dependencies on various web frameworks, libraries, etc. I wanted something that would play nicely with a standard LAMP stack so I could drop it onto one of my web servers without having to boot up an entirely new VPS just to avoid port 80/443 conflicts with Apache. Out of the question was anything requiring a dumb, container-based (I see you, Docker) solution just to get started. Nice-to-haves would be offering basic click-thru statistics and an easy way to script the service into my existing business tools and workflows.

Admittedly, I only spent about an hour looking around, but I didn’t find anything that met my needs. So, I spent an evening hacking together this project to do exactly what I wanted, in the simplest way possible, and without any significant dependencies. The result is a branded URL shortening service I can use with my customers that’s simple to use and also integrates with my company’s existing support tools (because of its URL-based API and (optional) JSON responses – see below).

Requirements

  • Apache2 with mod_rewrite enabled
  • PHP 5.4+ or 7+
  • A recent version of MySQL

Install

  1. Clone this repo into the top-level directory of your website on a PHP enabled Apache2 server.
  2. Import database.sql into a MySQL database.
  3. Edit the database settings at the top of index.php. You may also edit additional settings such as the length of the short url generated, the allowed characters in the short URL, or set a password to prevent anyone from creating links or viewing statistics about links.

Note: This project relies on the mod_rewrite rules contained in the .htaccess file. Some web servers (on shared web hosts for example) may not always process .htaccess files by default. If you’re getting 404 errors when trying to use the service, this is probably why. You’ll need to contact your server administrator to enable .htaccess files. Here’s more information about the topic if you’re technically inclined.

Creating a New Short Link

To create a new short link, just append the full URL you want to shorten to the end of the domain name you installed this project onto. For example, if your shortening service was hosted at https://example.com and you want to shorten the URL https://some-website.com, go to https://example.com/http://somewebsite.com. If all goes well, a plain-text shortened URL will be displayed. Visiting that shortened URL will redirect you to the original URL.

Possibly of interest to app developers like myself: The shortening service also supports URLs of any scheme – not just HTTP and HTTPS. This means you can shorten URLs like app://whatever, where app:// is the URL scheme belonging to your mobile/desktop software. This is useful for deep-linking customers directly into your app.

iOS Users: If you have Apple’s Shortcuts.app installed on your device, you can click this link to import a ready-made shortcut that will let you automatically shorten the URL on your iOS clipboard and replace it with the generated short link.

Viewing Click-Thru Statistics

All visits to your shortened links are tracked. No personally identifiable user information is logged, however. You can view a summary of your recent link activity by going to /stats/ on the domain hosting your link shortener.

You can click the “View Stats” link to view more detailed statistics about a specific short link.

Password Protecting Creating Links

If you don’t want to leave your shortening service wide-open for anyone to create a new link, you can optionally set a password by assigning a value to the $pw_create variable at the top of index.php. You will then need to pass in that password as part of the URL when creating a new link like so:

Create link with no password set: http://example.com/http://domain.com

Create link with password set: http://example.com/your-password/http://domain.com

Password Protecting Stats

Your stats pages can also be password protected. Just set the $pw_stats variable at the top of the index.php file.

Viewing stats with no password set: http://example.com/stats

Viewing stats with password set: http://example.com/stats/your-password

A Kinda-Sorta JSON API

This project aims to be as simple-to-use as possible by making all commands and interactions go through a simple URL-based API which returns plain-text or HTML. However, if you’re looking to run a script against the shortening service, you can do so. Just pass along Accept: application/json in your HTTP headers and the service will return all of its output as JSON data – including the stats pages.

Contributions / Pull Requests / Bug Reports

Bug fixes, new features, and improvements are welcome from anyone. Feel free to open an issue or submit a pull request.

I consider the current state of the project to be feature-complete for my needs and am not looking to add additional features with heavy dependencies or that complicate the simple install process. That said, I’m more than happy to look at any new features or changes you think would make the project better. Feel free to get in touch.

Moving Projects Forward

One of my favorite benefits of following a GTD workflow is that it eliminates a lot of the decision making for you. When it’s time to get work done, just fire up your task manager of choice, switch to your list of available next actions, and pick one. Having defined, physical next actions for each of your projects is the key to moving them forward. But sometimes you can get stuck and lose momentum. You may forget why a project is important.

I’ve found that this can happen for long running projects or for projects that aren’t clearly defined with next actions. For the latter, the solution is simple. Move your focus all the way down your hierarchy of tasks and come up with the very next physical thing you can do to move the project ahead. No matter how small that action might be, it will count as forward progress if you do it. And that might just be enough to get you going again.

But for projects and tasks that have been on your mind for seemingly ever, or for those that you just don’t remember why you signed up for them in the first place, it can be helpful to go in the opposite direction.

Take a look at the task you’re procrastinating on and move up a level to its parent. Do you remember why you added that to your list? If it’s a project, are you still committed to doing it? If you’re not sure, go up another level. Is it clear why that is important to you?

You can repeat this process all the way up to your areas of focus. Is it your career? Your side business? Your family? Whichever area you land on, it should be an important tent-pole in your life. You should be able to make the connection between why it is important to you and how that one small action can move you closer to your goal. And, hopefully, that’ll be the motivation you need to get un-stuck and moving forward again.

Switching to Google Photos from a Dropbox Photo Library

Five years ago I went all-in and migrated my ancient iPhoto library to generic files and folders on disk inside of Dropbox. I wanted something I could access from anywhere, and – perhaps more importantly – was future-proof. I liked this solution so much I started writing a book about it and even made an iPhone app to help me view my library on the go.

My library’s structure worked like this…

/Photos/
    /_Albums/
        /2017-12 Aaron's 4th Birthday Party/
        /2017-12 Christmas in Chattanooga/
        /2017-11 Thanksgiving in Nashville/
        etc...
    /2018-01/
        /2018-01-01 12:45:02.jpg
        /2018-01-02 02:38:15.jpg
        etc...
    /2017-12/
    /2017-11/
    /2017-10/
    etc...

That worked great. It allowed me to keep album-worthy photos separate from all of those one-off day-in-the-life photos we take. It also let me quickly find any photo just by knowing the album or month it was taken in.

The problem was that – especially with all of my home videos now in 4k/60fps – I was running out of disk space. My library was over 300GB. I had plenty of storage space left in my 1TB Dropbox paid account, but not on my hard drive.

I was facing the decision of not keeping all of my files locally or running Dropbox off a larger external drive. Neither option made me very happy.

But then came Google Photos.

If you know me then you might think I’ve gone crazy. I migrated ten years worth of Gmail to FastMail three years ago and never looked back. I wanted to be in control of my own data and domain name.

That said, I really did love Gmail for the ten years I used it. Most importantly, I trusted it. Many times I found myself referencing emails from a decade ago only to find them safely stored, not forgotten, just waiting to be read again. I’ve never lost a byte of data with any of Google’s product offerings – I trusted Photos would offer the same reliability. And sweetening the deal further, with my massive library I would be a paying customer. Google would have reason to keep my data safe versus my free Gmail account which came with no promises.

So I installed Google’s Mac uploader app on my Mac, pointed it at my Dropbox photo library, and waited. Three days later all of my photos and videos were in Google’s cloud. The only problem? I had no albums. Just a giant stream of 50,000 photos sorted (thankfully) by date.

So over the next few weeks I picked a couple albums each day from my old Dropbox library and recreated them in Photos. It was boring, monotonous, and not entirely pleasant work. But in the end it was worth the effort.

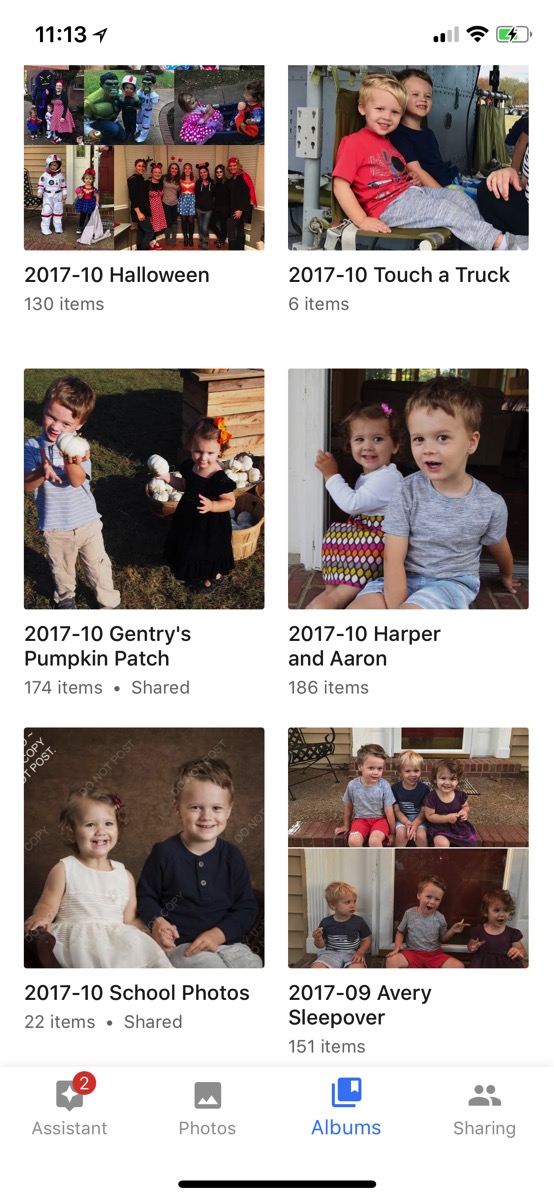
To keep things organized and easily searchable, each album follows the same naming convention as it did in Dropbox. “Year-Month Short Description” (2018-01 Aaron's Birthday Party). Here’s a screenshot.

IMG 4685FB06DD09 1

All the rest of my day-in-the-life photos are sorted individually by date under the “Photos” tab.

The Google Photos iPhone app is installed on my phone and takes care of backing everything up to their cloud. It’s also installed on my wife’s phone (and signed-in under my Google account) so it slurps her’s up as well.

Further, any SD camera cards we plug into my Mac are ingested by the Photos Mac app.

Every Monday, as part of my GTD weekly review, I do a search on the Photo’s website for “last 7 days”. That, predictably, shows the lasts seven days worth of photos, which I then go through and sort into albums and delete any pictures that aren’t worth keeping.

So that all takes care of getting my media into Google Photos, but once it’s all in there, then what?

Well, quite a lot actually.

You can search and filter by people. Here’s everyone in my library…

IMG 762E75E87362 1

Tapping on my wife’s grandmother filters down to only photos containing her…

IMG 714DA282CAE2 1

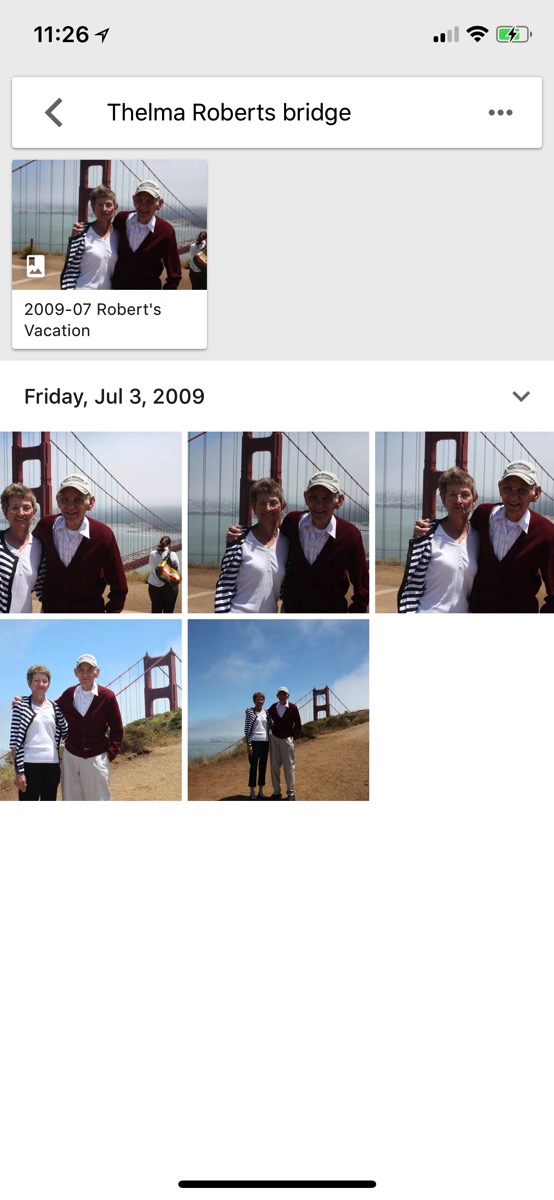
But Google’s AI is much smarter than just facial recognition. Watch what happens when I search for “Thelma Roberts bridge”…

IMG 60CAB60E7EF3 1

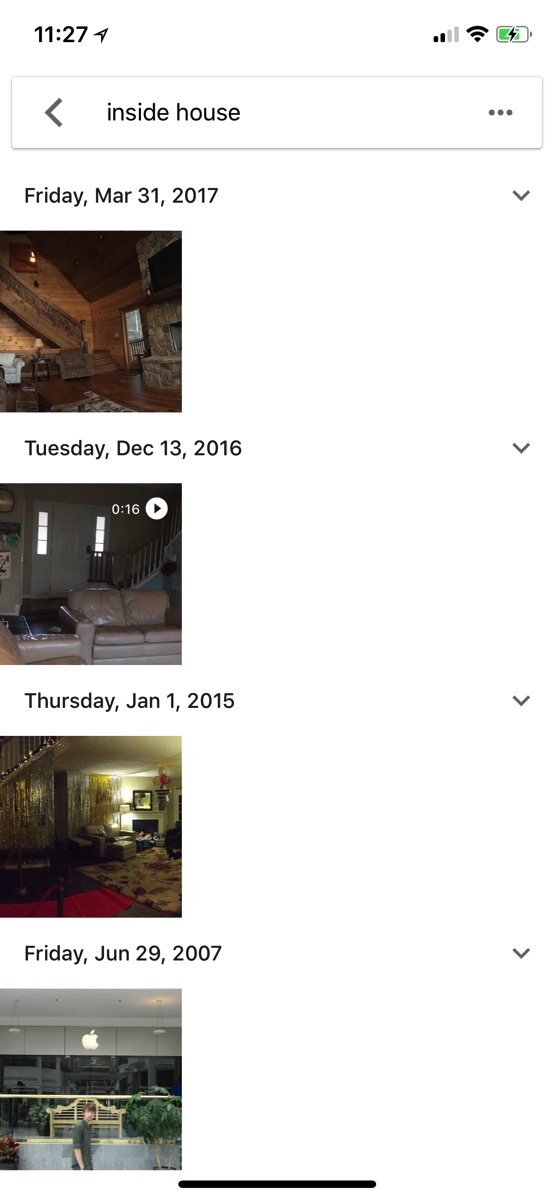
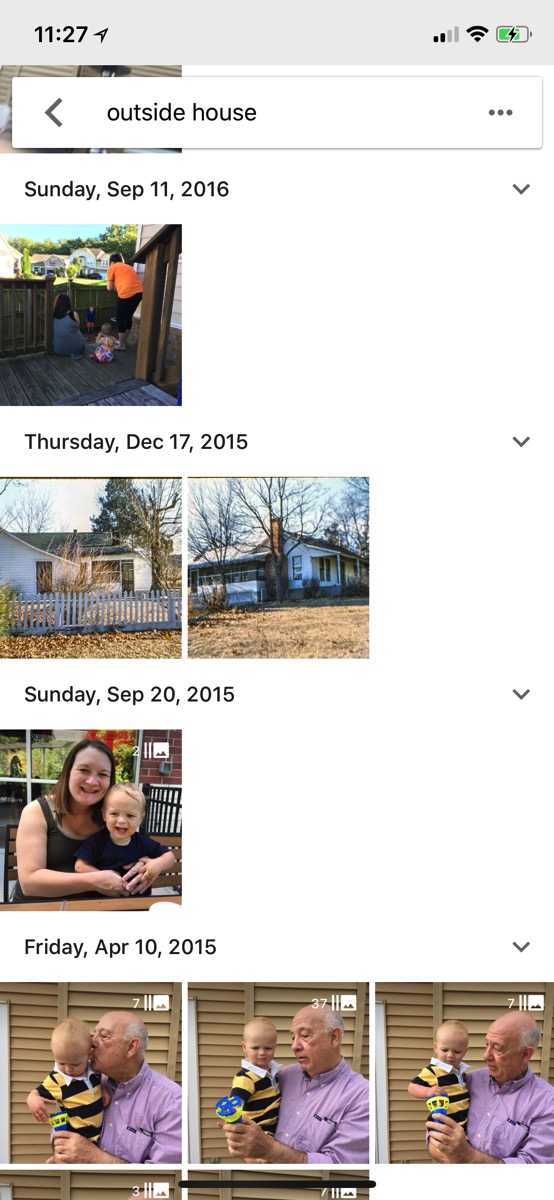
Amazing, right? But how clever is the AI, really? Well…

Search for “Inside House”….

IMG DE26B3947546 1

And then search for “Outside House”…

IMG 0B900B658B11 1

It’s truly astounding to be able to search, slice, and dice your photos this way. I can’t wait to see what features Google adds next.

Permission to Forget

I think it was David Allen who said you can do anything you want, but you can’t do everything you want. It’s ironic how an attempt to do everything will actually keep you from doing anything. —Shawn Blanc

A few weeks ago, I tweeted that I had reached “OmniFocus Zero”. I pulled up my available tasks one morning only to find that I had nothing to do. That’s not to say that there were no more tasks waiting for me in OmniFocus, it’s just that my Available perspective was empty. I had nothing due that day and no tasks that weren’t blocked or waiting on someone else.

A few of my GTD-doing friends expressed disbelief. How could everything be done? The simple answer is that I’m ruthless. I’m ruthless when it comes to delegating, deleting, and deferring until later.

I do my weekly review every Monday morning. One of my favorite things is when I come across a task that is no longer relevant to my life. That means I can delete it. Not only from my task manager, but, more importantly, from my brain. It’s one less open loop flying around my mind.

But it wasn’t always like this. I used to be a task hoarder. I’d write down absolutely everything, and never get rid of anything. I’d just keep kicking the can down the road foolishly and naively thinking I’d get to all of those tasks someday.

The trick I finally learned was to give yourself permission to forget. You have to make a ruthless decision and give yourself permission to admit that you’re never going to get around to that task and just delete it. If you have an item on your task list that is causing you anxiety because you just can’t get around to doing it – then maybe it’s not really something you’re committed to doing at all. Get rid of it.

You have to come to the realization that you can’t do everything. Sometimes, one concrete action is all you need to keep moving forward.

GeoHooks

I’ve always been fascinated with geo technologies and location based services. When I worked for Yahoo!, I was always bugging Tom Coates and Gary Gale about all things geo – including the sadly ahead of its time FireEagle web service.

Anyway, for the last two years I’ve been tinkering off and on with an idea of my own – geohooks. They’re webhooks that are triggered based on the location of you, another person, or a combination of multiple people.

I’m really happy to announce that https://geohooks.io is now available for people to beta test. You can sign-up for free here: https://app.geohooks.io/beta.php You’ll also need our iPhone app. You can get in on the test flight magic by @’ing me here or on Twitter or by email.

So what can GeoHooks do? Well…

  • Call a webhook when you enter or leave a specific geofenced area
  • Send an SMS to your spouse when you leave work and you’re on your way home
  • Send an SMS to your spouse when you leave work that also inculdes Google’s traffic estimate
  • Turn off the lights in your smarthome when both of you leave the house
  • Keep track of how long you’re at work each day
  • View a live map of where all of your account members currently are
  • Trigger any service on IFTTT
  • Securely share your current location to 3rd party web services with a level of accuracy you control (pour one out for FireEagle)

And much, much more.

Anythign you can trigger with a URL, you can now control with your location. GeoHooks is location-based webhooks for hackers, with a focus on privacy.

I’d love your feedback.

Moving to a More Comprehensive Weekly Review

Your weekly review is probably the key to keeping your trusted system running smoothly and most importantly out of your mind. For years, my review was little more than going through my list of projects every Sunday morning and making sure each was in an acceptable state.

But after reading Kourosh Dini‘s wonderful book Creating Flow with OmniFocus, I’ve taken his advice and implemented a more comprehensive weekly review that covers more than just my list of projects. It’s designed to be a whole review of every system in my life that accepts incoming data or holds reference material. This holistic approach does a much better job at keeping my mind free of open loops and all of my concerns written down in a trusted location.

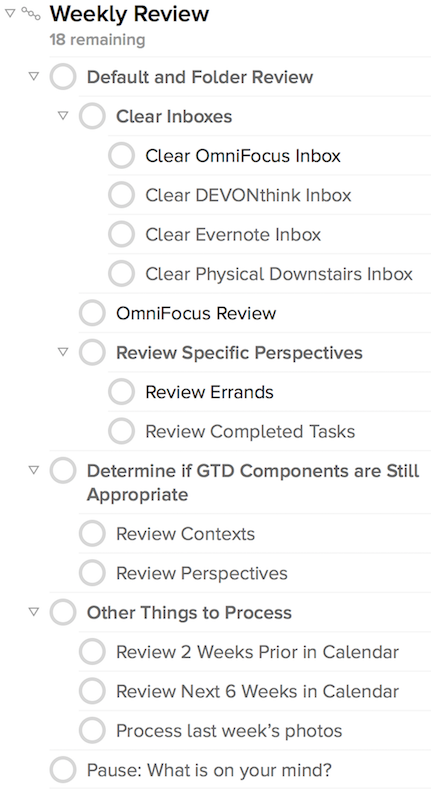
To start with, I now have a “Weekly Review” project filled with all the action items it takes to complete my review each week. This project is on hold so the tasks don’t pollute any of my perspectives. When it’s time for a review, I drag the project to the top of the project list while holding down the Option key on my keyboard. This tells OmniFocus to create a copy of the project rather than just re-ordering it in the list. Once the copy is created, I rename it with the date (ex: “Weekly Review 2017-09-25”) and mark it as active. I then focus on the project and begin working my way down through all the action items – checking them off as I go.

Here’s what my weekly review project looks like…

The first task is to go through all of my inboxes and process anything remaining in them. This includes, of course, OmniFocus but also Evernote, DEVONthink, and a physical inbox for postal mail. This process is pretty painless. It’s just a matter of taking a few minutes and putting everything you’ve collected over the last week into its proper, organized place.

Next up is a review of all of the projects in my OmniFocus database. I won’t go into too much detail about this. If you’re curious, you can read Getting Things Done or Creating Flow with OmniFocus – as each one talks extensively about how to do a proper review. For me, it’s a brief moment to meditate on each project and make sure 1) there’s a next action waiting to be done and 2) there are no extra thoughts or tasks about this project bouncing around in my head that I haven’t written down.

After reviewing all of my projects, I specifically pull up a perspective showing me all of the errands I have to run. This creates a solid foundation in my head of where I need to eventually go around town throughout the week. Most of these tasks don’t have due dates. Rather, they just need to be done in the near future as appropriate.

Following my errands I do a quick look over of all my custom perspectives in OmniFocus. I’m looking at each one and deciding if 1) is this perspective still relevant and something I look at frequently? If not, I delete it. 2) Is it still showing me the correct data I need to see? If not, I adjust its settings. And 3) Can I think of any other common “queries” or views of my database that I could turn into new perspectives?

The next two calendar tasks help keep me grounded. I do a quick review of what’s been on my schedule the past two weeks, which can often jog a few extra followup items out of my head. And then I get a lay of the land for the next six weeks. This, too, can shake loose tasks related to your calendar events that may have been skipped over or forgotten.

Last, is a section where I add any other recurring things I need to check in on. Currently, that’s just Google Photos as I do a review and sort of all the photos my wife and I have taken over the last week.

Finally, there’s The Pause. Dini pushes this point hard in his book and I tend to agree with its importance. This is a moment to sit back, close your eyes, and just let your mind wander wherever it wants to go. And as it does this, take note of any action items it uncovers that you can add to OmniFocus. The more stuff you can get out of your head and into your trusted system, the more energy you’ll have to focus on whatever task at hand you decide to do.

So that’s my weekly review. It takes about an hour each week, but it’s completely worth the time.

Again, my thanks to Kourosh Dini‘s fabulous book Creating Flow with OmniFocus for the insight into his own review process from which I cribbed most of my ideas.

Can the Cloud Be Your Only Backup?

With the news today that CrashPlan is exiting the consumer market, many folks are beginning to scramble looking for the next best backup solution. I can tell you right away that’s BackBlaze. It’s simple to setup, costs only $5/month/computer, and has the best-behaved-Mac-like software of any of the major backup providers. Download it, install it, you’re done.

So, why wasn’t I using BackBlaze all this time to begin with?

Well, I’m the IT person for my family (as I’m sure many of you are as well). After one of my family members lost data for the umpteenth time, I decided to take on handling their backups as well. Initially, as a very happy user of BackBlaze myself, that’s what I installed on everyone’s machine. The only problem was that $50/year/machine cost, which I was footing the bill for myself. I quickly found myself spending over $500 a year. That’s not a deal breaker, but it was definitely more than I wanted to spend.

CrashPlan offered a family plan for $15/month that included as many machines as you needed. At $180/year, that was very attractive, but I never fully trusted their shitty Java-backed software to work correctly on my Mac. However, after learning that Apple uses CrashPlan internally to handle some of their employee backups, I felt safe in switching.

I’m happy to say that for two years CrashPlan has worked great. But now that it’s going away, just switch to BackBlaze. It’s really the only sane option.

All that said, the point of this blog post isn’t to recommend BackBlaze. It’s to question whether full-disk cloud backups are even necessary any longer? Here’s what I mean…

For years I’ve kept meticulous backups. Every night my Mac would clone itself using SuperDuper! to one of two external drives – which were rotated every few weeks between my house and an offsite location. This let me boot up to exactly where I left off the day before should my Mac’s internal drive fail. In addition to that, I had Time Machine running to a networked drive for versioned backups. And BackBlaze backing up to their cloud for serious disaster recovery.

But is all of that really needed today?

I stopped using SuperDuper once Apple dropped FireWire 800 from their machines. Booting up an external disk over the remaining USB ports was just too slow and not worth the trouble. Time Machine over the network has become increasingly unreliable over the years, but it’s still a decent option. But as storage and bandwidth costs have decreased rapidly, I’ve begun to demand more granularity in my backups than Time Machine’s hourly schedule will provide. I want access to every revision of each file – not just whatever happened to be on disk when Time Machine did its thing.

All of my documents – and I do mean all of them – are saved in Dropbox. I pay an extra $40/year for their Packrat feature, which keeps a year’s worth of revisions of all my files rather than the default thirty day limit.

All of my work files (code) are versioned in git and backed up on GitHub in addition to being on my Mac at work.

So, Dropbox and git take care of keeping all of my files backed up and recoverable to any previous version. Everything else on my Mac can be recreated in a manner of hours after a fresh system install. Everything but one exception – my photo library.

If I were to lose a photograph of my kid, I’d be sad. If I were to lose all of my photos, I’d be devastated. All of these photos and home videos, some dating back to the early 1980’s, are the most precious data on my Mac. It’s an absolute must that they be protected.

For years I kept them perfectly organized in folders grouped by year-month inside Dropbox and backed up to CrashPlan and SuperDuper!. I even wrote an iOS app designed specifically to browse my Dropbox powered photo library. But as my library grew and hard drives decreased in size (due to the switch to flash drives, which haven’t yet caught back up with spinning disk capacities), I found myself running out of room on my laptop to store my complete collection. I was forced to move infrequently accessed albums to cold storage on an external drive and also to S3. My Dropbox solution was exactly what I wanted – it just didn’t scale.

Then along came Google Photos and iCloud Photo Library. The promise of each service sounded great. All of your photos and videos safely stored in the cloud and available on all your devices. But I was hesitant to move away from my on-disk Dropbox solution for fear of one day being trapped into one system or another. But without any real sane alternative, and with the geeky alure of Google’s image recognition technology paring your library, I gave in. I’m now paying both Apple and Google $10/month for their extra-storage plans so I can keep my entire library in both of their clouds.

And so far it’s working great. I’m still a bit nervous about not being in control of my own backups, but I’m willing to wager I won’t lose access to both services at the same time, so two copies of all my files in the cloud should be enough redundancy for now. (I hope.)

That was a long digression about backing up my photos, but back to my main point – with all of my data siloed into different services based on data type, is there longer any need for full system backups? I’ve asked myself this question a lot over the last few days as I’ve I migrated machines off of CrashPlan and back onto BackBlaze. For my parents and other relatives, I think the answer is still “yes”. The simplicity of BackBlaze makes keeping your family safe a one step process. But for me, a geek, I think I’m finally ready to wholly embrace the cloud as my primary backup solution.

Creating a Daily Standup Perspective With OmniFocus

Like many of you in the software industry, every morning at 10am my team has a standup meeting. It’s meant to be a quick five minute meeting where everyone says what they accomplished yesterday, what they’re planning on doing today, and if anything is blocking them from moving forward. If done correctly, it’s a super-fast way to stay in the loop with everyone.

But sometimes it can be hard to remember all the details about what you did yesterday – especially on Mondays when you’re trying to remember past the weekend and back to last Friday. To help with this, I’ve traditionally kept a journal or work log of what I’m doing throughout my day. But with my recent job switch, I decided to start keeping all of that information in OmniFocus where I can slice and dice the data in ways that a plaintext journal won’t allow.

Because we use JIRA at work to track our tasks, rather than using OmniFocus the traditional way by entering my to-dos and then flagging what I need to get done to create a “Today” perspective, I get my marching orders directly from JIRA. So instead of entering my to-do’s into OmniFocus in advance of doing them, I add them as I complete them and immediately mark each as completed.

What this gives me is a dated and timestamped list of everything that I’ve accomplished. And with the “Standup” perspective that I’ve setup, I can simply flip to it in the mornings during our meeting and get an instant glance of what I accomplished yesterday and any tasks that happen to be waiting for me to complete.

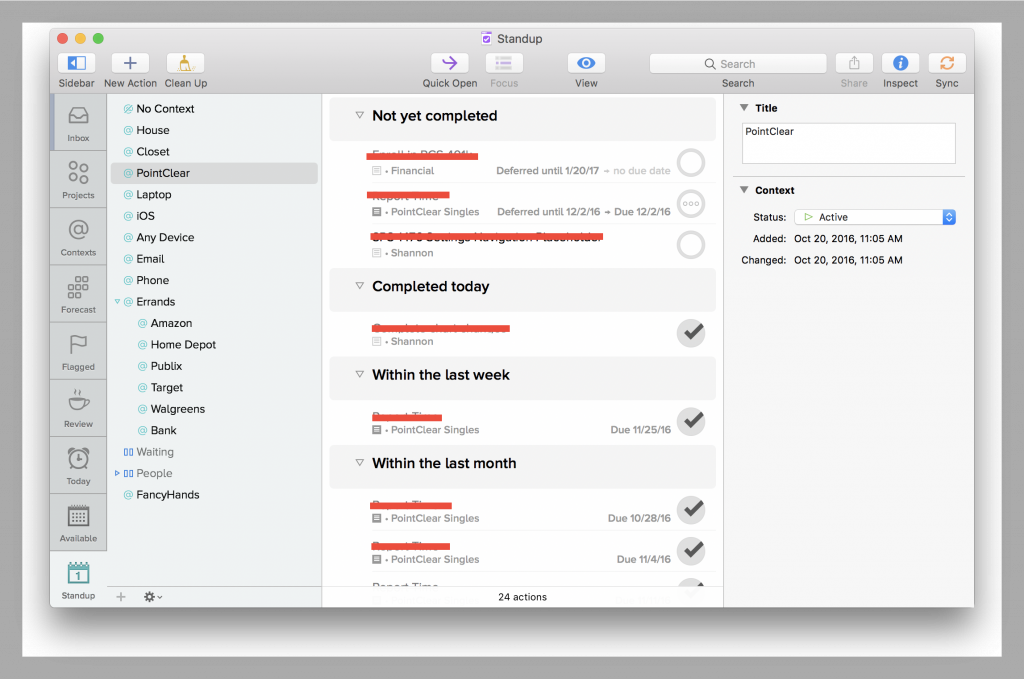
To accomplish this, all of my work tasks are assigned to an OmniFocus project that corresponds to the real life project they belong to. For contexts, however, rather than giving them something like “Office” or “Laptop” or “Email”, they all get the same context simply titled “Work”. This allows me to group them together and sort by completion date in my custom perspective. Here’s what it looks like…

standup-perspective

As you can see, all the tasks I’ve completed are grouped by date – completed today, yesterday, this week, this month, etc. And then at the top is anything I’ve yet to do or might be currently working on.

This gives me a super easy way to provide my standup report each morning without having to remember everything myself.

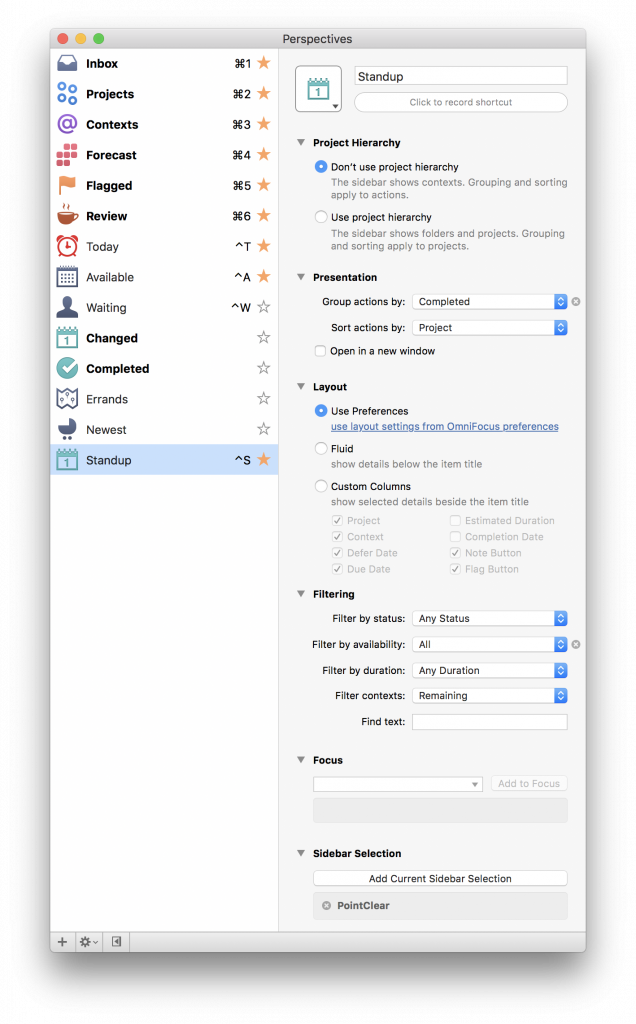
Here’s a picture of the perspective settings I’m using to do this…

standup-perspective-details

I’m not using a project hierarchy, grouping by Completed, sorting by Project, showing Any Status, and All available items. I’ve also focused the sidebar selection to just my “Work” context.

By saving these settings as a custom perspective, it not only helps me out each morning, but also gives me a instant look at what I’ve accomplished or when something was completed if a boss or co-worker has a question.

A Stupid Idea?

I have a stupid idea. Bear with me…

Apple’s new MacBook Pro is rumored to be updated later this year with the function keys replaced with a tappable OLED display. The idea being this display could change based on the app you’re using. But what if it wasn’t just the function keys. What if the whole keyboard was one big OLED touchable display?

When Steve Jobs stood on stage and announced the first iPhone in January 2007, before revealing the design, he showed a slide of “the usual suspects.” The standard smart phones at the time. He said the problem with theses phones (among other things) is the “bottom third.” He was referring to their fixed-in-plastic keyboards that are the same no matter what app you use. He said Apple “solved this problem thirty years ago with bitmap displays.”

Doesn’t that sound like an apt description of the standard laptop keyboard we’ve all grown accustomed to? What if it could change form whenever we switched apps?

Many people, myself included, are almost as fast at touch typing on a full-size, on screen, iPad keyboard as we are on a physical keyboard.

The travel of the keys on the new MacBook (One) has been drastically reduced to save space. Any further reduction and you’d practically be typing on a flat surface.

The new force touch trackpad in the MacBook (One) and recent MacBook Pros simulates the “click feel” by vibrating slightly.

What if the rumored MacBook Pro had a huge battery saving OLED screen for a keyboard that vibrated on key press? Would that be so bad?