DIY Video Hosting

I’ve been a paying customer of Vimeo since 2014 – specifically, their Pro plan.

Vimeo order receipt from 2014

(Please ignore that the above email receipt is for their Plus plan. Shortly after subscribing I realized I needed to upgrade to Pro, which supports commercial use.)

I needed a reliable way to host a bunch of screencasts and video tutorials I was producing for my software. I went with Vimeo because they’re the obvious choice in this space for two main reasons:

  1. I didn’t want my content hosted on YouTube where it would be surrounded on all sides by an infinite expanse of flaming garbage. (Don’t take that criticism too harshly – I’m a happy YouTube Premium subscriber.)
  2. Vimeo is really, really, really good at what they do. I mean, supremely top-notch when it comes to ease-of-use, controlling the end-user experience, speed, and quality.

But when my renewal email arrived in April, myself and other small developers were seeing sales slow down as the pandemic worsened.

Vimeo pricing chart

Another $240/year was a tough sell for the small amount of video content I was hosting with them, and I wondered if there might be a cheaper alternative – either another service or by hosting videos myself.

If you’re posting commercial content – like I often do – Vimeo’s terms require you to be a Pro subscriber or higher. And to be clear, I still think Vimeo at that price (at almost any price, really) is a great value. It’s cheaper than a company with four employees paying for Slack.

But at my tiny scale and thinking about cutting costs, given the amount of video content I’m actually posting each month and hosting with them, and also being a huge nerd, it didn’t make sense any longer.

So, let’s do this ourselves.

We need three things:

  1. Somewhere (cheaper than Vimeo) to serve video from.
  2. A way to play the video on our website.
  3. An easy way to convert raw video into an appropriate size and format for streaming.

So, where to actually host the video files? My requirements are somewhere reliable that won’t fall over if you get Slashdotted (ha, remember that?), can deliver quickly to visitors in any location, and won’t bankrupt you.

I have plenty of space available (and almost always enough bandwidth available) on my Linode (affiliate link – but Linode is wonderful) servers. But even my primary $20/month VPS with them was brought to its knees multiple times when traffic spiked. (Granted, I was running WordPress at the time.) And I don’t want to take the chance of my business website going down because one of my dumb blog posts on this website gets noticed.

A lifetime ago, I wrote about using S3 as a poor man’s content delivery network. That’s still an easy and reliable choice, but the cost for bandwidth doesn’t scale as a true CDN. Which is, of course, why Amazon offers CloudFront. But even then, at $0.085/GB, I’ve had multiple months in the past calendar year that would have been over $200.

Instead, let me introduce you to my secret weapon: BunnyCDN. (I get credit if you click that link. But I only use it because I completely love their service as you’ll see below.)

I switched to Bunny last October after using MaxCDN (now StackPath) since 2011 for all of my static assets. And I’ve been utterly flabbergasted at just how damn good they are. For a number of reasons:

  1. The main metric that matters: they’re really fast. I’m seeing equivalent performance as what I was used to with MaxCDN and the larger CDNs I’ve used at my day job.
  2. The two times I’ve needed to email them with a support question, a knowledgable, helpful human has replied quickly and without needing to go through dumb self-serve solutions.
  3. Bunny’s control panel where you manage your account, choose bandwidth settings, etc. is super easy to use and incredibly powerful (at least for my needs). It’s a really nice change from what I had with MaxCDN and the AWS Console (powerful as hell, but obtuse).
  4. Holeeeee crap their bandwidth is cheap.

For my static website assets (images, stylesheets, JavaScript, etc.) I use Bunny’s standard tier, which serves my content from all of their PoPs. That means visitors will connect to the server closest to them at $0.01/GB (for US and EU PoPs).

However, my video content uses their volume tier, which is distributed from 7 PoPs (instead of 41). While still being plenty fast enough, that reduces the cost further to $0.005/GB. That works out to a cool $5/TB when my traffic spikes.

I have zero understanding of how bandwidth is actually priced globally between providers or why some companies charge such a premium compared to others for the same bits over the wire. I assume you’re paying for reliability and/or speed? All I know is that I haven’t seen a blip of downtime or noticed any slowness in the nine months I’ve used BunnyCDN. I can’t explain how they can be so much less expensive. Maybe they won’t scale to “real” traffic? But for what I need, they’ve been a phenomenal choice.

(Ok, I’m done going on and on about them now. This really isn’t any sort of paid or sponsored content crap for Bunny. I’ve just been so impressed since switching, that I finally wanted to give them recognition.)

So that’s my answer to point #1 – where to host the video files.

The next thing we need is a way to show those videos inline on your website.

Gone are the days of embedded Flash video. Now, you can mostly get away with just using the native HTML5 video element.

However, if you want more control over the appearance of your video and how it behaves, take a look at Video.js. It’s a wonderful open source player from the kind folks at Brightcove that provides a similar level of control as the point and click customization options that Vimeo offers.

The last puzzle piece is getting your original videos into a web-friendly format and uploading them for distribution.

BunnyCDN offers their own online storage zones that you can simply upload to via FTP, but for historical reasons, I still store my large app downloads and videos on S3 and then have Bunny (and previously MaxCDN) pull from AWS as an origin server.

And as for the correct video format, I’m using Handbrake’s command line interface to convert my source videos files into mp4 using the Vimeo YouTube HQ 720p60 and Vimeo YouTube HQ 1080p60 presets.

But, because, hey, I’m a geek who doesn’t like doing extra work, I’ve wrapped up the whole process into a short shell script that

  1. Converts the source video to 720p
  2. Converts the source video to 1080p
  3. Uses qlmanage to output a frame of the video as a png for previewing in the HTML player before the video starts
  4. imagemagick to convert that png to a jpg
  5. Uploads all three assets to S3 with s3cmd
  6. Outputs the custom shortcode I use to embed videos in my blog posts

I just pass my video’s filename to that script, and a few minutes later I can copy and paste the output into my text editor and make it available on my website. Honestly, it’s an even faster process than using Vimeo.

Here’s the script. You’ll of course want to modify the paths to make it work with your own setup since it’s completely specific to my needs right now.

#!/bin/bash

bucket=$1

base=$(basename -- "$2")
extension="${base##*.}"
filename="${base%.*}"

p720="/Users/thall/Dropbox/Freelance/Videos/720p/$filename.mp4"
p1080="/Users/thall/Dropbox/Freelance/Videos/1080p/$filename.mp4"
png="/Users/thall/Dropbox/Freelance/Videos/jpg/$base.png"
jpg="/Users/thall/Dropbox/Freelance/Videos/jpg/$filename.jpg"

/usr/local/bin/HandBrakeCLI -Z "Vimeo YouTube HQ 720p60" -i "$2" -o $p720
/usr/local/bin/HandBrakeCLI -Z "Vimeo YouTube HQ 1080p60" -i "$2" -o $p1080

/usr/bin/qlmanage -t "$2" -s 1080 -o "/Users/thall/Dropbox/Freelance/Videos/jpg/"
/usr/local/bin/magick convert $png $jpg
rm $png

s3cmd put --acl-public --guess-mime-type $p720 "s3://$bucket/720p/$base"
s3cmd put --acl-public --guess-mime-type $p1080 "s3://$bucket/1080p/$base"
s3cmd put --acl-public --guess-mime-type $jpg "s3://$bucket/jpg/$filename.jpg"

echo "[tylervideo url=\"$base\" img=\"$filename.jpg\"]"

So that’s how I moved off Vimeo and started hosting my video content myself. On average, my bandwidth bill is about $11/month – and that includes videos, static assets, and ALSO binary downloads for all of my Mac apps. Previously, I was paying $20/month just for video hosting on top of the rest of my bandwidth.

It’s definitely a geekier solution that requires more work up front to setup, and I’m not sure I would recommend it for a “real” business, but for my needs it was a fun project and I’m happy to save $200 a year.

BespokeApp

Last night my daughter was sick, so I spent a couple of hours sitting in her bed to help her fall asleep. With a bit of time on my hands, I put together this little open source project.

I really don’t know if anyone has a need for this other than me. But I’ve built this app a few times for myself in the past, so last night I finally took the initiative to make it generic and reusable – both for my future self and anyone else who might find it useful.

It’s called BespokeApp. It’s a simple iOS app that gives you a tabbed web browser with the pre-defined websites of your choosing.

Why is this helpful? Well, I have a number of websites I visit frequently that are all related.

For example, in my day-to-day business running my little software company, I often bounce between my help desk, my customer database, my website stats, and a few other 3rd party web apps like Linode and NodePing.

Separately, I have a number of web apps running locally on my iMac that I use to manage our home media sever, Docker, and some Raspberry Pi stuff.

I think of all these websites as belonging to distinct groups that are helpful when used together while I’m focused on a specific task. A common workflow I’ll run multiple times per day is…

I’ll get a push notification on my phone about a new support ticket from a customer. So, I’ll open up my bespoke, small biz app, flip to my help desk, and read their ticket. If it looks like they’re having a problem with their license or need me to send them a duplicate receipt, I can one-tap over to my backend system, lookup their order, and reply.

When I’m working on a task that requires information from various sources or multiple websites, BespokeApp just makes it fast and easy to coordinate. Sure, on my Mac (or even Mobile Safari) I could do all of this with bookmarks, but specifically on iOS, this is a pain in the butt to manage with every browser I’ve tried. None of them make switching tabs easy. Or even make accessing a group of bookmarks less than eleventy-thousand taps.

BespokeApp gives me a single app to open with a tabbed interface that lets me quickly switch between related websites.

As I said at the beginning of this post, I’ve written this same app a few different times for myself as I’ve needed different groups. But now it’s generic and reusable.

Two bespoke app icons

Everything is configured with a single property list (.plist) file. It lets you define each tab’s title, image, and the URL it loads.

You can even add multiple (related?) URLs on a single tab. The first one will be loaded by default, and you can then long-press to switch between websites within that tab itself. It’s all very meta.

Bespoke app long press action

Best of all, if you find BespokeApp helpful, you don’t need to clone a separate copy for each group (app). Instead, just duplicate the iOS target in Xcode with a new bundle ID, give it a new name, and use a different .plist. That’ll let you keep all of your bespoke apps in a single project / repo.

So that’s it. BespokeApp is a pragmatic, 152 line long, one-trick pony. I really think you’re gonna love it. (Sorry.)

A Pirate Looks (Nearly) at Forty

I first drafted this post six months ago in response to something that happened to my wife and I six months before that. But for various “reasons” I decided not to publish it.

But then, six weeks ago, Nick Heer wrote this wonderful piece connecting today’s new world of all-you-can-eat streaming music services with the piracy websites of the 2000s – specifically, the amazing communities, breadth of choice, and user experience they offered. And this post started rolling around in my head again.

A few weeks later Nick added a little color to the news that AT&T is giving HBO a free pass on data transfer because, well, AT&T owns HBO. He ended his thoughts with

I fully expect a resurgence of piracy as studios and ISPs attempt to isolate media.

And now I’m banging away on this keyboard today to say, yes, absolutely it will.

Up until last June, it had been a long, long time since we pirated any content. But that’s exactly what happened to my family last year – and is the impetus for this post.

I musically came of age my freshman year of college when the rise of Napster coincided with my first access to non-dial up internet. I’d fall down a new rabbit hole every night as friends on AIM and in the dorm would recommend an unfamiliar artist. I’d search their name and moments later be listening to their back catalog.

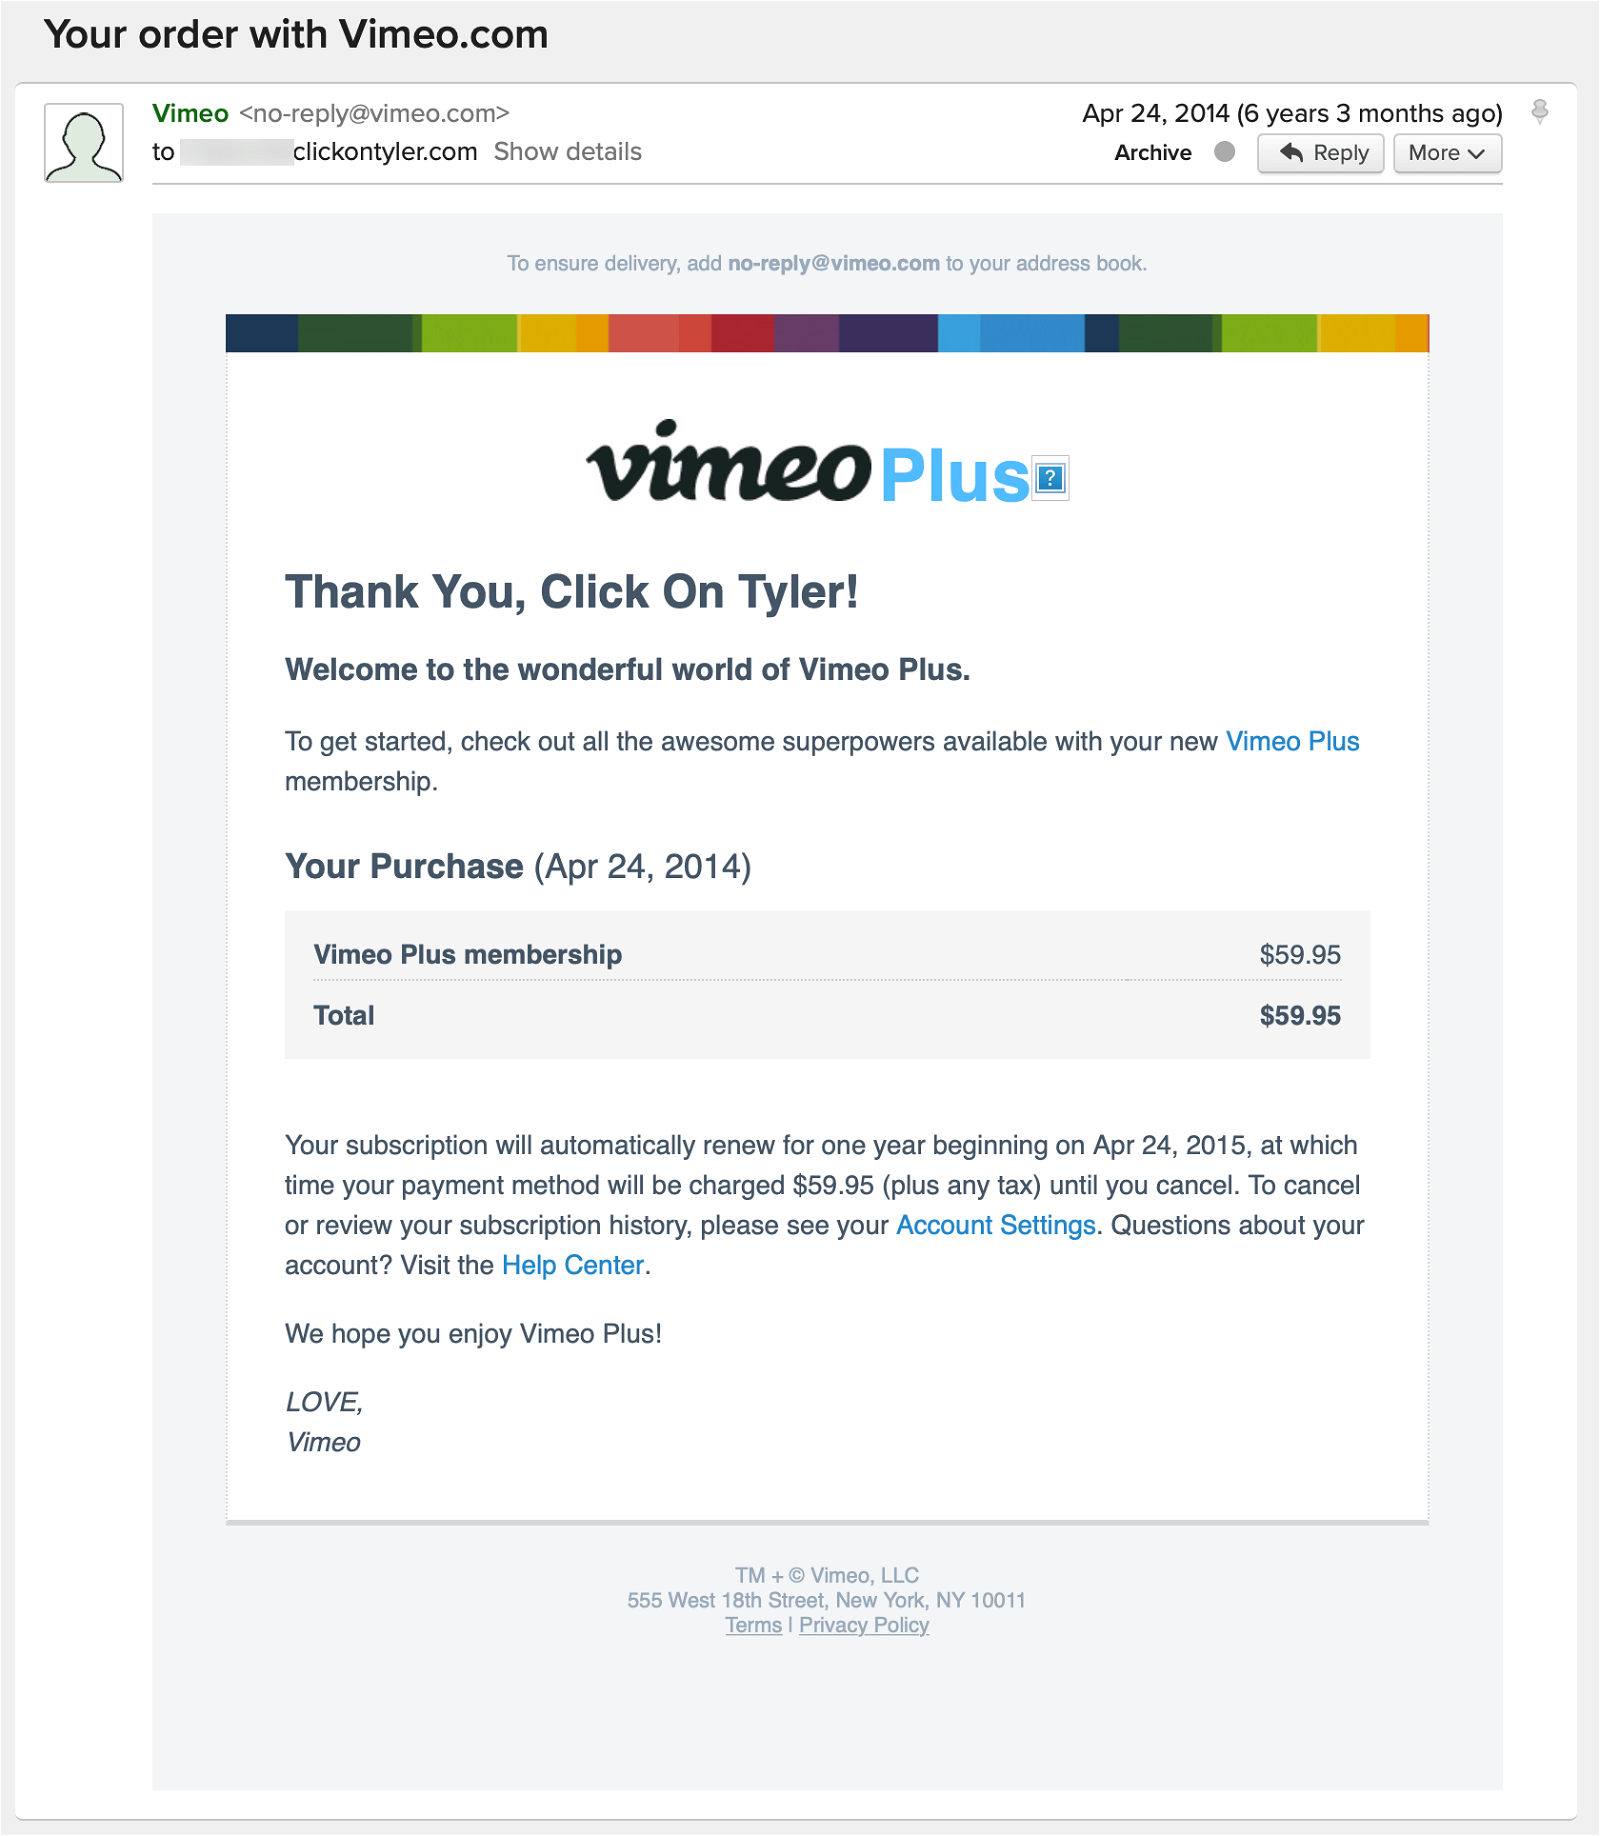
But by the time I got my first post-college job and a little disposable income in my pocket, the iTunes Music Store had been around for two years and I was more than happy to support my favorite artists.

And as far as music goes, I’ve been almost entirely above board and legit for the last fifteen years. But like Nick, I was also a member of Oink and discovered so much new music there.

The difference, for me at least, was that after “trying” some mp3s for “free”, if I wanted them permanently in my collection, I’d almost always pay for them via iTunes – assuming the songs were available. I can’t say why I did that other than I wanted my library to be “official”, and outside of buying CDs, the paid-for digital versions were canonical.

But movies and TV shows? What an utter shit-show the industry was back then. After our local Cupertino movie theater raised the price of a ticket north of $20, my wife and I almost entirely stopped going. That meant we watched everything at home. Sadly, though, the software, hardware, and bandwidth just wasn’t capable of supporting home media like we have now. But, a Mac mini running a combination of VLC and early builds of Plex hooked up to our HDTV meant we could solve that problem ourselves.

And for four years it worked wonderfully. But with the rise of Netflix and more capable streaming boxes, the UX of watching video legally finally got close enough to what we pirates had cobbled together ourselves years earlier to where we (and many of our friends) gave up our trusty HTPCs and went legit.

From 2012 until 2019 it all mostly worked fine. My wife and I were happy, paying customers. Sure, there was the whole Amazon Prime on iOS / tvOS debacle. And no way to find out if you didn’t remember which of the dozen streaming services carried Masha and the Bear when your three year old was melting down in the living room. And, of course, Apple kept fucking around with the the TV.app, adding more friction, up-sells, and making the whole experience pushier. But as long as your internet connection didn’t go out and you were confident you were under the residential data cap given to you by the internet company who also happens to own the streaming video platform you’re trying to watch, everything was great.

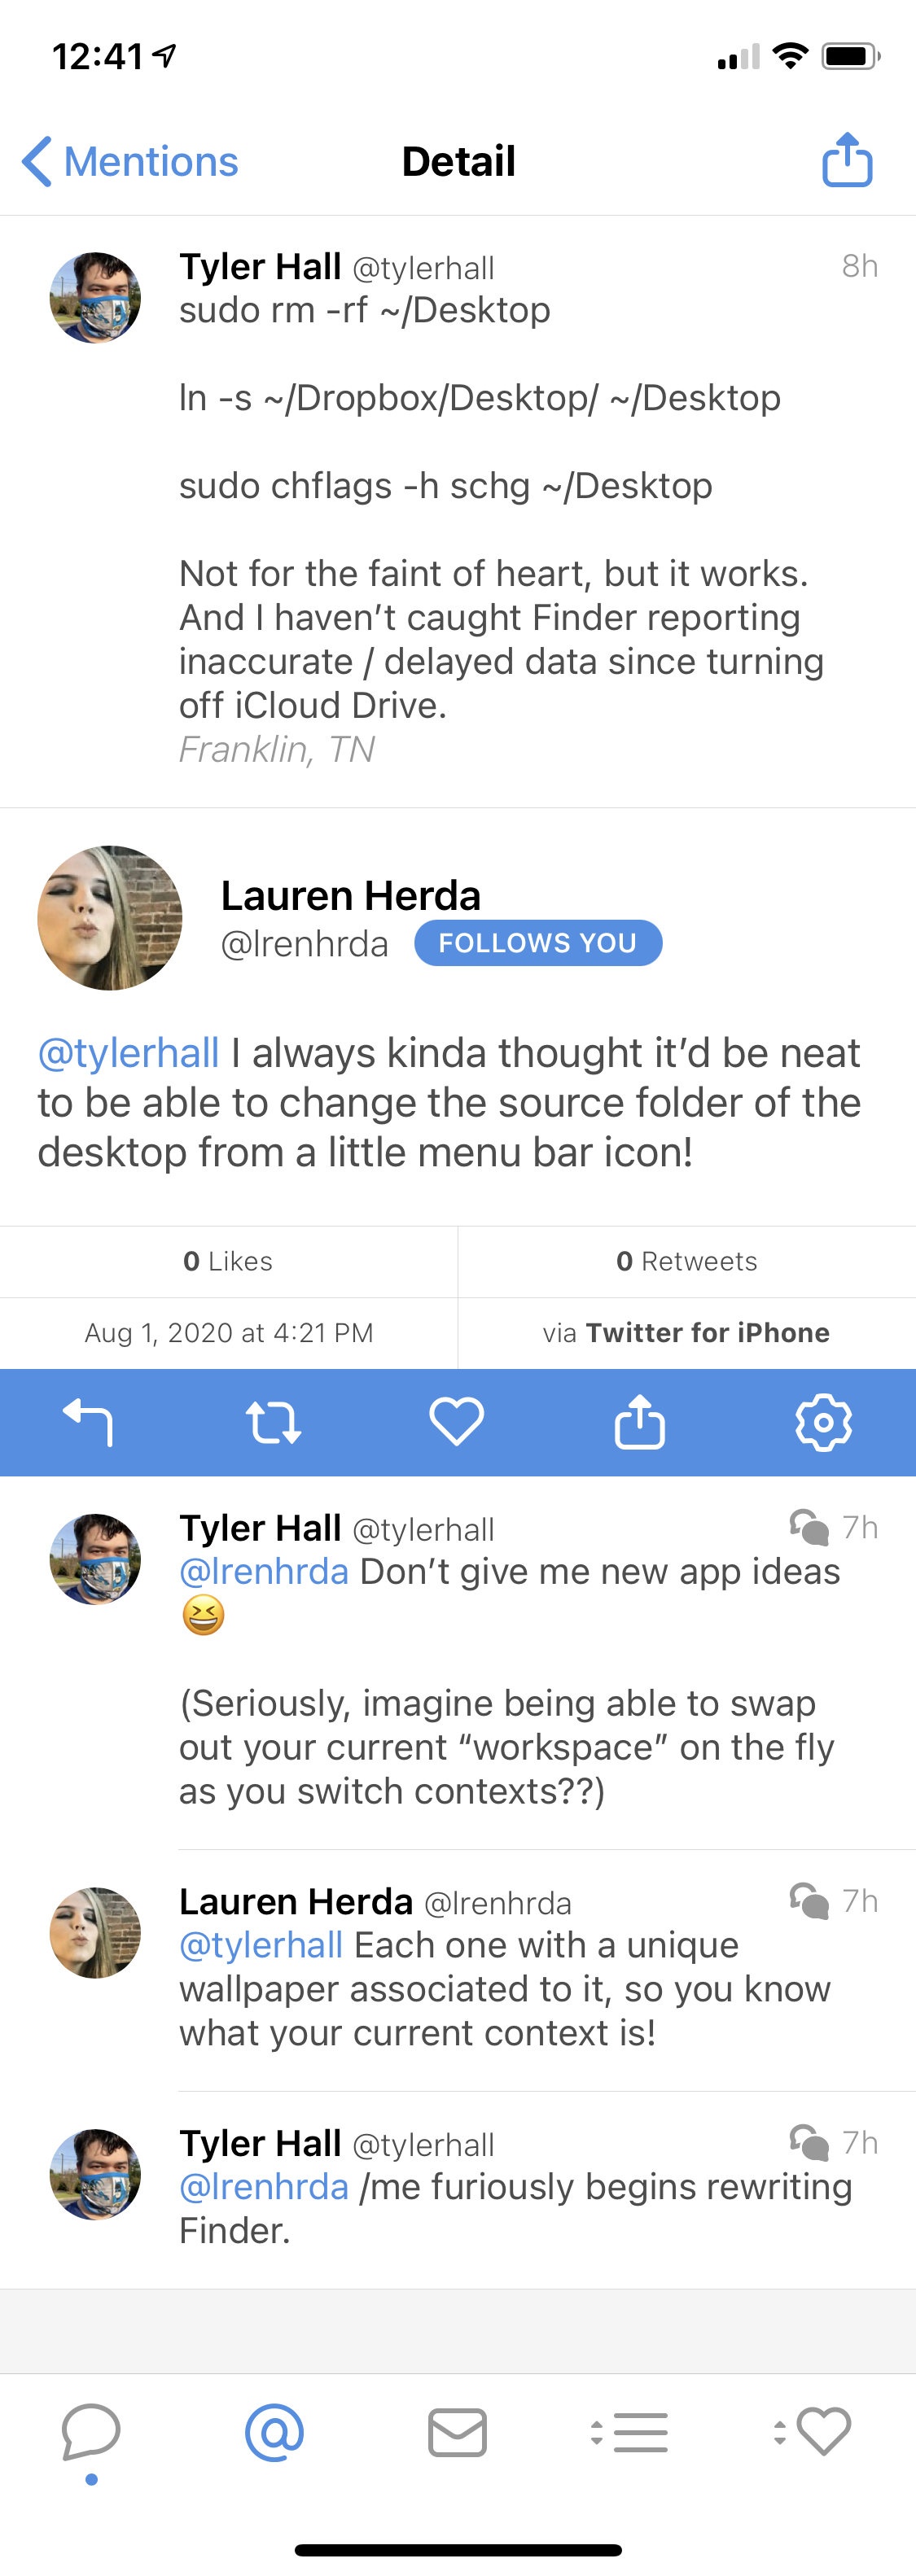
But one night last June we managed to get the kids to bed early and decided to rent a movie from iTunes. About forty-five minutes in, our youngest throws up, the oldest starts screaming because of the smell, and all hell breaks loose. Movie night over.

Amazingly, somehow, two nights later we again found ourselves with a quiet house again, ready to finish the movie we rented. But if you’ve made it this far into my story, you know exactly what happened next. We clicked play, and were informed our 48 hour rental period had expired.

For me, for us, that’s when the spell broke. For seven years we played by the rules. So I walked from the couch to my office iMac, visited an old favorite website of ill repute, and ten minutes later streamed the move in 4K to our TV.

That one evening re-opened the piracy floodgates for us, and we haven’t bought or rented another TV show or movie since. (Music, yes.)

Can I justify what we (and so many of my friends) are back to doing? Of course not. But am I OK with it? Yep. Here’s why.

The fragmentation of the streaming market into a different service for every IP holder means we’re headed back to the days of bundled cable packages. Instead of paying Comcast an exorbitant price for 200 channels to watch the five shows we care about, we’re now paying five (or more) streaming providers a smaller amount, individually, to watch the one show on each service we care about, which they use to finance production of a thousand other show we don’t want to watch. And added together we’re approaching if not exceeding what we were previously paying the single cable company.

But costs aside, the whole industry is a UX nightmare. Every service has their own awful, bespoke app. For my wife and I, we can mostly deal with that. But our parents? They simply cannot navigate so many contradictory options and ways of going about doing the same thing just because a different media conglomerate owns their three favorite shows. And good luck trying to explain the difference between HBO Now, HBO Go, and HBO Max.

Collectively, we’ve reached subscription fatigue – because of both cost and the hoops involved. Families like mine will pay for one or two services and then share passwords with or create guest accounts for other friends and family who then share their own subscriptions with us.

Some companies like HBO get it.

“It’s not that we’re unmindful of it, it just has no impact on the business,” HBO CEO Richard Plepler said. It is, in many ways, a “terrific marketing vehicle for the next generation of viewers,” he said, noting that it could potentially lead to more subscribers in the future.

Well, they used to, it now seems.

Anyway. That’s fine. It’s their content. But I view this as a market failure.

I want to pay for my content – I really do. I want to support the writers, actors, and workers making the media I enjoy. I don’t want to have to setup and maintain some wired-together, fragile pirating system. But when these media companies put onerous restrictions in place and refuse to agree upon terms that make sense to consumers – like the music industry finally did – for people with the know-how, we’re going to go back to stealing content.

And I use the word “stealing” deliberately because it absolutely is stealing. If you skim through any of the many piracy forums or subreddits, you’ll find tons of folks using twisted logic to justify that pirating content isn’t actually wrong or (worse) is somehow their right. But I have no illusions about it. When I illegally download a movie to watch one time because the studio insists I should outright purchase it for $20 instead of renting for $5, well, what I’m doing is stealing. It absolutely is and it’s wrong. But it’s also a crime that I would prefer not to commit if they would just come to the table and negotiate in good faith and try and understand what consumers want and are willing to pay for.

I’d like to make two final points.

The first is that there’s an argument to make against me which says I don’t have the right to their content just because I’m not willing to pay their price. I understand that.

But it’s not just about the cost.

Even in cases where I am willing (and happy!) to pay what they ask – and actually buy the content vs renting it – with the transition to digital / streaming, they’ve taken away my rights by denying me the ability to actually own the content I’m paying for.

As an adult, when I watch a movie, I typically just want to rent it one time unless it’s something special or a favorite. But my kids will watch the same few movies over and over and over again. So it makes perfect sense to buy their movies instead of renting them each time.

But if I buy them a movie on our Apple TV, it’s not mine. Every time they watch it the movie streams from Apple’s servers. And that means we’re dependent on a working network connection, which isn’t always guaranteed and certainly isn’t a thing on road trips. (Please don’t bring up syncing purchased videos from iTunes to iOS. Apple abandoned that workflow years ago.)

Even if I were to go old school and buy a movie through iTunes and download it to my computer, that file is encrypted. At any point Apple could revoke my ability to watch the film. Or I could lose access to my Apple ID. Or the studio could simply decide to remove the video from Apple’s platform. In any of those cases, through no fault of my own, I lose access to something I’ve paid for.

And there’s no alternative. I could buy a physical DVD or Blu-ray, but the media companies lobbied Congress two decades ago to make it illegal to backup those discs either for safe-keeping or to just make it easier to watch.

My point is: If these companies were willing to meet me in the middle, to give back the rights to the content I purchase instead of just licensing it to me, then I’d be willing to respect their rights, too.

Steve agreed with this back in 2007

Why would the big four music companies agree to let Apple and others distribute their music without using DRM systems to protect it? The simplest answer is because DRMs haven’t worked, and may never work, to halt music piracy. Though the big four music companies require that all their music sold online be protected with DRMs, these same music companies continue to sell billions of CDs a year which contain completely unprotected music. That’s right! No DRM system was ever developed for the CD, so all the music distributed on CDs can be easily uploaded to the Internet, then (illegally) downloaded and played on any computer or player.

Until then, I’ll keep paying for my music. And everything else? 🤷‍♀️

Very Simple

I’ll keep this post short because there’s really nothing more of substance I can add to this argument that many developers and pundits way smarter than myself haven’t already said.

But I suppose it’s flaring up again in the community because of the hey.com controversy, the recent developer survey Apple sent out (my less polite response from last year), and WWDC looming next week.

From my point of view this is all very simple:

The App Store opened eleven years, eleven months, and seven days ago. It is not a game. It is literally the livelihood of millions of people.

The 30% shakedown has never been justified other than “we can”.

The capricious and inconsistent review process has never been explained other than “no comment”.

With all the awfulness and urgency in the world right now; and with all the good Apple truly is doing, it feels like a waste of precious attention and resources to complain about the App Store. But, hey, that’s business.

Antitrust.

Now.

GrannySmith

Update: Take a look at Iris

Inspired by a post I wrote last year, I’ve built something new that I’m ready to share and get feedback from the community.

After upgrading to Catalina I noted

Back in April I wrote a quick post about how I was backing up the shared iCloud Photo albums that my friends and family all use to send pictures and videos of our kids back and forth. A reader emailed me today to ask if I knew where that folder had been moved to after upgrading to 10.15. So, I looked, and, sure enough, that sharedstreams folder was gone.

And with it, my ability to keep backups of thousands of photos and videos of my children that our friends and family (and their grandparents) had taken and shared with us.

Why does that matter? Scott said it best…

When I look on my Mac, I find these pictures of my kids that, to me, are absolutely priceless. In fact, I have thousands of these photos. If I were to lose a single one of these photos, it would be awful. But if I were to lose all of these photos because my hard drive died, I’d be devastated.

I never, ever want to lose these photos.

And even before the upgrade to Catalina, sure, I could backup the items themselves. But there was no way to backup the six and a half years of thousands of comments and likes that our family had posted to those albums. My family uses Apple’s shared photo albums more than Facebook or Instagram. If all that historical data was lost? We’d be devastated.

And if I can go off on an even more personal tanget for just a moment…

I’m typing this after getting my kids (finally) to sleep by myself this evening because my wife is spending the night at her grandmother’s house – my kids’ great-grandmother. Thelma, a kind and generous woman, is going to leave us in the next day or two. And my wife volunteered to take the night shift tonight so she could be there with her.

When my son was born six and a half years ago – her first great-grandchild – Thelma taught herself how to use an iPad in her 80s. She read books, the news, and was quite possibly the most active commenter and “liker” of all the photos and videos of the kids we’d share using iCloud. Whenever I posted a new picture of the kids being silly, I knew, could almost time it to the minute, when I’d get a notification back that Thelma, home alone in her big house with coffee in hand, had tapped the like button or commented with a ?? emoji.

And so now I think about not just all the photos and videos – but the 65,234 comments across 16,752 items we’ve shared. (How do I know those exact numbers? I’ll tell you in a minute.) Each one may be insignificant by itself. But combined? They represent 2,596 days of shared family history.

And when I think about losing the post she made about our newborn son in the hospital? Or the one she commented on last week? Only because there’s no way to get access to that trove of data? It breaks my heart.

Fast forward to a few weeks ago, a reader emailed me to say

Hello,

I really like reading your blog (are we still calling them that?). In particular, your posts on backups always give me better ideas on how I want to organize and save my family’s data.

Your blog, more than any other source I can find on the web, talks about backing up iOS photos and Apple’s iCloud Shared Albums. In our case, we use the Shared Albums as the exclusive place for posting photos of our 3-year-old (turning 4 on Saturday) daughter for our family and close friends. It’s a great way to share photos with family that’s completely outside of the typical social media engines.

So, while we have a backup (well, multiple backups) of the originals, my wife pointed out that we don’t have a backup of that feed and, most importantly, our and our family’s comments. We’ve chronicled the last four years of our life via the photos and comments and had our family comment with lots of stories and encouragement that have been a great way to stay connected.

I hadn’t thought about it until my wife mentioned it, but I have no backup of those photo/comment pairings. It would take one mistake by Apple (I admit not likely) or a misclick on our part to accidentally delete that album and irretrievably lose all of that content.

Are you using your Shared Albums in that manner? If so, do you have any thoughts on backing that up or exporting everything? I’ll admit I don’t really have an idea of what that backup would look like.

I’ve even thought about taking screenshots of the photos with the comments turned on (though doing that several thousand times doesn’t sound fun). I could try to automate that process, but so far I’ve not found any way to get Automator to interact with the Shared Albums and their comments, though I admit I’m a novice at it.

I hope this finds you and your family well and healthy.

Best,

Chris

So I thought about the problem again, and remembered a throw-away idea I mentioned near the end of my original blog post.

At the top level is a Core Data database. I thought I might get clever and explore that to see if I could extract out the metadata of the shared items and use it to help me write a “smart” backup script (that perhaps imports other people’s photos directly into Photos.app) instead of just taking the brute-force approach and backing up the entire album as a dumb blob, but I haven’t had enough time yet to investigate.

Enough was enough. I built it.

The app is called GrannySmith (for now) and it reaches into your Photos.app library and provides a fast, clean, native interface for browsing, sorting, filtering, and exporting all of your shared photos and videos, comments and likes. You can view a combined stream of all your shared albums, or just a single album, or even filter and see posts made by specific people.

GrannySmith screenshot

Your images can be exported directly to disk in a date-based folder structure for easy backup.

GrannySmith screenshot

And if Photos.app doesn’t have the full-resolution versions cached locally, GrannySmith will download the originals from iCloud – even your videos. You can also generate a JSON file with all of their comments and likes – neatly tied together for you to do what you want.

One more thing.

I realize that as incredibly helpful as I find archiving my photos and videos and having all of that meta data available to me in JSON format, I’m not most people. And most people don’t speak JSON.

Two months ago I released Roland – a static website generator written in Swift. Well, Roland is now embedded in GrannySmith. And that allows the app to build an actual static HTML blog out of your shared photo history.

GrannySmith website screenshot

Just like your typical WordPress website, you can browse your chronological timeline of posts – sorted by date and category. And all the original comments that friends and family posted to your shared albums are reproduced as blog comments.

GrannySmith website with comments screenshot

You can keep the exported website as an offline copy. Or you can upload it and host it yourself. There are no dependencies – no PHP, nothing. Just plain, vanilla HTML. It even comes with RSS and JSON feeds, so your geeky friends can subscribe and get updates outside of Apple’s ecosystem.

And the entire website is backed by a completely customizable template system written in PHP. So you’re free to make your exported website look and feel however you want.

It’s still very early days, but GrannySmith is coming along nicely. Here’s a four minute preview video that walks through everything – including a full website export. It’s best if you watch it in fullscreen.

Current Status and How to Download

GrannySmith works but is missing some key features I plan on adding and is also completely untested on anything earlier than 10.15.4. I’d love to know how it works for you on earlier macOS versions.

Known Bugs and Limitations

  • Most egregiously, while you can export a website of your content, you can’t currently export that JSON backup I mentioned. (Key feature, I know.) Mainly because I haven’t settled on a final data structure for it.
  • The “Dates” filter button doesn’t work yet.
  • Switching between albums is way slower than I want it to be.
  • The website templates are currently buried in ~/Application Support/. They can be customized, but this current release will overwrite them on launch to make my debugging process easier. You’ll need to live with the default theme for now.
  • I happen to like using GrannySmith as a lightweight UI to view new items that friends share with me. And since it’s pulling directly from your Photos.app database, it updates in real time, too. That said, to keep from destorying your bandwidth, the app will not automatically pull originals from iCloud when just browsing. You’ll need to choose “Download Originals” if you want those cached locally to view. Otherwise, GrannySmith will fallback to displaying the lower-res versions that Photos.app already has.
  • Building a website will build all of your albums. Ideally you need to be able to build from only the selected ones.
  • Building a website will not automatically download originals. Instead, it will use your low-res cached versions. If you want orignials included in the website export, you can select and download all first, then build the website.
  • Videos do not currently play in the app. But you can export and view them.
  • I also want to add support for scripting the app via the command line or some other type of built-in automated task so you can have GrannySmith automatically do a backup of your latest items every night, etc.

I also want to point out that GrannySmith does not store or transmit your photos, videos, comments, etc. off your Mac. Everything is done 100% locally. I see none of your data and don’t want to see any of your data. Keep all those cute kid pictures to yourself.

Download GrannySmith

You can download the latest preview release of GrannySmith from here. The app will check on launch with my web server for updates and to submit crash reports.

As with all the dumb things I post to this blog, any and all feedback is very much welcome – especially on this project.

Do You Hear That?

Shortly into quarantine at the beginning of March, I realized I had a problem. My iMac has too many audio devices, and managing them was becoming a pain in the ass. And it was all because working full-time at home again, in this new age of frequent work video meetings, Slack and Discord calls, and dealing with two young, screaming kids with no school to attend, created a perfect storm of audio requirements.

Prior to being stuck at home, I would take all of my standup and other phone calls in my car on the way to work and then handoff to my AirPods to wrap up. And because my coworkers are nice people and we all typically leave each other alone to get work done, I was happy to sit in my quiet office all day and do my thing.

I don’t typically listen to music at work, so my AirPods only got intermittent use throughout the day which worked great.

But I soon found that working at home posed two new problems:

  1. Way more phone calls and video meetings. I was on so many that my AirPods battery life was precariously low at times.
  2. My kids are insane noise monsters. And getting any kind of deep, focused work was nearly impossible without some sort of music playing in my ears. The AirPods ended up getting way more use than normal, and battery life really became a gating factor.

So, I bought a decent pair of noise cancelling, over-the-ear Bluetooth headphones that can also connect to my iMac with a wired audio cable. They’re awesome. The battery life is 40+ hours on a single charge, and they block out my kids so well that my wife gets mad at me because I can’t hear their actual screaming anymore.

But here’s the problem. My iMac now has:

  • Built-in speakers
  • Audio cable line-out
  • AirPods audio out
  • Noise cancelling headphones audio out

And also

  • Built-in microphone
  • AirPods audio in
  • Noise cancelling headphones audio in

But it’s actually slightly more complicated than that. I mentioned above that my new headphones can be wired-in in case their battery dies. That’s great! But, when wired, the microphone doesn’t work. It’s only available while wireless.

Also, if you’ve used combined Bluetooth input/output devices like AirPods before, you’ll know that when the microphone is active, there isn’t enough bandwidth to do high quality audio out at the same time. So when my AirPods are connected listening to music, and I take a call, the audio out degrades. That’s fine. But then when the call is over, my music starts playing again and sounds like crap until I manually switch my iMac’s audio input to another device.

Add to that my new work from home requirements where I frequently bounce between music, Slack calls, Discord video chats, RingCentral meetings, actual phone calls, etc. Basically, it just became incredibly annoying to keep digging into the Sound panel of System Preferences or option-clicking the volume icon in the menubar to make fiddly adjustments.

And, oh my god, don’t even get me started on the nightmare that is sharing AirPods between an iPhone and Mac that are within range of each other. (As a stupid joke, I very nearly bought www.haveifactoryresetmyairpodstoday.com and filled it with a giant YES just to put into this blog post.)

Anyway, all I wanted was a super-simple, fast audio input/output switcher app. I swear there used to be something out there that did this, but my googling failed me.

I already own SoundSource from the amazing (incredible?) software wizards over at Rogue Amoeba. (Seriously. Go buy it.) And while it will totally perform the audio adjustments I want and then some, it’s a mouse-required type of app. As readers of this blog will know, I’m a keyboard junkie. So if I’m going to be forced to use a mouse, I might as well just go ahead and use the native macOS volume menubar icon.

So I did what I always end up doing, and wrote the app I wanted for myself. It’s called Ears. And you can have it, too.

Ears for macOS app icon

The idea is simple. Press a hotkey and Ears opens. And still without touching a mouse, pick a new audio output or input (or both!) device, and be done. That’s it.

Here’s Ears in action.

In that video you can see me summon Ears with a hotkey, and then move up and down and between the two lists of input and output devices to select what I want, and then press return to dismiss. It’s that simple.

But it can be even faster than that. You don’t have to use the arrow keys to navigate up and down and between the lists. Your output devices are numbered 1 through 9. And your input devices are A through Z. Just type one of those keys and Ears will select each device.

So, if your global Ears hotkey is ^4 (that’s mine), then in this screenshot…

Ears audio device picker window

opening Ears and picking my headphones as output and internal iMac microphone as input is simply:

^4 3 a ↵

But, we can actually make it even faster than that. There’s a setting in Ears Preferences called “Change devices immediately”.

Ears Preferences window

If that’s enabled, then typing a device number/letter will instantly switch to it and dismiss the picker window. So, if I just want to switch to my headphones, my keystrokes become:

^4 3

Boom. Done. ?

Ok, but can we make it even easier still? You betcha.

This isn’t something I had initially planned to add into the app when I built it. My original goal was to make it purely a way to change audio devices. And so this extra feature was added just because it seemed to make sense – even though I feel bad about it because it treads so closely to the great work done in ToothFairy by Michael Tsai and AirBuddy by Guilherme Rambo. (I own both!)

If you enable Ears’s “Auto Connect” feature, you can mark Bluetooth audio devices as favorites. And then pressing the “Auto Connect” hotkey will instruct your Mac to search for a favorite device and attempt to connect.

Auto Connect is flexible, however. Your favorite input and output devices don’t have to be the same ones. You can set your AirPods as a favorite output device and auto connect to them, but your audio input can remain with whichever device was already selected. That way, your AirPods music won’t degrade in quality. You can set any combination of devices with any combination of inputs and outputs.

And, now, finally. One last incredibly nerdy feature of Ears that I’m hoping appeals to at least one other person than myself.

Ears is scriptable.

Both from the command line and via AppleScript.

> Ears --help
USAGE: ears [--input <input>] [--output <output>] [--list-outputs] [--list-inputs]

OPTIONS:
  -i, --input <input>     The audio input device to make current.
        The name must be an exact match.
  -o, --output <output>   The audio output device to make current.
        The name must be an exact match.
  --list-outputs          Show available output devices.
  --list-inputs           Show available input devices.
  -h, --help              Show help information.

> Ears --list-outputs
*Soundcore Life Q20
External Headphones
iMac Pro Speakers

> Ears --output "External Headphones"
> Ears --input "Tyler's AirPods"
tell application "Ears"
    set audio input "Soundcore Life Q20"
    set audio output "iMac Pro Speakers"
end tell

You can set your active audio devices and also query a list of available devices on the system and read which ones are active.

So that’s Ears. I built it to solve my own, dumb workflow problems and find it super useful every day. I hope you do, too.

Ears is completely free to use, but if you find the app helpful, I would love your support. You can make the nag screen that opens when the app launches go away forever with a one-time, pay-what-you-want purchase.

Absolutely Priceless

Scott said it best fourteen years ago at WWDC 2006.

When I look on my Mac, I find these pictures of my kids that, to me, are absolutely priceless. In fact, I have thousands of these photos. If I were to lose a single one of these photos, it would be awful. But if I were to lose all of these photos because my hard drive died, I’d be devastated.

I never, ever want to lose these photos.

Just in case anyone is still worried about all those irreplaceable memories – and the years of comments and likes from friends and family that go along with them – I’m workin’ on it.

Preparing For Work Meetings

I have too many meetings at work. (But that’s a topic for another day.) And I take very detailed notes during each one so I have a running history of our project I can refer back to, so I know what’s expected of our team, and what we expect from the other groups we work closely with.

There’s nothing unique about that. It’s just meeting notes.

But what I want to share today are two quick iOS Shortcuts I use to prepare for each meeting.

Almost every single note I take – whether it’s a throwaway idea, a reminder, the beginning of a blog post, or meeting notes – starts in Drafts. If whatever I’ve written ends up just being temporary, it says in Drafts and I archive it when done.

But anything else that may need to be referenced again in the future gets moved into Ulysses for permanent storage or final editing.

All of the meeting notes I take and keep in Ulysses follow a standard format that makes them easy to find, reference, and work from. Here’s an example:

# 2020-05-22 Dev questions with Product team about new feature 2:30pm

Johnny Appleseed
Tyler Hall
Bob Costas
x Tom Waits
Bonnie Raitt
x Michael Stipe
Leroi Moore

## Prep Thoughts

- Question 1 is about something something we need to have this and this defined before we can begin.

- How is this UI thing supposed to animate under this condition?

- etc

- etc

Have they considered that the fidget doodad might not correlate to the blippy bob when the furnitzer does its thing?

## Notes

BC said jumble pony will contaminate the water on 2020-07-10.

https://link.to/prototype-screens

BR promised final copy and translations by EOD Tuesday.

Lorem ipsum dolor sit amet, consectetur adipiscing elit, sed do eiusmod tempor incididunt ut labore et dolore magna aliqua. Ut enim ad minim veniam, quis nostrud exercitation ullamco laboris nisi ut aliquip ex ea commodo consequat. Duis aute irure dolor in reprehenderit in voluptate velit esse cillum dolore eu fugiat nulla pariatur. Excepteur sint occaecat cupidatat non proident, sunt in culpa qui officia deserunt mollit anim id est laborum.

It’s a very simple structure written in Markdown that I’ve settled on over the years.

The H1 header is the meeting date in YYYY-MM-DD format followed by the title of the calendar invite and the start time. By always beginning with the date in that format, it

  1. Makes it easy to search/filter for things that happened on a specific day or year/month combination.
  2. Ensures my notes can be sorted chronologically by title (filename) – just in case their creation or modification dates (which I typically sort by) get messed up.

Next up is the list of attendees included on the calendar invite. Once the meeting begins, I put an x next to anyone who didn’t join. If you’ve ever worked with someone who is flakey and/or unreliable (or a professional gas lighter), it can be extraordinarily helpful to have a record of every scheduled meeting they skipped out on. CYA, folks.

The first H2 is a section where I add any thoughts / comments / research I do before the meeting begins that I want to be able to reference or remember to ask questions about.

And, finally, the ## Notes section is just that – the notes I take during the actual meeting – not to be cross-pollinated with the notes I prepare for myself prior to the start.

Anyway, none of that is special. It’s just simple and works for me.

For a long time, I’d have to create a note in the above format for every meeting by hand. Not only that, but I’d have to remember to do it ahead of time or else I’d be stuck scrambling to jot down my thoughts when my calendar alerted me it was time for the meeting to actually start.

Here’s the two iOS Shortcuts that fix that for me.

The first is called “Meeting Template”. When I run it on my phone it

  1. Finds all of my Not All Day events in the next 7 days on my work calendar that don’t include the word standup. (I have a separate folder of notes just for standup logs.)
  2. Presents a menu for me to select one of the events.
  3. Grabs the name of the calendar event
  4. Grabs the event’s start time and date
  5. Gets a list of the invited attendees
  6. Combines all of that info into my standard (empty) note format
  7. Sends the new note to Ulysses and puts it in a specific folder with all of my other work meeting notes.

I’ve added that shortcut to the widget section on my phone’s Today screen (or whatever that left-of-home screen is called), so I can swipe, tap, pick an event, and I’m done.

I almost exclusively take notes on my Mac, so I wish I could run this shortcut on macOS itself, but I always have my phone with me and Ulysses’s cross-device sync is so wonderful the new note is nearly instantly available on my Mac to begin working with.

The last puzzle piece is actually remembering to do any preparation for the meetings that require it. Not every meeting needs hours of research or prototypes built ahead of time, but it’s usually helpful if I do at least give each upcoming meeting a few minutes of thought beforehand.

So I have one more Shortcut that helps me remember to prepare.

Whenever I receive and accept a new work calendar invite, I’ve trained myself to remember to run the following shortcut that

  1. Finds the same set of events as the previous Shortcut.
  2. Prompts me to pick one (usually the meeting that I just accepted).
  3. Asks me how far in advance I’d like to be reminded to prepare.
  4. Adds a new event to my calendar named “Prepare For ‘The Title of the Original Meeting'” scheduled in advance for the amount of time I picked in step 3.

These new events are, literally, reminders and could just as easily be added to Reminders.app, OmniFocus, or your todo app of choice.

But – given how my brain works – I think of them more as dedicated blocks of time that I need to carve out of my schedule to make sure I do the prep work needed.

My todo list, my reminders, even when I assign a due or defer date, still typically remain fluid and can be rearranged (within reason). But calendar events are scheduled, dedicated times to do certain things.

So, for most meetings, I just schedule the reminder an hour or two in advance if there’s any preparation to be done at all. But for other more in-depth meetings where I might need to prepare a demo or diagram to help convey my thoughts visually, those take time and I schedule my reminder event far enough in advance to account for that.

StopTheJeff

Jeff Johnson is my favorite kind of developer. He’s stubbornly pragmatic in solving the most infuriating types of problems that customers face: The myriad software paper-cuts forced upon us by large corporations trying to squeeze an extra penny of engagement out of every user and the skeezy, underhanded, web developers exploiting our every click.

This post is my next in the ongoing series I promised to write about my favorite apps in support of #IndieSupportWeeks. I’ve been meaning to write about Jeff’s apps for a few weeks now, and today’s blog post about his newest creation finally forced my hand into doing so. It’s just too deviously clever an app not to write about.

But first, let’s talk about his main app: StopTheMadness.

(Actually, first, just go buy it. Then come back here and listen to me tell you why you should be glad you did.)

StopTheMadness isn’t really an app. It’s a native, modern Safari extension.

Of course, these days, you can’t actually just make a browser extension for Safari. You have to bundle it inside an app – even if that app does nothing other than tell you “Hey, dummy. Go open Safari”.

Which is why the extension I use to display an RSS feed button in my browser toolbar comes with an app that doesn’t actually do anything.

(I think the whole extension app requirement comes from a good place, but not one that was ever fully vetted-out to consider how Pro users – the ones most likely to actually use browser extensions – want to use them. It reminds me of Apple’s early iPhone OS recommendation (requirement?) that third-party apps put their settings in a bundle inside Settings.app. I mean, I get it, I guess. But that’s sort of like opening a System Preferences pane to change the background color of your text editor. I’m glad the platform has moved away from that.)

I digress.

Anyway, StopTheMadness is a browser extension that stops all the dumb websites out there from doing all their dumb things.

Stuff like preventing you from copying and pasting – or pasting specifically into a password field for sEcUriTy reasons. Or disabling contextual menus. Or blocking text selection. The list goes on. All those user-hostile decisions that are typically dictated to a lowly web developer by middle management.

You can enable / disable features globally or on a per-website basis.

You can even configure Jeff’s extension to always open certain websites with a specific browser other than Safari. That’s excellent if you’re like me and prefer to do all of your Google apps in Chrome, while remaining logged out in Safari.

StopTheMadness is a veritable cornucopia smorgasbord of solutions for the web’s worst offenders.

I can hardly believe I’m saying this, but it’s a rare example of JavaScript being used for good. It’s a digital condom for your web browser. (I so, so hope Jeff uses this paragraph as a testimonial on his website ?)

It’s such a great, niche idea for an app aimed squarely at folks who care about their interaction with technology. It’s a perfect fit in line with Apple’s user-focused ethos at a time when so much software prioritizes profits over user experience.

It’s also a brilliant display of brute-force pragmatism to just fucking fix a problem at all costs that was likely bugging him personally, and then organically grew into a full product.

Which leads me to his other app that debuted last May. StopTheNews.

Have you ever been annoyed that Safari on macOS 10.14 Mojave wants to open Apple News articles in News app instead of in Safari? Well no more! I’ve just released a new, free, open source Mac app called StopTheNews that stops Safari from opening Apple News articles in News app. Instead, StopTheNews opens the original article URL in Safari.


I mean, come on. How can you not love an app that works around Cupertino’s pathological denial that the web is (at times) a valid medium for consuming content and uses their own system hooks to stop them from forcing you into an app that redisplays that same content also using web technologies?*

And now, today.

StopTheTwitter.

What began as a lone cry for help on the Nightmare Website, turned into a working solution eighteen days later.

I think my tweet-rant describes the problem well enough, but just in case you’re not convinced. Look at the magical user experience that happens now that Associated Domains have been brought to macOS. Here’s a video of me – right now – editing this blog post. I wanted to re-visit my tweet that I linked above, so, naturally, I clicked the link in my literal text editor and…

it bypasses my browser and opens the goddamn Twitter app instead.

_sigh_

Oh my goodness. I was very close to wrapping up this post just now when a developer friend messaged me:

That’s one of those bizarre bugs that are, in fact, so bizarre you can’t even tell if they’re really happening or if it’s just you the user (or you the developer) screwing something up. Even when you see it happen over and over again for months. You still don’t file a radar because you can’t reproduce it or even be sure it’s a legitimate issue. But, wow. Finally having confirmation that it’s not just you? That’s a great feeling.

Right. Ok.

The end of this post went off the rails and turned into an unintentional rant. That wasn’t my goal.

My point is go give Jeff’s apps a try. They’re clever. Well made. And solve a real experience problem that I know many of us face. He’s a solo developer doing good work for all the like-minded Apple customers out there.

I’m now going to go file that bug report.


If the Apple News apps are not actually complicated wrappers around a webview, I would love to be told otherwise and will gladly retract my snarky statement and post a correction. I know they’re Catalyst amalgamations, of course, but I still assumed WKWebView was underneath it all.

Additional MailMate Tips

I received a ton of great feedback from visitors about my MailMate love-fest earlier this month. Most people didn’t know the app existed. So, here’s a few more details around how I have my setup configured along with the hidden preferences I’ve enabled.

Here’s my copy of MailMate:

MailMate window

On the left is your typical macOS source list with all of my mailboxes and smart folders. I’ll describe those later. But first, the three-pane main view.

At the top, outlined in red, is the message list. When Gmail came on the scene in 2004 and introduced email threading to the masses, it was a revelation. And I stuck with a threaded inbox view even after I switched my personal email account to Fastmail.

But maybe a year ago? I was digging through my archives trying to find a specific conversation with a customer, and I found it easier to do my research when I reverted back to a standard, chronological list of my messages. After fifteen years of only looking at threaded conversations, this “new” view just sort of…stuck? And it’s been my default MailMate view ever since.

Don’t get me wrong, MailMate has excellent support for organizing by threads. It even offers an amazing feature I’ve never seen in any other email client – showing the total number of messages in a thread and then allowing you to sort by that count. For example, here’s my threaded customer support archives sorted by longest conversation.

MailMate window

The right-most column shows the number of emails in each thread. Apparently one customer and I exchanged 57 replies!

Going back to the first screenshot, the bottom area outlined in green is the currently selected email. Even though MailMate is optimized for sending plain text (and HTML using Markdown) emails, it renders HTML messages just as well as any other client. Unlike most iOS email apps I’ve tried (as well as a good number of macOS apps), I’ve never encountered any significant HTML rendering bugs – even from the most ridiculously formatted mailing lists or advertisements.

As I said above, I prefer a chronological inbox with one email per row. However, I do find it incredibly helpful to see – at a glance – previous correspondence with the sender. All modern email clients offer threads, which is great, but MailMate offers an instant correspondence view (what I call a “history” view) that shows every email you’ve ever exchanged with that person – regardless if it’s part of the current conversation. And that’s the area outlined in blue.

MailMate window

I have a pretty good memory for my customers, but I find it invaluable to instantly see previous conversations I’ve had when someone reports a bug or has a question. The correspondence view also (accidentally) gives me an ad-hoc view into their order history. Because I bcc myself on every order receipt and serial number lookup, when I select their support email, the history view shows an email for every order they’ve placed, etc. It’s a crazy-useful feature.

Next up, the sidebar.

Inboxes are inboxes, so I’ll skip those. But the purple folders are smart mailboxes. And MailMate has by-far the smartest and most powerful search and filtering capabilities of any email client I’ve used. Here are the four main smart folders I’ve added to my top-level view:

Bills

This mailbox simply searches for the word “bill” in the subject or body of the email. I know, that’s a stupid simple rule. But, it works!

MailMate window

Newsletters

I have a secret email address that I only use for subscribing to newsletters and mailing lists that I actually want to read. This smart mailbox filters on that as well as for a number of From: senders that I signed up for long ago before I started using a dedicated newsletter email address.

I really like having all of these emails organized into a single view. I get too many to read everything. But, when I have time, I can quickly dip into the recent stream of updates and then jump back out – almost like a lower priority and less urgent RSS reader.

Notifications

I mentioned above that every email my backend system sends to a customer is automatically BCC‘d to me just so I can keep an eye on things. For branding reasons, many of those emails come from different addresses based on what product they’re concerning or the reason for the email. This mailbox has smart rules defined to collect all of those.

Orders and Receipts

Finally, my Orders mailbox gathers all online orders, receipts, etc. It does this by searching for the keywords “order”, “receipt”, and “invoice”.

MailMate window

Again, it’s a really simple search to setup, but it works wonderfully for my needs.

MailMail Hidden Preferences

The MailMate manual has an entire section on hidden preferences that aren’t exposed through the GUI. Feel free to read through everything that’s available. Some of them are so useful, but also so esoteric, that I keep an updated shell script in Dropbox with all of my customizations that I can re-run if I ever need to setup a new computer.

defaults write com.freron.MailMate MmDockCounterFontSize -float 48.0
defaults write com.freron.MailMate MmDockCounterFontSize -float 36.0
defaults write com.freron.MailMate MmShowAttachmentsFirst -bool YES
defaults write com.freron.MailMate MmAttachmentButtonsOnLeft -bool YES
defaults write com.freron.MailMate MmSingleMessageWindowClosesAfterMove -bool YES
defaults write com.freron.MailMate MmComposerInitialFocus -string "alwaysTextView"

Dock Counter Font Size

I keep my Dock resized to be pretty small on screen, and I find the default badge sizes hard to read when I’m leaning back from my screen. Bumping up the font size is a nice touch for my fast-approaching-forty eyes.

Attachments Up Top

I never understood why MailMate defaults to showing an email’s list of attachments at the bottom of the message – offscreen if the message has to scroll. This bool makes them up appear at the top of the message view.

Close Window after Move

Does just what it says. If you’re viewing an email in a separate window, when you file away the message into a folder, MailMate will also close the extra window.

Give Composer Initial Focus

When you set this preference, pressing ⌘N to create a new email will focus the body of the message so you can begin typing right away – as opposed to focusing the To field.

So that’s a bit more about my MailMate setup. There’s a ton of additional tweaks, customizations, and power features you can set to bend the app exactly to your liking.