After migrating my company’s email away from Gmail a few years ago, I’ve become firmly entrenched with Apple’s Mail.app on the desktop. Everything works great, but I do miss having access to Rapportive’s Gmail extension. It’s great at providing extra information related to the person you’re emailing with. To make up for this lack of functionality, I’ve created a quick AppleScript that automatically opens up a new Mail window and finds any previous conversations I’ve had with the sender. I use it all the time whenever a customer emails so I can quickly see any past conversations.
I’ve built the script into an Alfred workflow that lets me run it via a keyboard shortcut. For Alfred users, here’s the workflow. And the raw AppleScript is below for those of you using FastScripts or some other script launcher.
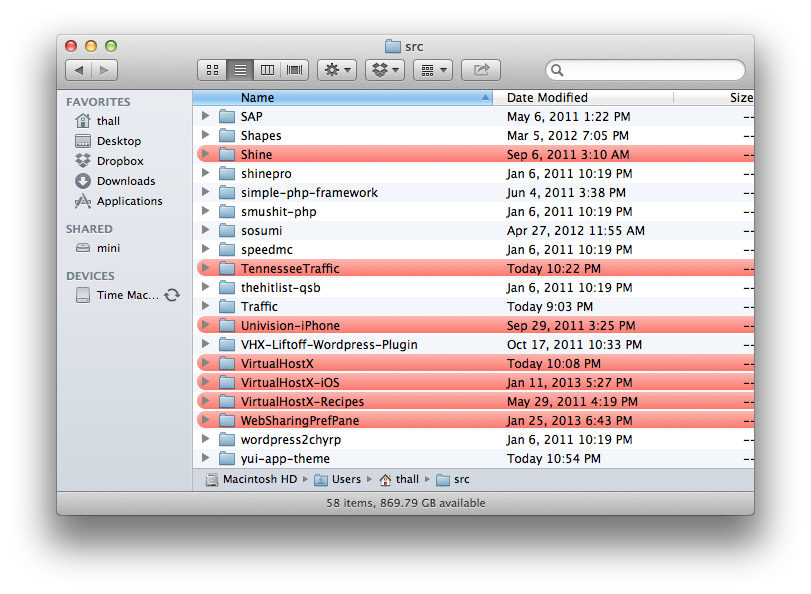
Last week, I finally got around to building the number-one VirtualHostX feature request groups/folders in the sidebar. I had put off implementing this feature for years because I never knew quite where to start when it came to Core Data and NSOutlineView. But, with VHX 5.0 coming out later this year, I decided to lock myself in my office and not come out until I had a sorted, drag-and-droppable, outline view working. In the end, it only took about three hours to get all the pieces in place. And while I’m not quite ready to release this feature to my users, I thought I’d jot down some tips and code snippets that I found helpful while it’s still fresh in my mind. Google wasn’t particularly helpful with any recent results on the topic, so maybe this’ll be found by someone struggling with the same problem.
Setting up your XIB
In your Core Data model, create a one-to-many relationship called children pointing back to your same entity. Then create a corresponding one-to-one relationship called parent back to the same entity. The trick here is that you’re not going to have an entity for groups/folders and then another entity for your actual items (in my case, virtual hosts). They’re all going to be the same entity, but with a property called isFolder that allows you to differentiate between the two types.
In your NIB file you’ll need an array controller bound to your NSManagedObjectContext, set to Entity mode, and with a Fetch Predicate of parent == nil. This will fetch our top level objects entities without a parent. Next, create a tree controller with its Children Key Path set to children, set to Entity mode, and its Content Array bound to your array controller’s arrangedObjects.
Finally, drag an NSOutlineView to your NIB. Set its dataSource and delegate to one of those blue NSObject’s, which you’ll subclass to be an OutlineViewController you’ll create in code later on.
OutlineViewController.h/m
Connect the IBOutlets back to the appropriate objects in your NIB.
Here’s the first big chunk of OutlineViewController.h/m
Managing the outline item’s expanded state
We’re so spoiled with how much crap work Cocoa handles for us, I naively thought that NSOutlineView would just automatically remember the collapsed/expanded state of the items in my tree. It turns out, there is a way to have NSOutlineView persist those states to NSUserDefaults, but I could never get that to work. So I just do it all manually it’s not that hard. Just add a BOOL to your Core Data model called isExpanded and then further down in OutlineViewController.m
And then subclass your NSOutlineView’s reloadData method to be:
And that’s basically it. Overall, not as much code as I would have expected (thanks to bindings, natually). Hope the above code helps anyone tackling the same problem. Much of my code was discovered/cribbed from this great blog post on the topic from a few years ago.
My Pebble arrived last week and I’ve been geeking out over it ever since. I’ve been thinking a lot about wearable tech the last few years and signed up immediately when Pebble was first announced last year. (I can’t wait to see what Apple can do in this space.)
So with a full week of Pebble use under my belt, I decided it was time to do something super geeky with my new smart watch. PebbleCam is the result of a few hours this afternoon tinkering around in Xcode.
In a nutshell, PebbleCam is an iPhone app that lets you use your Pebble as a remote shutter for the phone’s camera. You launch the app and it displays the camera. Prop the phone up, put it on a tripod, whatever, then get you and your friends in to frame. As long as you’re in Bluetooth range, clicking the “play/pause” button on your Pebble will snap a photo and save it to your phone’s photo library.
How does it work?
Currently, there’s no way to communicate from Pebble back to the phone except for the music control buttons. To take advantage of that, the app plays a blank MP3 file in the background and then listens for any remote control events (play, pause, next, previous) to come in via the Pebble. When a play/pause event occurs, the app snaps a photo and saves it to your phone’s photo library.
The code is fairly straightforward and is available on GitHub. Anyone in the iOS developer program can download the code and install the app on their phone. And for you jailbreakers out there, I’ve committed an .ipa file you can download
In the next update, I plan on assigning the next track button to change the camera from rear-facing to front-facing. That leaves one button left (previous track) to play with. Any ideas on what I could assign it to?
If there is enough interest, I’m not opposed to submitting the app to Apple for inclusion in the App Store. (I don’t see any reason why it wouldn’t be accepted.) However, before I do that, I’d need someone to create an icon for the app. Right now I’m using the official Pebble iOS app icon with a camera photoshopped on top.
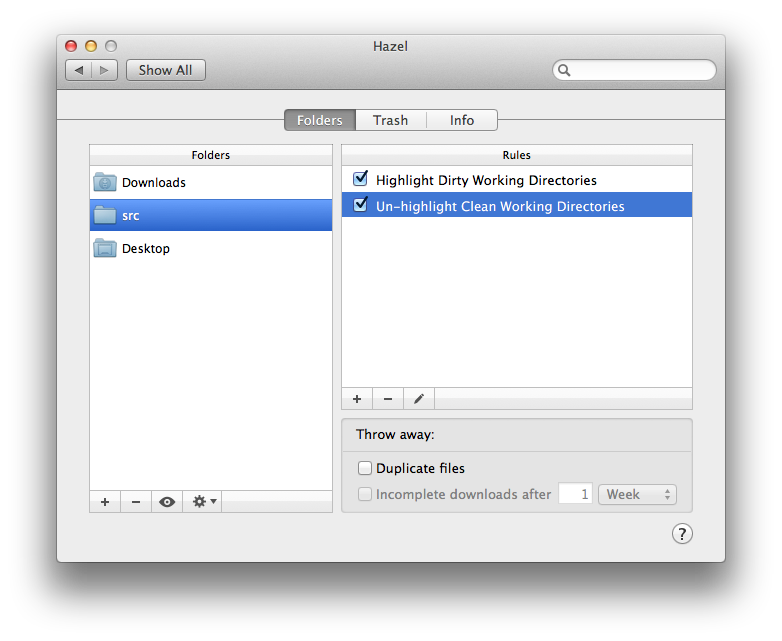
Today I thought I’d share one of the more esoteric Hazel rules I use to monitor the files on my Mac. (If you’re not familiar with Hazel, an indespensible Mac utility that everyone should own, here’s a brief intro.)
This rule monitors the folder containing all of my git repositories and highlights any sub-folders that have uncommitted changes. At the end of a work day, it’s a great way to see at a glance which projects have unsaved changes.
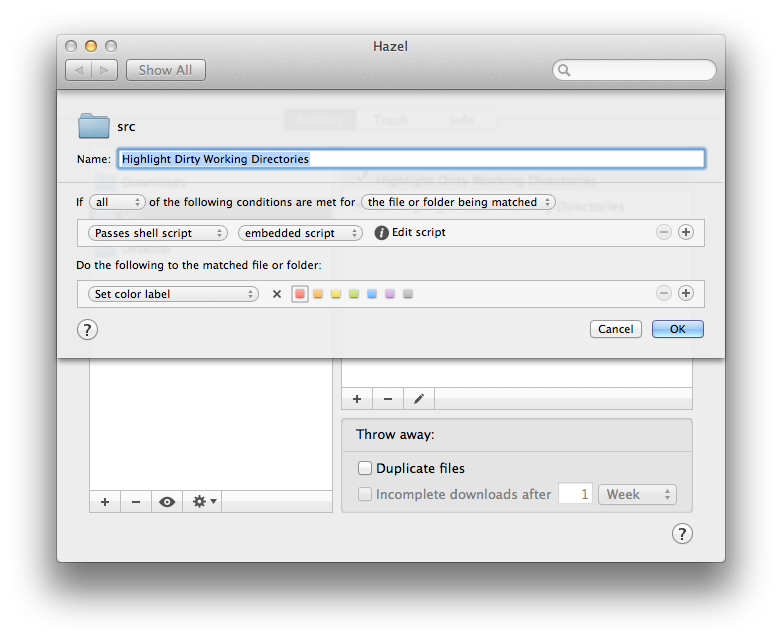
Here’s a screenshot of my Hazel rules…
And here’s the shell script that is embedded in rule #1…
dirname=$1
if [ -f $dirname ] ; then
    dirname=`dirname $dirname`
fi

cd $dirname

if git status | grep --quiet "working directory clean"; then
    exit 1
else
    exit 0
fi
As you can see in the first rule, the shell script changes directories into the git project and then pipes git status through grep to check for any changes. Any modified working directories are matched and highlighted red in the Finder.
The second rule un-highlights any folders which don’t get matched – folders with clean working directories.
If you’d like to import the rules into your own copy of Hazel, you can download the rules here.
Two and a half years ago, when I first wrote about how I use OmniFocus, I was working a full-time job in addition to my committments at home and my freelance work. A year ago this week, I left my day job and ventured out on my own — devoting myself full-time to building my own apps and the occasional freelance job. That’s neccessitated a change in my OmniFocus setup — particularly with how I structure my contexts, start dates, and due dates. Today, I’d like to go over how these things have changed and the system I’ve settled on. (I think I got the idea for this system from either David Sparks or Simplicity Bliss. I can’t find their original link right now if I did, my apologies.)
Contexts for People Who Work at Home
The biggest change in my routine is that I no longer go into an office every day. Occasionally I’ll work from a coffee shop, but the majority of my work day is now spent in my home office. This has caused me to rethink how I structure my contexts.
I’m not a strict adherent to David Allen’s Getting Things Done system, but I follow it fairly closely. If you’re familiar with the system you’ll know that when choosing what to do next, he says there are four criteria you can apply, in this order:
Context
Time available
Energy available
Priority
Allen defines Context as “the first factors that limit your choices about what you can do in the moment.” He lists factors such as being at a specific location (home, work) or having a particular tool (phone, computer) at hand.
Previously, I had seperate contexts for Home, Work, and Phone — plus contexts for Errands and any people/coworkers I’ve delegated tasks to. Now that I work from home, that’s changed. Here’s why.
The location requirement makes sense for people who have a regular 9-5 office job, but not so much for folks who work at home. Except for errands, most everything on my todo list can be done at home.
Also, as third-party apps improve and gain functionality on my iPhone and iPad, the requirement of having access to a specific tool is rapidly going away. I always have my phone with me, and if I’m home, I always have ready access to a computer or iPad.
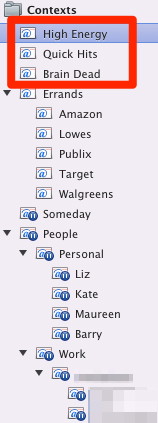
Practically speaking, this means I’ve gotten rid of my Home, Work, and Phone contexts and replaced them instead with labels that borrow traits from Allen’s “Time available” and “Energy available” criteria. My new context list looks like this:
Since I’m now “always” at home, my next actions are better decided based on my mood and how much time I’ve got available.
High Energy is for actions that require my full attention. Things such as a writing this blog post, fixing a bug in one of my apps, etc.
Quick Hits are items that I can just bang my way through, quickly. Anything that will take less than two minutes to finish goes in here. Knocking this list out all at once in the morning is an easy morale boost for me.
Brain Dead is just what it sounds like. These are things I save for when I’m low on energy at the end of the day or anytime I just don’t have the mojo ready to do real work. Stuff like paying bills, scanning any papers I’ve got laying around, or changing lightbulbs.
Those three contexts encompass everything that was previously in my Home and Work buckets.
The rest of my contexts haven’t changed. I still keep my Errands context organized by store — each of which is GPS tagged in OmniFocus, so my tasks automatically pop-up on my home screen when I’m near the store. And for any tasks I assign to another person, I keep a context for them under People, which is on hold so the tasks don’t show up in my list of available actions.
Start and Due Dates
The other big change in my OmniFocus habits I’ve noticed since leaving my day job is how often I assign start and due dates.
An amazing (and perhaps obvious) result of working for yourself is that you rarely find yourself up against hard due dates. Now that I’m my own boss, I definitely push myself to get things done by a certain time, but if they aren’t? It’s not a big deal. I can just push them off to the next day.
This means in almost every instance where I (or my boss) would normally assign a task a due date, I instead give it a start date. It’s great because items I can’t currently work on stay out of my view and only show up when I’m ready to work on them.
Replacing due dates with start dates has dramtically increased how often I add something to my inbox. I used to worry about adding trivial small reminders because I didn’t want them clogging up my task list. But now that I’ve discovered the power of start dates, I throw everything in there with a start date, knowing it won’t appear until I can actually do something about it. An added bonus is that OmniFocus rarely shows an overdue or due soon badge, which means if one does appear, I know I really do have something due. Less false positives mean I pay better attention and am less prone to ignoring the warning.
Mandatory Conclusion
So that’s it. Working from home has been a big and very much welcome change. And as my work habits have changed, so has the way I use OmniFocus. And, as usual, it’s kept up like a champ.
Like most of you reading this, I have my iPhone with me 24/7. Lately, I’ve caught myself compulsively checking it for new notifications. Even when it hasn’t made a sound or buzzed recently, I still have the habit of hitting the home button just in case there’s a missed notification on the lock screen. I was starting to remind myself of a gambler pulling a slot lever thinking just-one-more-time-maybe-this-time there will be something there for me. It’s an addictive pattern and one that I wanted to try and curb if not break.
I decided to try and pare down the number of notifications I get throughout the day by turning off everything that wasn’t necessary. But what’s necessary? I scrolled through my Notification preferences in Settings.app and was shocked at just how many apps are setup to send push alerts. Most, while well-meaning, aren’t that important. I ended up turning off everything except SMS, Twitter, and email.
I left those three enabled because I reasoned anything that comes through one of those channels requires an immediate/timely response. No one sends me text messages except friends, family, and my bank. And while I could probably do with fewer Twitter @replies, I do get quite a few tweets from customers looking for help. I definitely want to reply to those quickly when possible. That leaves email, which I started to think more about. I realized very rarely do I get any one email that requires a fast response. In most cases, I’ve learned customers expect a reply within a business day. Responses within a few hours (or even less) are just gravy. With that in mind I turned off email notifications, too.
But then I took it a step further and actually removed my email accounts entirely from my phone. It was a spur of the moment decision. The rationale being that I’m already sitting in front of a computer nearly twelve hours a day with Mail.app open. Every time I got an email Mail.app would chime, my phone would buzz, and my iPad would ding as well. Definitely no need for all three. And for the time times I’m out of the house with just my phone, I don’t really need email, do I?
And so that’s what I did for the next two weeks. No notifications except for texts and Twitter. And email completely removed from my device.
How’d it go? The best way to describe it is similar to cutting out caffeine cold-turkey. I have to admit I was a little twitchy that first week. Even though I knew there was nothing to look at, I still had to stop myself from tapping the home button from time to time. But eventually that feeling began to fade. In its place was a . . . comfortable quiet. I found myself leaving my phone in other rooms rather than always keeping it in my pocket. Hours would go by without thinking about what I might be missing. It was a nice change.
The only problem I encountered were a few times when I was out and needed to reference something in my email. In one case I had an address saved in an email I needed to lookup; another time I needed to show a barcode in a PDF attachment to get into a Washington Nationals baseball game.
I figured those two cases were enough reason to re-enable email on the device. BUT, I didn’t turn on email notifications. Instead, I set my email to only fetch manually when I open the app. I found that setting to be a nice compromise. No more unnecessary alerts but access when I need it.
And so that’s the way I’ve left things for the last two weeks. Now, if my phone buzzes in my pocket, I know it’s either a text or someone on Twitter trying to reach me. I no longer take my phone out just to find a useless spam email. It’s taken some getting used to, but overall my mind feels less busy. And that’s a good thing. I highly recommend it.
I’ve writtentwice before about how important it is to have reliable, automatic backups running on all of your machines. I’m especilly thankful for mine this weekend.
After travelling for the American holiday, I returned home to find my iMac in an unbootable state. I’m not sure what happened exactly — all I could tell is that a hard drive error occurred around 3am one night, corrupting the system. Disk Utility, which often works magic, couldn’t fix the error. But, not to fear, four hours later Time Machine had me back up and running exactly where I left off.
The best part of the whole situation is I was never once worried. Between Time Machine, Dropbox, Backblaze, and GitHub, I knew all of my data was safe.
I can’t encourage you enough to take a moment right now during this holiday weekend and make sure your backups are in place and working. (Make sure you test them, too! A backup you can’t recover from does you no good.) And, if they’re not, take my advice and set them up now.
Back in August I wrote about my experience switching this blog from WordPress to Jekyll. Three months in, I’m happy to report everything is going swimmingly. I survived a few high traffic moments from Hacker News and was thrilled to see the site stay up even when I managed to break MySQL on the server.
The only issue I’ve faced is a higher barrier to writing new content. Switching away from WordPress means I had to give up their web interface and one-click posting. Instead, my workflow is
Write a post using some text editor – typically TextMate on my laptop.
Preview and double-check that the rendered Markdown content is correct.
Commit the file into git.
ssh into my web server
git pull the new post
Run jekyll
As you might imagine, steps three through six are a little annoying. They’re just invasive enough that I dread — just a little bit — adding new content and especially correcting typos.
What I want is something more automatic. Thanks to Dropbox and a little server side magic, I’ve got a solution that completely eliminates those last four steps. And while I know I’m not the first person to come up with the following solution (although I’m having trouble finding another example online at the moment), I do want to document my setup both for my sake and anyone else looking for the steps involved.
Here’s what’s going to happen:
Write a post using markdown and save it into the _posts folder of my Jekyll site stored in Dropbox.
The file gets synced to my server which is also running Dropbox.
A cron job on the server notices the new file and automatically runs Jekyll, updating my site with the new content.
Other than actually writing the content, everything else is automatic. The whole system took about twenty minutes to setup. Here’s how…
Configuring Dropbox
I’m assuming you’ve already got a Jekyll site built and stored somewhere in Dropbox. The next step is to share that folder via Dropbox with your server. Installing Dropbox on Ubuntu is relatively painless if you know your way around the command line. Per their instructions
cd ~ && wget -O - http://www.dropbox.com/download?plat=lnx.x86_64 | tar xzf -
Then, you’ll want to download their helper script that lets you start/stop the Dropbox daemon. It’s linked at the bottom of their Linux installer page.
Once you’ve got Dropbox installed, I’d suggest creating a new account just for your server. This lets you selectively share folders of content from your primary Dropbox account. This is important for a couple reasons. First off, I’ve got 60GB of data in Drobox — that’s way more than my small Rackspace cloud instance can handle. Also, I simply don’t feel comfortable having so much personal information just sitting around on my server.
With the software installed and running, use Dropbox to share your Jekyll folder with your new server account and wait for it to sync.
Watching for Changes
The next step is putting in place a process to automatically watch for changes to files in our Jekyll _posts folder and then rebuild the site. I’m sure there are a bunch of tools available on Linux to handle this; the first one I ran across was incron. It was surprisingly easy to setup. Like a cron job, you give it a command to run and when to run it. But instead of a date/time, you give it a path to watch and which filesystem events to listen for. Installing was simple:
sudo apt-get install incron
Then, you need to give your user account permission to run incron jobs.
sudo vim /etc/incron.allow
and add your user account name to the list — save your changes.
Finally, add your job via
icrontab -e
The icrontab jon syntax looks like
<path to watch> <file system event conditions> <command>
A few months ago at work we ran into an odd user experience problem. The home screen for one of our iPad apps included a small icon in the navigation bar showing the current weather. Normally it displays the weather for the user’s current location or any location they’ve saved. No problem. But what do we show the first time the app launches? At that point, they have no saved location preference and we don’t know their physical location because they haven’t yet opted-in to CoreLocation. We came up with three options.
Don’t show anything, or show a generic no-location-set icon. We tried this, but our designers didn’t ilke the empty experience.
Immediately prompt the user for permission to access their location as soon as the app launches. We nixed this idea, too, since we didn’t want an ugly system alert to be their first interaction with our app.
Pick some standard default location until the user chooses a different one.
We actually went with option #3 and set New York City as the default location. Unfortunately we found that this confused users. Even though they hadn’t given us their location info yet, they still assumed that the icon represented their local weather forecast. Imagine seeing a sunshine icon when it’s pouring rain outside. Not good.
That led us to consider a fourth solution. Over lunch we came up with the idea of trying to infer the user’s general location based on the data available in their address book. If it worked, we could provide an approximate weather forecast on first launch without popping-up a nagging alert window.
On Mac, doing this is easy. Just query the user’s “Me” card and pull out their city or zip code. But on iOS, for privacy reasons, we don’t know which card is the user’s.
Thinking a bit more about the problem we realized that most people know lots of people who live near to them and fewer people as the distance increases. So we decided to look through the user’s address book and find the most common city, state, and zip code. The idea being that would let us infer the user’s state if nothing else.
The code for this was pretty quick to write. We built a small sample app and distributed it to everyone in the office. We were shocked to find out how well it worked. It correctly guessed the user’s appoximate location for all but one of the devices we tested it on.
In the end, however, we chose not to add this “feature” to the app. We decided, while clever, it was just a little too creepy even though we never did anything with the data. But, it was still a fun thought experiment and a nice proof of concept to spend an afternoon on.
Almost four years ago today, I moved across the country and accepted a job at Yahoo!. But one of the main reasons I took the position happened six years before that.
In the Fall of 2001 I was a Sophomore in college at MTSU. Each morning I’d roll out of bed and open my Yahoo! home page. It was the first step in my morning routine. I’d check the news, check my email, then get ready for class.
On Tuesday the 11th I woke up at 7:45. The first thing I saw on Yahoo! was a headline that a plane had crashed into one of the towers. I clicked through to the article, but it was such breaking news the whole story was only three sentences long. It had just happened.
I woke up my roommate — a pilot himself — and turned on CNN just in time for both of us to watch the second plane hit live. Neither one of us spoke about it. We just sat there in silence watching the morning unfold.
I haven’t spoken to Chris in years, but if he’s anything like me, that image turned into one of the defining moments on our way to becoming adults. And looking back, we both would have missed it if not for the news being reported on Yahoo! that morning.
And so, six years later in September 2007, I was sitting in Starbucks with my Yahoo! offer letter in hand trying to decide. I remember thinking how much Yahoo! had indirectly changed my life that day and with a thousand other small contributions since then. And now I was given the opportunity to work for them and possibly impact millions of other people, too.
That’s why I took the job.
So tech pundits can write gleefully about the fall of Yahoo! — the many missteps they took during their short corporate history. But fuck ’em. I’m proud I got to work there and with so many incredible people for three full years. And I’m sad to see Yahoo! put themselves up for sale. There are few companies around with such reach — few that can claim to have changed the lives of so many people with nothing else but a few bits over the wire.