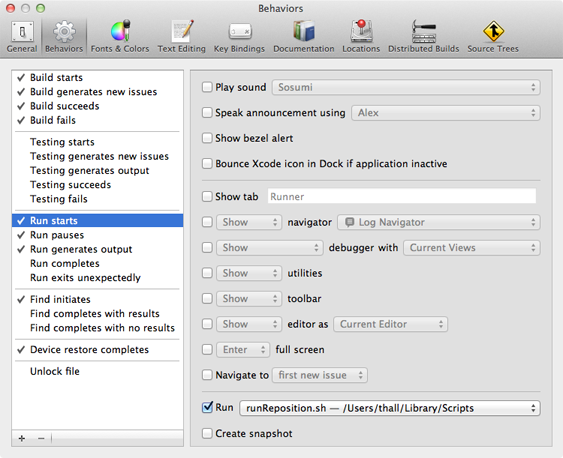
If you work with two monitors of different sizes, Xcode has an annoying bug of launching the iOS Simulator partially off screen — forcing you to manually drag it into position using the mouse. It’s not that bad the first time, but after a full eight hour working day with hundreds of launches, it gets very tedious.
Luckily, we can solve this with Xcode 4’s new “Behavior” settings and a little AppleScript.
Open up your favorite text editor and create the following script:
#!/bin/sh
osascript -e 'tell app "System Events" to set position of window 1 of process "iOS Simulator" to {-864, 134}'
Where where {-864, 134} are the {X, Y} coordinates you’d like the simulator positioned at.
Save the script somewhere appropriate and select it as a new “Run” command in Xcode’s “Run Starts” behavior.
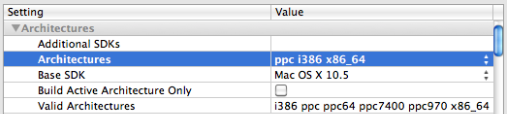
Last week I released a minor update to VirtualHostX. Shortly thereafter, my inbox was flooded with reports of an “unsupported architecture” error on launch. After a quick lipo test I verified that somehow I had managed to build and ship the app as Intel only — no PowerPC support.
I went through my git revision history and was able to track down the error. From what I can tell, the Xcode 3.2.6 update removes the default universal binary option. That’s fine for new projects, but I was completely taken by surprise to see it modify the build settings of an existing project.
Regardless, now that the (once famous) universal binary checkbox is gone, here’s how to add PowerPC support back.
In your target’s build settings, change “Architectures” to “Other” and specify “ppc i386 x86_64”.
Note: It’s entirely possible this whole episode was my fuck-up and not Xcode, but there are a bunch of similar reports online. So who knows? It certainly wasn’t mentioned in the release notes.
I spend about ten hours a day staring at two 27-inch Apple cinema displays. It makes coding great. But, with that much screen real estate, I keep losing my mouse cursor. I’ll have to jiggle it around for half a minute trying to find where it’s disappeared to.
No more!
Yesterday I discovered OS X has an option in the Universal Access Preferences pane that lets you adjust the size of the cursor from normal all the way up to holy-gigantic. I have mine set to a comfortable 33% — which is just big enough to keep from getting lost, but not so large that I can’t tell where I’m clicking.
For the last twelve months I’ve been keeping detailed records regarding the number of users pirating my Mac apps and toying with different ways of converting those users into paying customers. I’m not foolish enough to ever think I could actually eliminate the piracy — especially since I believe there are a few legitimate reasons for pirating software — but I was genuinely curious as to what the actual numbers were, the motivations behind doing so, and if there were any way I could make a small dent in those numbers.
A quick summary for those who don’t want to read the full post (tl;dr)
Software developers are foolish if they think they can prevent piracy. The only goals worth pursuing are
Make it incredibly easy for honest customers to purchase your software.
Find simple, non-intrusive ways of encouraging pirates to become paying customers.
Retire to a sandy location with the tens of hundreds of dollars you’re sure to make.
A Bit of History and Harsh Reality
VirtualHostX 2.0 was released on July 19, 2009. Fake serial numbers first appeared (to my knowledge) on August 3, 2009. That’s fifteen days. Fifteen days for someone to take the time to engineer a fake serial number for a relatively unknown, niche app.
Nottingham was released on November 28, 2009. It took eight days for the first serial number to begin appearing.
Admittedly, the serial number scheme I used was incredibly simple. So it was no surprise that it was easy to crack. But seriously? Eight days? I doubt it took whoever did it more than an hour of actual work. I was just flabbergasted they cared enough to even take the time. A little honored truth be told.
So I did what any software developer would do. With each new software update I released, I made sure to ban the infringing serial numbers. Now, I fully realized the futility of what I was doing, but still — I thought that if I at least made it inconvenient for the pirating users to have to seek out and find a new serial number each time, maybe I’d win a few of them over.
Nope.
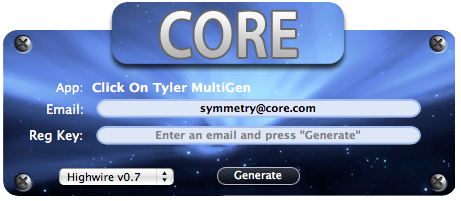
Rather than posting new serials, CORE (that’s one of the “teams” that release pirated software and serial numbers) simply put out “Click On Tyler MultiGen” — which was an actual app you can download to your Mac and use to create your own, working serial number for all of my products. Here’s a screenshot:
(It even plays music.)
So, with that out in the open (you can download it here), there was no point in banning serial numbers any longer.
Instead, I turned my attention towards measuring the extent of the piracy. I wanted to establish a baseline of how many users were stealing my app, so I could then tell if any of my attempts to counteract it worked.
I won’t go into the technical details of how I measured the number of pirated apps in use, but after a two month period I can say with high confidence that 83% of my users were running one of my apps with a fake serial number. Let that sink in.
Eighty-three percent.
Fuck.
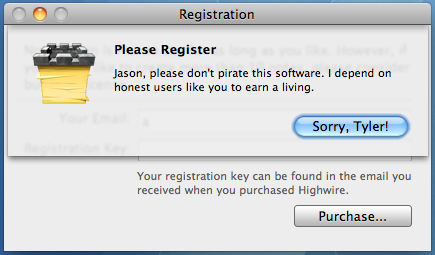
Experiment #1 – The Guilt Trip
My first attempt at converting pirates was appealing to their sense of right and wrong. (I’ll pause while you finish laughing.) I released an update that popped up this error message when it detected you were using a fake serial number:
Two things worth noticing:
I looked up the users first name (if available) from Address Book and actually addressed the message to them.
They only way to dismiss the message was the guilt-trip-tastic “Sorry, Tyler!” button.
Sure those things were cheesy — the folks on the piracy websites actually mocked me for it — but I thought adding a little humanity (and humor) might make a difference. And it did.
Over the next three months I saw a 4% decrease in the number of users pirating my apps. Now, is that for certain because of my silly message? It’s possible, but I can’t be certain. Nonetheless, I thought it was a strategy worth continuing.
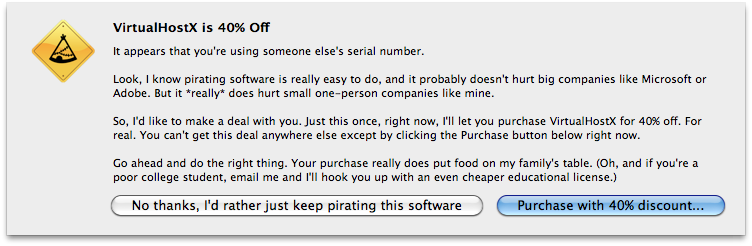
Experiment #2 – the guilt trip and a carrot
At the beginning of this year I decided to be a bit more proactive and actually offer users a reason to pay other than simply “doing the right thing”. So, I began showing this error message instead:
And I was serious. I presented the pirates with a choice. A one-time, limited offer that was only good right there and then. They could either click the “No thanks, I’d rather just keep pirating this software button” or they could be taken directly to my store’s checkout page along with a hefty discount.
(I was wary of doing this because I didn’t want to offend my real, paying customers who have been kind enough to part with their money at full price. I realize it’s not fair that honest users might pay more than the pirates. To them, I hope they’ll understand that I was simply trying to convert and make at least a little money off of users who were simply not paying to begin with. Hopefully the full-price you paid was worth it at the time and still is today.)
Did it work?
I was very careful to measure the number of times the discount dialog was displayed and the number of discounted sales that came through. The result? 11% of users shown the dialog purchased the app. I suspect that number might be a little higher as I’m sure some users saw the dialog more than once.
Despite 11% being a small number compared to the overall 83% piracy rate, I was thrilled. Most online advertisers would kill for an 11% conversion rate. I considered the experiment a success and let it continue on for a number of months until the numbers dwindled down to 5%, which brings us to today.
The Big Switch
Last month (April 2011) I released Nottingham 2.0 — and with it, a new serial number scheme that requires a one-time online activation. I’ve always been adamantly opposed to registration checks like this both as a developer and a user. But now that everyone is (almost) always connected, these checks don’t bother me as much as a user any longer. Especially if they’re unobtrusive and one time. Also, after seeing the raw numbers, the developer in me is now more concerned with buying food than lofty expectations.
I hope I’m not stirring up a hornet’s nest by saying this, but so far sales of Nottingham 2.0 are going well and piracy is virtually non-existent. Is that bound to change? Of course. I fully expect my scheme to be cracked at some point. But now that activation is involved, I have a much better view of when and how often it’s happening. Another benefit is that it’s no longer sufficient to pass around a serial number or even a key generator. Pirates will now need to patch the actual application binary (totally doable) and distribute that instead.
With those promising results in mind, I made the decision to convert my existing VirtualHostX 2.0 users to the new serial scheme as well. My goal — as always — wasn’t to stop the piracy but at least make a small dent in it.
My foremost concern was to make things simple for my existing customers. Under no circumstances did I want to annoy (or piss off) them. I couldn’t just invalidate all of their old serial numbers and send everyone an email with their new one. That would surely prevent someone from using the app right when the needed it the most. I had to make sure the switch was as frictionless as possible.
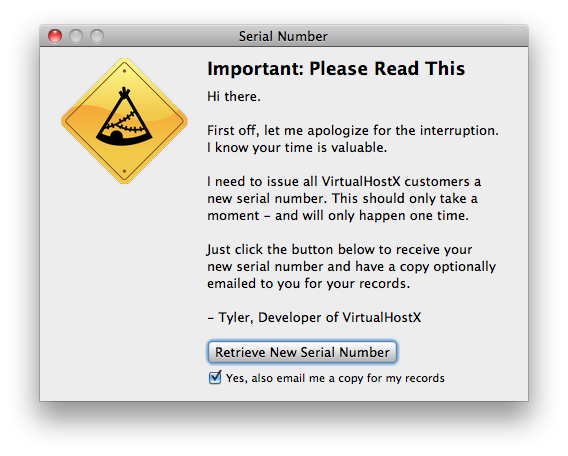
So, I toyed with different upgrade processes for a few weeks and finally settled on a system that I deployed with the 2.7 a few days ago. Here’s how it works.
The first time the user launches VirtualHostX after getting the automatic upgrade to 2.7, they’re shown this window:
I explained the situation as plainly as possible while also being upfront with the understanding that this is an inconvenience for them, not me, and the requisite apology. I also made it simple — one button to click — no other steps.
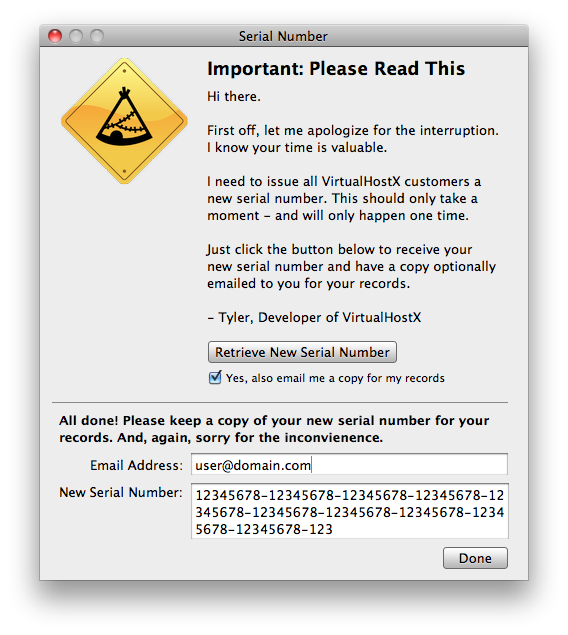
So, click the button, wait about five seconds and:
The app automatically connects to my server, validates their old serial number, generates a new one, and registers the app without any other user intervention. It’s all automatic.
So far the switch has gone well. I’ve seen about 30% of my registered users go through the update and have had exactly two emails — not complaining — but just confused as to what was going on. One customer even wrote in to say:
That was so painless. Great job on the messaging and single-click process. Very well done.
So that makes me feel good. Even though I wish I could have avoided the process, I’m glad it appears to be going smoothly. If any other developers ever find themselves in a similar situation, I can highly recommend this approach.
So That’s It
Many of the points I’ve written about are hardly new or exciting to anyone who’s written software or pirated it. So I’m not posting this as some sort of revelatory treatise. Rather, I just wanted to document the experiences I’ve gone through as a one-man software company who’s trying to earn a little money while keeping his users happy.
In the end, the most important thing you can do is be respectful of your users’ time by writing software they’ll love so much they can’t wait to pay for. Once you’ve got that down, then you can try and encourage the rest to pay up 🙂
Two years ago I posted some quick instructions on how I keep my Adium chat logs synced between Macs using Dropbox. I’ve tweaked my setup slightly since then. Here’s my new approach.
First, if you already have Adium on multiple machines, copy all your logs over to a single Mac. You can merge the folders easily with an app like Changes. Once you’ve got a canonical folder of all your combined chat logs, place it somewhere in your Dropbox. Then…
If the output lists anything other than i386 or x86_64 you’ll get rejected.
This was particularly painful for me because it appears this check is only run when submitting a new version of your app — PPC framework binaries don’t cause a rejection during the original app submission process. I thought I was going crazy since I had made no project changes since the first submission and running lipo on the app binary didn’t return anything unusual. Hopefully this will save someone else the hour of head scratching I just went through.
Earlier this week, the Chromium Blog announced an official extension API for Chrome’s omnibox (search bar). I’ve always loved keyboard driven interfaces — the command line, [Quicksilver](http://en.wikipedia.org/wiki/Quicksilver_(software)), Alfred, etc — so, I immediately started thinking about what I could build with it.
My first idea was a documentation browser for Apple’s Mac and iOS libraries. I’m always googling for class and framework names as a way to quickly jump to Apple’s documentation site. The problem is that many times the developer.apple.com link is buried down the page, which means I waste time scanning for the link rather than just hitting return for the first search result.
This extension solves that problem by allowing you to type “ios” or “mac” followed by a keyword. It then presents and auto-completed dropdown of matching search results which take you directly to the relevant page on Apple’s documentation site. Here’s a screenshot after typing “ios UIImage”
For those among you wondering how I’m searching the Apple docs, I caught a lucky break. Apple’s Mac and iOS reference site includes a small search box that autocompletes your queries. I tried sniffing the network traffic to see what web service they were using for suggestions (hoping to hook into that myself) but found they were showing search results without sending any data over the wire. A little more digging and I realized they were pre-fetching a dictionary of results as a giant JSON file on page load. With that data — and a sample Chrome extension courtesy of Google — it took no time at all to connect all the pieces and get the extension working.
If you’d like to install the extension, just click here for Mac and here for iOS. You’re also welcome to download and improve the code yourself from the GitHub project page.
Every holiday, between the food and family, I always seem to find time for a quick project. Last year I built the first version of Nottingham over the Thanksgiving break. This year was no exception, and I found myself putting the final touches on Sosumi for Mac after an eighteen hour coding streak this weekend.
Sosumi for Mac builds on the original Sosumi project I started last Summer — a PHP script that returned the location of your iPhone by scraping MobileMe’s website and that eventually evolved to use Apple’s “official” API once that was released.
Last week, Apple pushed a rather large update to the Find My iPhone service and made it free to all users. Along with that came some API changes, which broke Sosumi. With help from Andy Blyler and Michael Greb, we managed to get it working again. I took the opportunity to go all out and write a native Cocoa implementation of Sosumi as well. And, with that done, I went one step further and built a full-fledged desktop app for tracking all of your iDevices.
Now that it’s complete, it’s much easier to simply open up Sosumi for Mac, rather than having to re-login to Apple’s website or iPhone client each time. The desktop app also opens up some fun possibilities. A future version could notify you when your spouse leaves work in the afternoon so you know when to begin preparing dinner. Or alert you if your child strays from their normal route on the way home from school. Or, since Sosumi provides your device’s battery level, you could even send alerts if your phone needs to be charged soon.
Admittedly, this kind of always-on location tracking can certainly be creepy. But that’s almost always the case with these types of applications. Whether Fire Eagle, Foursquare, or Google Latitude — it’s always a matter of striking a reasonable balance between convenience and privacy. I trust you’ll use Sosumi for good rather than evil.
Back in June I wrote a detailed post describing how I backup my data. One of the key components of my backup strategy was using Backblaze for continuous, offsite recovery in the event of a disaster.
Well, disaster struck.
Last week, the hard drive in my father’s MacBook died. In the past, I’d setup a networked Time Machine drive to backup my parents’ laptops, but for whatever reason it never worked reliably. OS X would often become unable to mount the drive — even when connected to an Apple Airport. Fortunately, I gave up on Time Machine a few months ago and installed Backblaze on everybody’s Mac. Ponying up the $50/year per machine seemed like a great deal. Definitely worth the peace of mind it brings me knowing I don’t have to waste time fighting with Time Machine or manually backing up their data whenever I visit.
This past week, with my father’s hard drive verifiably dead, I’m happy to report that Backblaze performed flawlessly.
My father isn’t a heavy computer user, but he still had 20GB of data stored in Backblaze’s cloud. Once we verified that his data really was lost, I signed into Backblaze’s website and requested a full zip file backup of all his files. Twenty minutes later they emailed to say a 20GB zip file (!!!) was ready to download. Over my 30mbit Comcast connection it only took about an hour to download, another ten minutes to unzip, and bam! All of his music, photos, documents, everything right back as it was just hours earlier.
It’s so, so, so important to keep good backups of your data. In my father’s case, he had fifteen years worth of genealogy research on his Mac. I can’t even imagine that data being lost. And while I’ve done a few small restore tests with Backblaze, this was the first time I’ve truly needed it for a full recovery. And, like I said above, it worked just as advertised. Kudos to the Backblaze team on an outstanding product.
I’m totally obsessed with web site performance. It’s one of those nerd niches that really appeal to me. I’ve blogged a few times previously on the topic. Two years ago, (has it really been that long?) I talked about my experiences rebuilding this site following the best practices of YSlow. A few days later I went into detail about how to host and optimize your static content using Amazon S3 as a content delivery network. Later, I took all the techniques I had learned and automated them with a command line tool called s3up. It’s the easiest way to intelligently store your static content in Amazon’s cloud. It sets all the appropriate headers, gzips your data when possible, and even runs your images through Yahoo!’s Smush.it service.
Today I’m pleased to release another part of my deployment tool chain called Autosmush. Think of it as a reverse s3up. Instead of taking local images, smushing them, and then uploading to Amazon, Autosmush scans your S3 bucket, runs each file through Smush.it, and replaces your images with their compressed versions.
This might sound a little bizarre (usless?) at first, but it has done wonders for mine and one of my freelance client’s workflows. This particular client runs a network of very image-heavy sites. Compressing their images has a huge impact on their page load speed and bandwidth costs. The majority of their content comes from a small army of freelance bloggers who submit images along with their posts via WordPress, which then stores them in S3. It would be great if the writers had the technical know-how to optimize their images beforehand, but that’s not reasonable. To fix this, Autosmush scans all the content in their S3 account every night, looking for new, un-smushed images and compresses them.
Autosmush also allowed me to compress the huge backlog of existing images in my Amazon account that I had uploaded prior to using Smush.it.
If you’re interested in giving Autosmush a try, the full source is available on GitHub. You can even run it in a dry-run mode if you’d just like to see a summary of the space you could be saving.
Also, for those of you with giant S3 image libraries, I should point out that Autosmush appends an x-amz-smushed HTTP header to every image it compresses (or images that can’t be compressed further). This lets the script scan extremely quickly through your files, only sending new images to Smush.it and skipping ones it has already processed.