A good friend texted me the other day. They said:
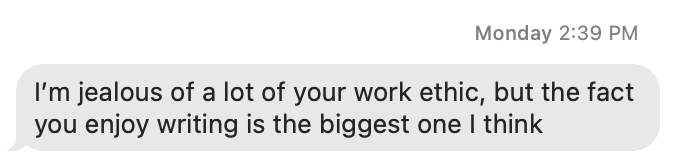
I’m jealous of a lot of your work ethic, but the fact that you enjoy writing is the biggest one I think
I don’t share that to say that my work ethic is better than anyone else. I’ve been called “lazy” my whole life by teachers, friends, even loved ones when it comes to me not putting effort into things I’m not passionate about.
Is that a personal flaw? Yes, I think so. If I could have mustered the maturity and self-discipline to study for the classes I wasn’t interested in, I probably wouldn’t have flunked second-semester college Biology two times. I probably would have remained in past jobs longer. And a million other screwups and failures throughout my ridiculously privileged life could have been avoided if I had just cared enough to try harder at the things I didn’t care for.
A few years ago, my therapist told me I’m going to have just the right personality and temperament to enjoy my 40s when I get there. I wasn’t entirely sure how to take his comment then, but now that I’m well into my thirty-eighth trip around the Sun, I think it’s beginning to sink in.
What I mean is, I feel like I’m dangerously close to discovering the cheat code for my own life. After a decade of turbulence, I’m more at peace with myself than I ever have been. Thirty-eight years into being here, I finally understand myself well enough to forgive my shortcomings (while continuing to try and be better) and realize what makes me tick, what motivates me, and how I can fight back against the worst parts of myself and stay healthy.
Everything above is just a long-winded and meandering introduction to say that this post is about motivation. Specifically, the two most significant motivating factors that contribute to my “work ethic,” as my friend said.
Jerry Seinfeld
The first one is so dumb and straightforward that I can hardly believe it works. I didn’t even realize I was using it to my advantage until I stumbled upon a story about Jerry Seinfeld that accidentally made the idea internet-chic.
There are a million blog posts and articles explaining it, so I won’t bore you with a detailed rehashing. But, in summary, do the thing you want to do every day. The more days you can muster in a row, the more leverage you create to keep yourself from ending the streak – from breaking the chain.
I’m tempted to dismiss the whole idea as nothing more than a fancy way to build a habit, except that I think the insight of using an ever-growing streak – compounding interest, essentially – as leverage against yourself can help you through the period before it becomes a habit. At least that’s how it has helped me.
Two quick examples.
For a long time, I kept a daily journal using the wonderful Day One app for Mac and iOS. Whether added for this reason or not, I don’t know, but the main screen displayed the number of consecutive days you last wrote an entry. I accidentally got my streak up to twenty days or so and just never wanted to see that number stop climbing.
Soon I had a couple of months in a row, and by the time I finally let a day lapse without writing, over two years had passed.
Along those lines, when it comes to the software I write, I really do enjoy looking at my GitHub contribution chart. And while I think it’s a complete asshole move to judge anyone else by what theirs looks like, I like seeing mine.
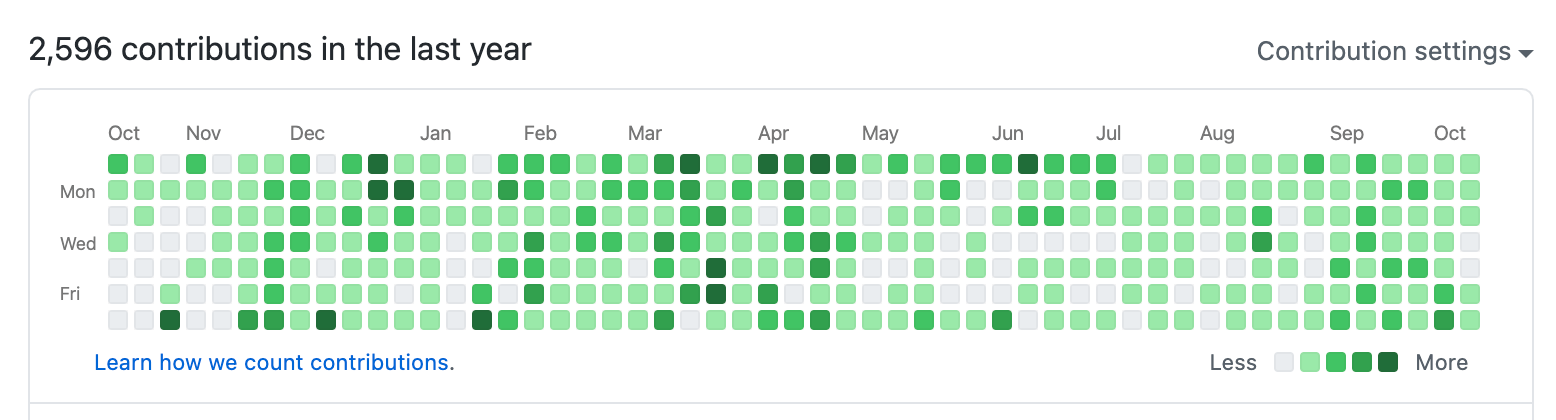
While maybe not as specific or as motivating as a number you can count, it’s fascinating to see the relative ebbs and flows chronologically. I can often correlate the chart seasonally or to my mood levels over time. And, yes, it gives me a bit of an endorphin rush when I can look back and feel proud of what I accomplished.
I’ll end this section with a recent quote from one of my very favorite people, Kourosh Dini.
Moving something forward a little bit each day is likely more important than doing something all at once. Doing so helps you to build the structures needed to keep moving forward.
I wrote something similar (but not nearly as eloquent) six years ago.
Moving on.
Fear
The other big thing that pushes me forward is fear.
When I stay busy, productive, engaged, curious, whatever you want to call it, I feel mentally healthier. That doesn’t mean I work all the time or that I don’t binge-watch a season of TV every now and then, but without some baseline level of gears turning in my head, solving problems, and learning something new, I get dangerously bored – for lack of a better word.
I turn inward. I shut down. I’ve been to some very dark places in my life, and in hindsight, the warning signs were always there. Chief among them is losing interest in the work I am passionate about.
And so I’m incredibly fearful of that happening again. Call it a precursor or a canary in a coal mine, but if I can gauge my ability to remain engaged in my work as a barometer for my mental health, I’m happy to do so.
Kourosh’s post I linked above offers this quote from Paul Tillich‘s The Courage to Be.
Courage can meet every object of fear, because it is an object and makes participation possible. Courage can take the fear produced by a definite object into itself, because this object, however frightful it may be, has a side with which it participates in us and we in it.
If I’m going to be afraid, I’d much prefer to use that emotion to my advantage, stay busy, and build things that make me (and hopefully other people) happy.