Back in June I wrote a detailed post describing how I backup my data. One of the key components of my backup strategy was using Backblaze for continuous, offsite recovery in the event of a disaster.
Well, disaster struck.
Last week, the hard drive in my father’s MacBook died. In the past, I’d setup a networked Time Machine drive to backup my parents’ laptops, but for whatever reason it never worked reliably. OS X would often become unable to mount the drive — even when connected to an Apple Airport. Fortunately, I gave up on Time Machine a few months ago and installed Backblaze on everybody’s Mac. Ponying up the $50/year per machine seemed like a great deal. Definitely worth the peace of mind it brings me knowing I don’t have to waste time fighting with Time Machine or manually backing up their data whenever I visit.
This past week, with my father’s hard drive verifiably dead, I’m happy to report that Backblaze performed flawlessly.
My father isn’t a heavy computer user, but he still had 20GB of data stored in Backblaze’s cloud. Once we verified that his data really was lost, I signed into Backblaze’s website and requested a full zip file backup of all his files. Twenty minutes later they emailed to say a 20GB zip file (!!!) was ready to download. Over my 30mbit Comcast connection it only took about an hour to download, another ten minutes to unzip, and bam! All of his music, photos, documents, everything right back as it was just hours earlier.
It’s so, so, so important to keep good backups of your data. In my father’s case, he had fifteen years worth of genealogy research on his Mac. I can’t even imagine that data being lost. And while I’ve done a few small restore tests with Backblaze, this was the first time I’ve truly needed it for a full recovery. And, like I said above, it worked just as advertised. Kudos to the Backblaze team on an outstanding product.
I’m totally obsessed with web site performance. It’s one of those nerd niches that really appeal to me. I’ve blogged a few times previously on the topic. Two years ago, (has it really been that long?) I talked about my experiences rebuilding this site following the best practices of YSlow. A few days later I went into detail about how to host and optimize your static content using Amazon S3 as a content delivery network. Later, I took all the techniques I had learned and automated them with a command line tool called s3up. It’s the easiest way to intelligently store your static content in Amazon’s cloud. It sets all the appropriate headers, gzips your data when possible, and even runs your images through Yahoo!’s Smush.it service.
Today I’m pleased to release another part of my deployment tool chain called Autosmush. Think of it as a reverse s3up. Instead of taking local images, smushing them, and then uploading to Amazon, Autosmush scans your S3 bucket, runs each file through Smush.it, and replaces your images with their compressed versions.
This might sound a little bizarre (usless?) at first, but it has done wonders for mine and one of my freelance client’s workflows. This particular client runs a network of very image-heavy sites. Compressing their images has a huge impact on their page load speed and bandwidth costs. The majority of their content comes from a small army of freelance bloggers who submit images along with their posts via WordPress, which then stores them in S3. It would be great if the writers had the technical know-how to optimize their images beforehand, but that’s not reasonable. To fix this, Autosmush scans all the content in their S3 account every night, looking for new, un-smushed images and compresses them.
Autosmush also allowed me to compress the huge backlog of existing images in my Amazon account that I had uploaded prior to using Smush.it.
If you’re interested in giving Autosmush a try, the full source is available on GitHub. You can even run it in a dry-run mode if you’d just like to see a summary of the space you could be saving.
Also, for those of you with giant S3 image libraries, I should point out that Autosmush appends an x-amz-smushed HTTP header to every image it compresses (or images that can’t be compressed further). This lets the script scan extremely quickly through your files, only sending new images to Smush.it and skipping ones it has already processed.
I’ve noticed a resurgence on the web of peopletalkingaboutOmniFocus and how they use the app to manage their task lists. Despite being a user for nearly three years — since the first public beta — for some reason I’ve never gotten around to writing about why I find it so useful and how it fits into my own workflow. So that’s what this post will attempt to do.
(Oh, and if you’re one of those readers who likes to skip straight to the end, allow me to save you the trouble: OmniFocus wipes the floor with every other Mac task manager because of Perspectives.)
Everything I say obviously only applies to my own, odd way of getting things done — but hopefully there will be a few points others might find useful, too. Particularly since my work straddles two different worlds: during the day I’m at a large corporation with responsibilities to multiple teams and relying on tasks delegated to other co-workers. At night, in addition to my personal commitments, I freelance and run my own, small software company.
OmniFocus helps keep me sane. Here’s how.
Three Buckets
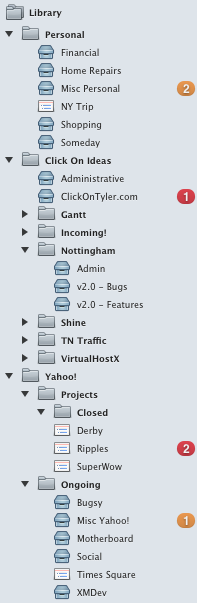
All of the tasks I do throughout my day fit into one of three buckets. Some people call these “categories” or “areas of responsibility”. OmniFocus represents them as folders.
My first folder, “Personal”, holds all the tasks and projects that fall under my, well, personal life. This includes everything from the mundane “buy toilet paper” and “rent car for NY trip” to beefier tasks like “get three estimates for new backyard fence”.
Within this folder I have a few single-action lists. These are a special category of task lists in OmniFocus that aren’t actual projects. Meaning, they’re not something you can ever fully complete — they’re ongoing. As you can see in the screenshot to the right, these lists cover topics like “Financial”, “Home Repairs”, “Shopping”, and my “Someday” list. I’ve found that most of my day-to-day tasks fit nicely into one of these lists. And if they don’t, it’s no big deal. I just create a new project as needed.
My next bucket (folder) is “Click On Ideas”, which is the LLC I do freelance work as and use to sell my Mac apps. Within that are folders for each of my apps and projects for any freelance work on my plate.
In the screenshot, I’ve opened up the folder for Nottingham. Inside you’ll see I’m actually using OmniFocus for tracking bugs and new product features. I’d never recommend this for larger, team based work, but as a single developer it works fairly well. The majority of my bug reports and feature requests come from user feedback via email. Because OmniFocus integrates so nicely with Mail.app, it’s practically frictionless to convert an email from a user into a task.
The folder I use to organize my day job at Yahoo! has a different structure. Each project gets its own list which sits inside one of two folders. “Projects” is for items that have a hard delivery or launch date. These are lists that contain concrete steps towards launching whatever it is I’m working on. They’re larger commitments that will eventually be completed and go away. The “Ongoing” folder is for projects that are complete from a development standpoint but still need to be maintained. It also contains other, more generic areas of responsibility that have occasional tasks.
The one thing all three buckets have in common is that I’ve structured their folder and task hierarchy uniquely to match the way I naturally focus on my work. In my freelance world, I rarely multitask. I’m focused on a single project for days at a time. Selecting one of my app folders lets me quickly see everything related to that product and nothing else. But at work, I’m constantly shifting my focus as priorities and other external variables change. Being able to focus on the projects that have due dates makes it easy to evaluate what needs to get done now and what can wait till later in the day or tomorrow.
Starting the Day
The organization explained above is how I make plans and keep an eye on the bigger picture. But when it comes to actually doing the work and knocking down my todo list, I have a rigid routine in place.
Each morning after I wake up, I get a drink (not that kind of drink), freshen up, and sit down on the couch with my laptop and zone out for 30 – 45 minutes checking news, Google Reader, Twitter, etc. I’ve found that getting all of my “soft news” and social updates out of the way first thing in the morning helps repress the urge to to check-in constantly throughout the day. I take note of anything worth reading for later, filing items into OmniFocus and Instapaper as needed.
With that out of the way I move on to my email. Like many people I’m sure, this is usually my largest source of stuff to do. Despite being two timezones ahead of my co-workers, I’ve always got 20+ action emails waiting for me when I wake up. And while I don’t subscribe to Inbox Zero or whatever, I do process my emails immediately, in a way that makes sense to me.
Each email gets scanned and categorized. No excuses. Every message is either
Something I can immediately delete or archive
Something that I can create a task out of and then archive
Or something that needs a reply. If that’s the case, it stays in my Inbox until I do so.
The benefit of this system is that no email gets left behind. Everything is guaranteed to be acted upon or at least seen and acknowledged, quickly. Perhaps more importantly, it means that each message remaining in my inbox is either unread or awaiting a reply — anything urgent is caught before it becomes a problem.
With my email processed and new tasks delivered to OmniFocus, I can turn to what actually needs to get done today. This is where OmniFocus really sets itself apart from the competition.
Perspectives
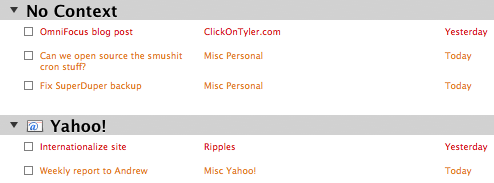
OmniFocus has the notion of Perspectives. These are saved settings that you can switch between with a single click. When deciding on the day’s work, I switch to the Due perspective. This gives me an instant look at all the tasks that are overdue or need to be completed in the next day or so.
I’ve customized OmniFocus’s built-in Due perspective to group my tasks by context. This gives me a clear division between what I have to do for Yahoo! and everything else. That’s important to me because, after all, Yahoo! pays the bills and those tasks take priority over most of my other commitments.
This first-thing-in-the-morning review provides a good foundation for the day. It’s great starting out with a clear sense of what needs to be accomplished so when your boss emails with a fire drill you know immediately what can be shifted or dropped without wasting time gathering your notes.
With a clear mind, it’s easy to get started and fully concentrate on the work at hand knowing everything else is accounted for and ready when you are.
But OmniFocus’s Due perspective is just the beginning. Here’s my toolbar with the perspectives I flip between most frequently.
There are four perspectives on the right that I’ve created.
Y! Available – Shows all of the work related tasks that I can choose from to do. This is more powerful than it might initially seem. Because OmniFocus lets you make certain tasks dependent on others — Task A has to be completed before Task B — you only see those items you can actually do. It filters out everything else so you don’t get distracted when picking what’s next.
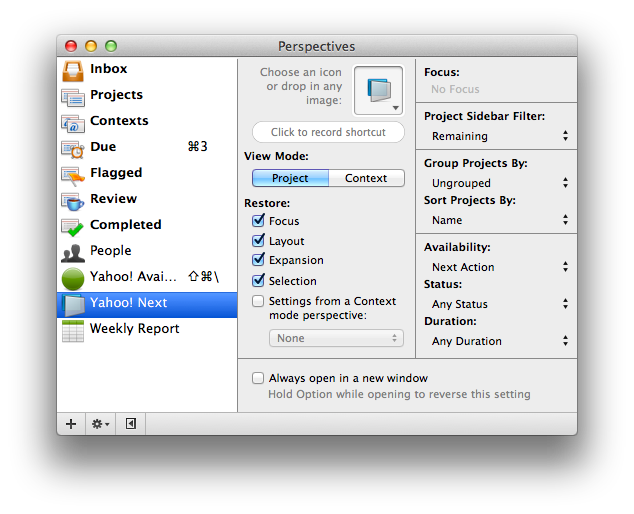
Y! Next – This is similar to the Available view, except it further refines the tasks it displays. Rather than showing everything you can do, it simply gives you the next item available in each project. This is great when you’re in the zone, cranking through your work, and trying to stay focused.
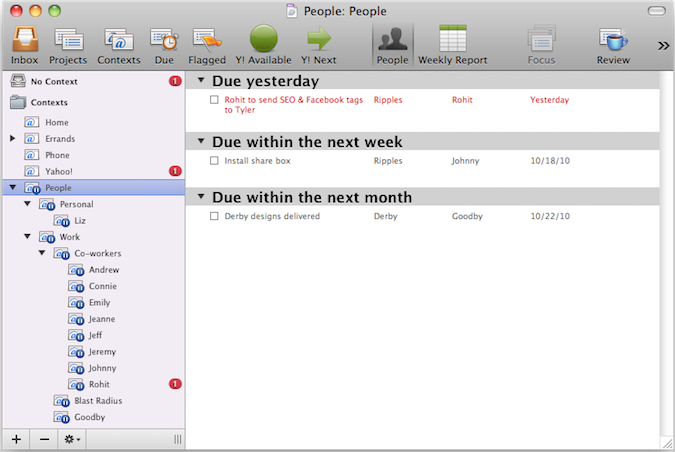
People – I love this view. It generates a list of all the items that I’m waiting for other people to finish. Here’s a screenshot: I accomplish this by creating a context with the name of each person that owes me something. Then, whenever I need to delegate a task, I just assign it a context of that person’s name and forget about it.
Two tricks that make this work well:
Group people by company. This lets me see not only who at Yahoo! I’m waiting on, but also any 3rd party vendors.
Make sure you mark each context as “on hold”. This way, the tasks don’t show up in your Available or Due perspectives. Since the tasks are assigned to other people, there’s no need for you to worry about or even seem them.
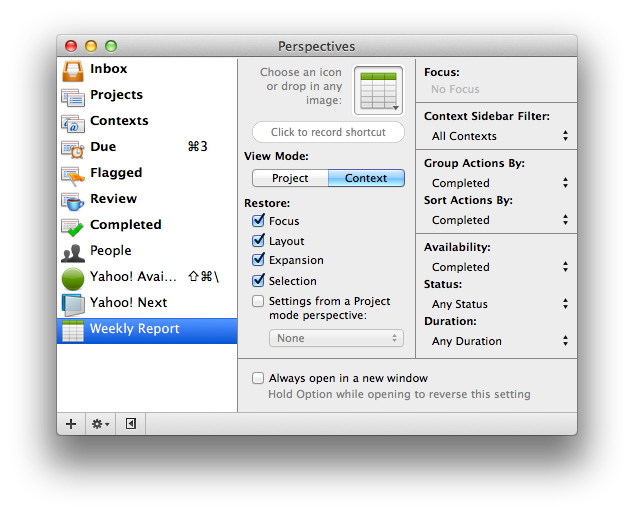
Weekly Report – Finally, this perspective generates a list of everything I’ve accomplished in the last week — grouped by project and ordered by date completed. This is a great tool to have at your disposal during stand-ups or review meetings with your boss.
It’s hard to describe how incredibly powerful Perspectives are until you actually spend a few days with them in your workflow. Other task managers have smart folders or dedicated “Today” lists, but they absolutely pale in comparison to the flexibility that Perspectives afford.
Let’s Be Clear
I don’t want to end up with an inbox full of hate mail tomorrow morning, so there’s one thing I want to clarify (because I know how insanely zealous the web’s productivity cult can be). This is my system. Not yours. I’ve timed my daily activity futzing around in OmniFocus, and it has never broken twenty minutes. That’s less than half an hour out of my day in exchange for a clear mind and less stress.
But if you’re one of the many on the web, clamoring for “simplicity”, who work best in plain text files, edited in Notational Velocity, synced via Simplenote to your laptop, where you publish them to your GitHub hosted website using Sinatra, and then review them on your iPad at Starbucks, before transcribing them into your Moleskine using a Blackwing pencil — more power to you. The important thing is that you find a system uniquely fitted to your needs. Which leads me to my final point…
The Takeaway
First off, I apologize for my use of the word “takeaway”. It’s something that was beaten into me during my assimilation into the culture of a corporate Marketing department. (action items!)
The takeaway from this blog post is this: Don’t let your desire to Get Shit Done™ get in the way of you getting shit done.
More specifically, find a system for managing your commitments that works for you and stick to it. Use any tool you want as long as it fits your workflow and keeps you sane and efficient. It’s ok to tweak things down the road, but don’t go jumping ship each time the new task manager du jour gets a favorable Lifehacker review.
I’m not going to call out anyone specifically, but there are a number of well-known bloggers who I follow and respect very much, yet week after week it seems like they discover a new iPhone task tracking app or some holy grail full-screen text editor that promises to revolutionize hipster productivity. And that’s fine — whatever works for them. But my fear is their clout, if you can call it that, is creating an online community of zombie, productivity wanks who put their tools in front of their work — who spend more time figuring out how to get stuff done rather than actually doing it.
My advice to you? Ignore those posts. (Hell, ignore this one!) But hurry up and find a system that works for you so you can get back to doing what you do best — making awesome stuff.
For an upcoming project, I needed a quick PHP function that would generate strong passwords. It’s an easy problem on the surface, but it has some quirky nuances that appear if you spend any length of time thinking about it.
For example, it’s not enough to merely pick characters at random — you have to include at least one character from each set (lowercase, uppercase, digits, symbols) to minimize the chances of someone guessing the password.
Another problem are ambiguous characters. Many times, users won’t (or can’t) cut and paste the password you generate for them. This happens quite often on mobile devices. They’ll manually transcribe the password from an email or even read it aloud. Differentiating between I, l, 1, 0, and O can be a nightmare — for them and for you when they email support because their password won’t work.
Complicating matters further, long, random passwords are often mistyped because users have to look back once or twice while typing the password. For long strings, it’s easy to lose your place and duplicate or leave out a character or two.
The method I finally decided on solves each of these problems. It generates a strong password of a specified length, without any ambiguous characters, and can optionally include dashes between groups of characters to help users retain their place. You can also customize which sets of characters the password will contain, e.g. alphanumeric, no uppercase letters, etc.
<?PHP
// Generates a strong password of N length containing at least one lower case letter,
// one uppercase letter, one digit, and one special character. The remaining characters
// in the password are chosen at random from those four sets.
//
// The available characters in each set are user friendly - there are no ambiguous
// characters such as i, l, 1, o, 0, etc. This, coupled with the $add_dashes option,
// makes it much easier for users to manually type or speak their passwords.
//
// Note: the $add_dashes option will increase the length of the password by
// floor(sqrt(N)) characters.

function generateStrongPassword($length = 9, $add_dashes = false, $available_sets = 'luds')
{
    $sets = array();
    if(strpos($available_sets, 'l') !== false)
        $sets[] = 'abcdefghjkmnpqrstuvwxyz';
    if(strpos($available_sets, 'u') !== false)
        $sets[] = 'ABCDEFGHJKMNPQRSTUVWXYZ';
    if(strpos($available_sets, 'd') !== false)
        $sets[] = '23456789';
    if(strpos($available_sets, 's') !== false)
        $sets[] = '!@#$%&*?';

    $all = '';
    $password = '';
    foreach($sets as $set)
    {
        $password .= $set[array_rand(str_split($set))];
        $all .= $set;
    }

    $all = str_split($all);
    for($i = 0; $i < $length - count($sets); $i++)
        $password .= $all[array_rand($all)];

    $password = str_shuffle($password);

    if(!$add_dashes)
        return $password;

    $dash_len = floor(sqrt($length));
    $dash_str = '';
    while(strlen($password) > $dash_len)
    {
        $dash_str .= substr($password, 0, $dash_len) . '-';
        $password = substr($password, $dash_len);
    }
    $dash_str .= $password;
    return $dash_str;
}
Four years ago, on another blog, I wrote about my file backup strategy — everything I use to keep my data safe. A lot has changed since then. CD’s and DVD’s have fallen by the wayside, raw hard disk space has gotten insanely cheap, and online storage has finally taken off in a big way. At the prompting of a friend, I thought it might be fun to revisit the topic and show — four years later — how my backups have evolved.
Previously, my backups were done piecemeal with all of my data segregated into groups depending on priority and size of the data. Movies and music went here, documents there, email someplace else, etc. It was largely due to time, available storage, and cost. But now that storage is cheaper and I’m a little bit richer, I feel completely confident in my backup plan in any situation.
Time Machine
With external hard drives costing well under $100, there’s no reason any Mac user shouldn’t be using Time Machine. My 1TB iMac (where I do all of my work) is connected wirelessly to a 1TB Western Digital World Edition which plugs in directly to my router via ethernet. The drive appears as an AFP share in Finder, and Time Machine has no trouble backing up to it.
I used to backup to a network attached Drobo (see my review here), but every time a backup would start the Drobo would slow down, causing video on our home media center (Mac Mini + LCD TV + Drobo) to stutter. It’s worth noting that this was a first generation Drobo — the new ones are probably better.
Time Machine has saved my butt a bunch of times. Twice I’ve done full system restores, but much more often I find myself going back in time to retrieve a lost file or an earlier version.
So that’s my first layer of protection. Time Machine offers full system recovery plus the added bonus of incremental file versioning in case my hard drive dies or I do something stupid.
SuperDuper!
Next. I have two 1TB Western Digital Studio drives. These things are crazy fast since they connect directly to my Mac over Firewire 800. Of course, only one is connected at a time. The other stays locked safely away in my bank’s safe deposit box. Every morning, at 5am, SuperDuper! does a full, bootable system clone to the connected drive. And twice a month I swap the one at home with my duplicate off site.
With a local Time Machine copy already in place, why do this one? A few reasons.
First, in the event of a disaster or robbery, I have a backup stored elsewhere I can rely on. It may be two weeks out of date, but it’s certainly better than nothing. Second, having a bootable backup means no downtime. Zero. In the event of major data loss, if my Mac’s hard drive is unusable, it’ll probably take five hours to restore from Time Machine. But what if that drive is actually broken? How long would it take to purchase a replacement drive and install it? If you do it yourself, maybe a day. But if you have to rely on an Apple warranty repair? Possibly a week. With a bootable copy, I can be back online and working in five minutes. I work from home 100% of the time — I can’t afford any downtime. This keeps me covered.
Oh, and for those who are extra curious, I have the following cron job on my Mac:
00 05 * * * /usr/sbin/diskutil mount /dev/disk1s3
Because I don’t like having my backup drive plugged into my system 24/7 (it slows down Open/Save dialogs whenever it has to spin up), I keep it unmounted. That cron script automatically mounts it every morning at 5am. When that happens, SuperDuper! automatically launches and performs a backup and unmounts the drive when finished.
One last bit of esoterica: if the drive unmounts and SuperDuper! quits after every backup, how do I know it actually ran each morning? Simple, I configured SuperDuper!’s Growl settings to leave a “sticky” notification on screen when done. That way I have a message waiting for me each morning telling me if the backup finished or failed.
Backblaze
As mentioned before, my SuperDuper! copies give me an offsite backup in case of catastrophe, but they could be up to two weeks out of date. Backblaze solves this by keeping an always up-to-date copy of my data stored online in their cloud. It’s a simple Preference Pane that runs in the background. Once you get through the initial backup process (took a full week for me), your data is always backed up with negligible network and CPU usage for only $5 per machine. It really is an excellent service and excellent software that, unlike many of their competitors, feels like a first-class citizen on your Mac.
So, if my house gets swept away in a flood (which it nearly was), what happens? Well, for $99 Backblaze will overnight me a DVD of my data. If that’s not large enough (which it isn’t), for $189 they’ll overnight an external hard drive containing everything. Sure it’s pricey, but this is a worst case scenario. And $189 is an absolute bargain when it comes to recovering my data.
Miscellany
Those three layers of protection keep me pretty well covered from a full system perspective. I’ve got incremental backups, offsite backups, and disaster recovery backups. In addition to that, there are a few other tools I use.
All of my source code, and I mean all of it, is stored in GitHub. I used to run my own Subversion server which got backed-up nightly to Amazon S3, but GitHub’s ease of use and UI are exceptional. I’m happy to say I’m a paying customer. But that still doesn’t mean my data is completely safe. What if GitHub were to lose my code? Due to the nature of Git, I have full copies of my repositories on my hard drive — which is, of course, backed up along with everything else mentioned earlier.
Email. All of my personal and work email goes through Gmail. I trust Google up to about 99%. But there’s always 1% of me that worries they might fuck-up my data or simply lock me out of my account. So, I keep a copy of Mail running on our media center (which is backed up, too) that downloads all of my mail via POP3. The only way to lose my email is if Google fails and my house burns at the same time. I feel confident that won’t happen . . . probably.
Contacts and calendars? Synced via MobileMe of course. In case Apple screws up? I can recover via Time Machine or one of my SuperDuper! backups.
Finally, miscellaneous documents, financial records, 1Password keychains, etc. I stopped using my Mac’s “Documents” folder a long time ago. Instead, everything gets saved into Dropbox and mirrored across two other Macs and in their cloud. In addition, super important files like tax returns, warranty receipts, etc get copied into Amazon S3.
Whew
So that’s it. That’s my backup solution. It’s changed quite a bit over the last four years. Of particular note is that I’ve completely eliminated CD/DVD backups. I can’t even remember the last time I burned a disc, as everything is handled over the network now. Also, I’ve moved from backing up only the critical pieces of my system to full-on, multiple, bit-for-bit backups. Again, as storage prices have fallen, this was inevitable — and I’m so glad it’s finally happened.
So take my advice as someone who has lost and seen others lose critical data in the past. Backups aren’t something you “get around to”. They’re processes you need to put in place and do, now.
I pester a lot of my friends about this who don’t backup at all. They always say to me “Oh, I don’t really have anything important.” That may be the case for a very few people, but now that our lives are almost completely digital, there’s always something at risk. You need to take a few minutes and really think — imagine standing on your lawn at night, watching your house burn. Get past all your possessions, your furniture, your clothes, even your prized DVD collection from college and the note your first girlfriend wrote you. Where are your photos? Your home videos? Your tax returns? What about the insurance records you’ll need to start rebuilding your life? Do you even have your agent’s phone number on you?
I admit my solution may be over the top for some people, but you’re a fool if you don’t have at least one backup in place.
On this lazy Sunday afternoon I thought I’d take the opportunity to mention a few open source projects I’ve recently updated. GitHub makes sharing code so ridiculously easy, it’s a shame not to call attention to it occasionally in case other people might find something useful.
Sosumi 2.0
First up is Sosumi 2.0. Last year, when Apple launched the Find My iPhone component of MobileMe, I immediately saw an opportunity to grab persistent location information from my phone — without background processing. Although Apple didn’t supply an API for this information, it turned out to be easy enough to scrape their site and wrap it up nicely into a PHP class. Nat Friedman even used it as a way to automatically update his Google Latitude position in his playnice project, and I built a similar script for Yahoo!’s Fire Eagle service. It all worked well enough, but it was slow and prone to breaking whenever Apple updated me.com.
Fast forward to last week, Apple released an official Find My iPhone client for iPhone and iPad. The mere fact that they released this means there had to be a hidden “official” API somewhere. After a few hours messing around in WireShark I found their API end point and re-wrote Sosumi to talk to their API just like the client app. The result? Dramatically faster location updates (10x) and a solid script that’s immune to changes on MobileMe’s website.
<?PHP
include 'class.sosumi.php';
$ssm = new Sosumi('your-username', 'your-password');
$location = $ssm->locate();
That’s it. $location will be an array populated with your phone’s latitude, longitude, and a few other useful data points. What you do with this information is up to you!
PHP HTML Compressor
Like the name says, this project is a small PHP class that accepts an HTML document and minifies its filesize by removing unnecessary whitespace and blank lines. It takes care not to touch fragile areas like <pre> blocks. The result is HTML that renders exactly the same in the browser but (in my testing) can be up to 15% smaller. In today’s increasingly mobile world, every byte over the wire counts — and this is a simple way to speed up your page load times.
The compressor can be used in three ways:
Pass it an string containing HTML and it’ll return the minified version.
As full fledged command line utility. Pass it a filename or pipe content to it via stdin and it will send the minified version back over stdout. This is super useful for adding automatic compression into your deploy/build scripts.
Or as a WordPress plugin that automatically minifies all of your posts and pages. Combine it with wp-super-cache and you’re well on your way to a speedy site — even on a shared host.
For an example of the type of HTML the compressor produces, just take a look at the HTML source of this site. Every page is piped through the compressor before being saved as a static file on my server.
Google Search Shell
My google-shell project is another small command line utility. It’s a simple interface to Google’s search results that talks to their AJAX Search API. It lets you easily pull down the top results for any query — including the result’s URL, title, and a brief abstract from the page. It has quite a few options that allow you to customize the output to be either human readable or digestible to other scripts. For example, here’s an ugly, ugly shell command that shows off the power of what having Google at your fingertips can do:
URL=`gshell -fun1 "imdb american beauty"`; curl $URL | \
sed -n 's/.*\([0-9]\.[0-9]\)\/10.*/\1/p' | head -n1
In case you don’t speak nerd, that tells google-shell to return only the URL of the first result for the query “imdb american beauty”. In other words, the same thing as Google’s “I’m Feeling Lucky” option. It then takes that URL, downloads it, and pipes it through a messy sed and head command that extracts the IMDB rating for American Beauty. Granted, that’s quite a lot to type — especially considering you could open a web browser and google it yourself much faster. However, if you were to add that long command as an alias in your Bash profile. you could very quickly write a command like
imdb "american beauty"
That would instantly return you the rating of whichever movie you specify. Nerdy, but cool, right?
Anyway
As always, the three projects above and all my open source code are available on GitHub. Hopefully you’ll find something useful. If you do, I’d love to hear about it — and I always welcome bug fixes and other contributions.
A year and a half ago I wrote about OpenFeedback, an open source Cocoa framework for gathering feedback from your users. Initially, it was a sister project to Appcaster, my indie dashboard web app. Since then, Appcaster has grown up and morphed into Shine, but OpenFeedback remained unchanged. Tonight, though, I took a few hours off from Highwire and rewrote OpenFeedback from scratch.
The rewrite wasn’t strictly necessary, but it certainly didn’t hurt. The original code was hurried and in poor shape. I was able to cut the amount of code by 30% and give the dialog a more modern looking tab view.
Like before, adding OpenFeedback to your application is trivial — there’s no code required. You simply link your app against the framework and hook-up the appropriate actions in Interface Builder. In under five minutes you can have an elegant way to encourage users to ask questions, submit bug reports, and suggest new features.
My long term goal for OpenFeedback has always been for the Mac developer community to rally behind it, making it a drop-in standard much like Sparkle. That hasn’t happened yet (obviously), but Shine has been getting some goodattention lately. If I’m lucky, maybe some of that goodwill will carry over and help kickstart things along.
I’ve been wanting to switch my online store away from PayPal for quite a while now. Although there are a bunch of PayPal horror stories floating around the web (here’s a recent one), my main reason is to make my life simpler. As much as I like rolling my own solutions, it’s too complicated to offer quantity discounts, coupon codes, and multiple currencies on top of the PayPal API alone. After a lot of investigation and much urging from friends, I made the switch Sunday night to FastSpring.
I couldn’t be happier.
In addition to what is quickly becoming legendary customer support, their e-commerce platform is a dream to work with. Without even reading the documentation, I was able to setup my store and fully integrate it with my backend license fulfillment system (Shine) in under two hours. And that’s doing things the complicated way. If I weren’t such a control freak, I could have handed over the license generation and email confirmation responsibilities to their system as well.
The only tricky part I came across was creating a custom theme based on their default style. The documentation for creating a custom theme from scratch is well written and easy enough to follow. But, unfortunately, if all you want to do is add a custom header or make a small tweak to their default style, there’s no easy way to do so, since they don’t supply a “starter” theme to work from. But, with a little patience you can reverse engineer things easily enough and extract the assets you need. And that’s just what I did to create the look and feel of my store. Once I had their basic layout copied, dropping in my Click On Tyler header was a snap.
You can download the default theme I put together, here. Hopefully it’ll save you some time. Or, better yet, maybe FastSpring would be kind enough to post it to their documentation page for everyone else to use as well.
Update: Did I say legendary customer support? I mean it. It’s a little after 1am here, and FastSpring just emailed me a quick thank you along with their official default theme. Awesome work guys (and gals).
Two years ago, shortly after I released VirtualHostX 1.0, I wrote about Appcaster – a web dashboard for Mac developers I built that manages my application updates, payment processing, etc. With the release of VHX 2.0 and Incoming!, I decided it was time to rewrite Appcaster as the original code was hurried and hastily patched over the last few years.
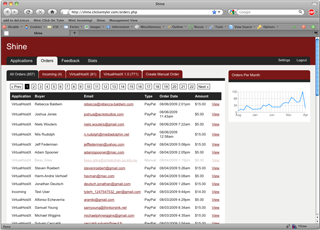
Today I’m happy to officially announce Shine, a revamped version of Appcaster re-written from the ground up. The goal of Shine (more on the name in a bit) was to provide clean, easy to use dashboard for indie Mac developers and also to build a stable foundation that provides for future improvement down the road.
I chose the name Shine because, at it’s heart, it’s a complimentary product to Andy Matuschak’s Sparkle project. (Inevitable tagline: Your app already Sparkles, now make it Shine.) The core functionality, like Appcaster before it, is to automatically generate appcast feeds for your product updates. But it does a whole lot more, too.
Shine handles order processing using PayPal’s IPN service. That includes generating the license information (using either Aquatic Prime or your own, custom scheme), emailing it to the user, and managing the database of orders. It also computes aggregate stats based on your users’ Sparkle update requests, collects user feedback (bug reports, feature requests, questions), and automatically stores your application updates in Amazon S3.
In short, Shine manages my entire Indie Mac developer workflow.
The code is based on two of my other open source projects: the Simple PHP Framework and YUI App Theme. SPF provides a clean, lightweight, active record pattern to model the data, and yui-app-theme is an admin area CSS template built on top of the YUI Grids framework. Combining these two projects let me build Shine in record time (about 24 working hours).
The code for Shine is free to use (MIT license) and available on GitHub. Feel free to email me with any questions or feedback.
Sosumi is a PHP script that scrapes MobileMe and exposes Apple’s Find My iPhone functionality to the command line or your own web application. This lets you pull your phone’s current location and push messages and alarms to the device.
Like my previous blog post that dealt with AT&T’s Family Map service, my goal was to connect my iPhone with Fire Eagle by Yahoo!. There are a few iPhone Fire Eagle updaters available, but they’re all limited by Apple’s third-party application restrictions. Sosumi gets around those restrictions by running every few minutes on your own server rather than the device itself. In my case, I’ve setup a cron job to run the script every fifteen minutes and push my location to Fire Eagle.
Until Apple releases a location API for MobileMe (not likely, and not their job), this will have to do.

