Back in August I wrote about my experience switching this blog from WordPress to Jekyll. Three months in, I’m happy to report everything is going swimmingly. I survived a few high traffic moments from Hacker News and was thrilled to see the site stay up even when I managed to break MySQL on the server.
The only issue I’ve faced is a higher barrier to writing new content. Switching away from WordPress means I had to give up their web interface and one-click posting. Instead, my workflow is
Write a post using some text editor – typically TextMate on my laptop.
Preview and double-check that the rendered Markdown content is correct.
Commit the file into git.
ssh into my web server
git pull the new post
Run jekyll
As you might imagine, steps three through six are a little annoying. They’re just invasive enough that I dread — just a little bit — adding new content and especially correcting typos.
What I want is something more automatic. Thanks to Dropbox and a little server side magic, I’ve got a solution that completely eliminates those last four steps. And while I know I’m not the first person to come up with the following solution (although I’m having trouble finding another example online at the moment), I do want to document my setup both for my sake and anyone else looking for the steps involved.
Here’s what’s going to happen:
Write a post using markdown and save it into the _posts folder of my Jekyll site stored in Dropbox.
The file gets synced to my server which is also running Dropbox.
A cron job on the server notices the new file and automatically runs Jekyll, updating my site with the new content.
Other than actually writing the content, everything else is automatic. The whole system took about twenty minutes to setup. Here’s how…
Configuring Dropbox
I’m assuming you’ve already got a Jekyll site built and stored somewhere in Dropbox. The next step is to share that folder via Dropbox with your server. Installing Dropbox on Ubuntu is relatively painless if you know your way around the command line. Per their instructions
cd ~ && wget -O - http://www.dropbox.com/download?plat=lnx.x86_64 | tar xzf -
Then, you’ll want to download their helper script that lets you start/stop the Dropbox daemon. It’s linked at the bottom of their Linux installer page.
Once you’ve got Dropbox installed, I’d suggest creating a new account just for your server. This lets you selectively share folders of content from your primary Dropbox account. This is important for a couple reasons. First off, I’ve got 60GB of data in Drobox — that’s way more than my small Rackspace cloud instance can handle. Also, I simply don’t feel comfortable having so much personal information just sitting around on my server.
With the software installed and running, use Dropbox to share your Jekyll folder with your new server account and wait for it to sync.
Watching for Changes
The next step is putting in place a process to automatically watch for changes to files in our Jekyll _posts folder and then rebuild the site. I’m sure there are a bunch of tools available on Linux to handle this; the first one I ran across was incron. It was surprisingly easy to setup. Like a cron job, you give it a command to run and when to run it. But instead of a date/time, you give it a path to watch and which filesystem events to listen for. Installing was simple:
sudo apt-get install incron
Then, you need to give your user account permission to run incron jobs.
sudo vim /etc/incron.allow
and add your user account name to the list — save your changes.
Finally, add your job via
icrontab -e
The icrontab jon syntax looks like
<path to watch> <file system event conditions> <command>
A few months ago at work we ran into an odd user experience problem. The home screen for one of our iPad apps included a small icon in the navigation bar showing the current weather. Normally it displays the weather for the user’s current location or any location they’ve saved. No problem. But what do we show the first time the app launches? At that point, they have no saved location preference and we don’t know their physical location because they haven’t yet opted-in to CoreLocation. We came up with three options.
Don’t show anything, or show a generic no-location-set icon. We tried this, but our designers didn’t ilke the empty experience.
Immediately prompt the user for permission to access their location as soon as the app launches. We nixed this idea, too, since we didn’t want an ugly system alert to be their first interaction with our app.
Pick some standard default location until the user chooses a different one.
We actually went with option #3 and set New York City as the default location. Unfortunately we found that this confused users. Even though they hadn’t given us their location info yet, they still assumed that the icon represented their local weather forecast. Imagine seeing a sunshine icon when it’s pouring rain outside. Not good.
That led us to consider a fourth solution. Over lunch we came up with the idea of trying to infer the user’s general location based on the data available in their address book. If it worked, we could provide an approximate weather forecast on first launch without popping-up a nagging alert window.
On Mac, doing this is easy. Just query the user’s “Me” card and pull out their city or zip code. But on iOS, for privacy reasons, we don’t know which card is the user’s.
Thinking a bit more about the problem we realized that most people know lots of people who live near to them and fewer people as the distance increases. So we decided to look through the user’s address book and find the most common city, state, and zip code. The idea being that would let us infer the user’s state if nothing else.
The code for this was pretty quick to write. We built a small sample app and distributed it to everyone in the office. We were shocked to find out how well it worked. It correctly guessed the user’s appoximate location for all but one of the devices we tested it on.
In the end, however, we chose not to add this “feature” to the app. We decided, while clever, it was just a little too creepy even though we never did anything with the data. But, it was still a fun thought experiment and a nice proof of concept to spend an afternoon on.
Almost four years ago today, I moved across the country and accepted a job at Yahoo!. But one of the main reasons I took the position happened six years before that.
In the Fall of 2001 I was a Sophomore in college at MTSU. Each morning I’d roll out of bed and open my Yahoo! home page. It was the first step in my morning routine. I’d check the news, check my email, then get ready for class.
On Tuesday the 11th I woke up at 7:45. The first thing I saw on Yahoo! was a headline that a plane had crashed into one of the towers. I clicked through to the article, but it was such breaking news the whole story was only three sentences long. It had just happened.
I woke up my roommate — a pilot himself — and turned on CNN just in time for both of us to watch the second plane hit live. Neither one of us spoke about it. We just sat there in silence watching the morning unfold.
I haven’t spoken to Chris in years, but if he’s anything like me, that image turned into one of the defining moments on our way to becoming adults. And looking back, we both would have missed it if not for the news being reported on Yahoo! that morning.
And so, six years later in September 2007, I was sitting in Starbucks with my Yahoo! offer letter in hand trying to decide. I remember thinking how much Yahoo! had indirectly changed my life that day and with a thousand other small contributions since then. And now I was given the opportunity to work for them and possibly impact millions of other people, too.
That’s why I took the job.
So tech pundits can write gleefully about the fall of Yahoo! — the many missteps they took during their short corporate history. But fuck ’em. I’m proud I got to work there and with so many incredible people for three full years. And I’m sad to see Yahoo! put themselves up for sale. There are few companies around with such reach — few that can claim to have changed the lives of so many people with nothing else but a few bits over the wire.
Last week I finally took the plunge and completely switched this website from WordPress, which I had been using for over four years, to Jekyll. There are tons of articles online about switching, so I’m not going to attempt to write any sort of exhaustive guide about the process. These are just my own first impressions — one week in — along with a few lessons learned and a couple scripts I wrote to automate the process.
Why switch?
First off, let me be clear that I didn’t switch because of any failing on WordPress’s part. I’ve been a happy WP user for years, and I’d still recommend it to other web writers with no reservations. However, because of its dynamic nature, WordPress is succeptible two to problems that I got tired of dealing with:
WordPress can be slow. Because WordPress renders your site from a database on each page view, it can quickly grind to a halt during a burst of traffic. And before you email me, YES, I’m well aware of all the caching best practices and plugins you can use to speed up things. But short of having WordPress output the entire site as static html files after each change, you’re always going to run into some initial PHP overhead. Even with WP-Super-Cache installed and tuned, this site became unresponsive the last two times I landed on Reddit and Hacker News. That’s unacceptable.
Security updates are a bitch. That’s especially true for a self-hosted install of WordPress. Every security point release is an annoying fifteen minutes out of my day where I have to download the latest release, upload to my server, test for any regression issues, commit the changes into Git, etc. I’ve done this a thousand times before and frankly I’ve got better things to do with my time. I don’t blame WordPress for the security fixes. In fact, I applaud them for reacting so quickly. As the most popular blogging platform I know they’re a huge target and they do a great job managing that risk. I just don’t want to deal with it anymore. With static HTML files there is no attack vector to worry about.
Let’s be honest. I’m a geek, and the thought of keeping my site organized as a few folders of text files in a git repo is awesome.
Switching
I had poked around and exprimented with Jekyll a few times before finally deciding to swtich, so I was already familiar with how the system works. (The docs are available if you want to know more.) As a bonus, I’ve been writing my blog posts in Markdown for years, so there were really only two steps between me and a fully static site:
Pull all my blog posts and pages out of WordPress’s database and save them as Jekyll formatted text files.
Convert my existing WordPress theme into a Jekyll layout.
For those who are wondering, the whole proceess took about three hours on a Saturday night. Not too shabby.
Exporting Out of WordPress
The first big step towards migrating to Jekyll is getting all of your content out of WordPress into a format Jekyll can use. Buried deep inside the Jekyll Ruby gem is an importer script for most of the major blogging platforms including WordPress. Unfortunately for me, I don’t know Ruby, and I’m not familar with the gem system. I fooled around with their (seemingly out of date) instructions, but decided it would be faster and more foolproof just to write my own export script. Many of my pages and blog posts have custom post fields attached to them for setting things like page titles and URL slugs. Writing my own script ensured all those settings would come through during the export.
As for the script itself, there’s not much to it. It pulls all the content from your WordPress database and saves each post and page out as a Jekyll formated text file.
Building the Layout
Creating the Jekyll layouts were suprisingly simple. I basically just took my existing HTML as rendered by WordPress, saved it onto my desktop, and cut it up into a few template and include files. The layouts and includes are available to look through.
The flow of the templates is faily simple. Each Jekyll controlled page inherits from the layouts/default.html file.
{% include header.html %}
{{ content }}
{% include footer.html %}
The header.html and footer.html includes are just raw HTML that build out the bulk of the site. One thing to note inside each is that I’m using a bunch of Jekyll variables that are echoed out during the Liquid processing. Each page’s title and meta description is pulled from front matter defined in the corresponding Jekyll file. I’m also prefixing all of my static content URLs (images, stylesheets, JavaScript, etc) with a site.cdn variable which is defined globally. Currently, this points to my CDN domain on MaxCDN, but if they ever should go down (or if I switched away) I only have to change one line and re-run Jekyll to begin serving content from an alternate domain.
Any Concessions?
Yep, but only one. While I’m sure with enough hacking around I could have totally replicated my WordPress site’s structure, I didn’t want to spend a lot of time rebuilding a bunch of archive pages that didn’t matter other than (perhaps) for search engine ranking. So my old monthly archive pages as well as the indexed blog pages went the way of the dodo. To make up for the blog index, and to ensure my old content stays available in Google, I setup a simple index listing all of my posts, ordered by date.
Odds and Ends
Migrating to Jekyll gave me an opportunity to go through my four year old Amazon S3 bucket where I store all of my static content. A lot of cruft and abandoned files have built up over the years, so this was a good chance to clean it out. With a few thousand files to go through, I certainly wasn’t going to do it by hand. So here’s a quick script that scans a local copy of the bucket and checks each file to see if it’s referenced anywhere on my site. If not found, it deletes the unused file. It was incredibly easy to do since all of my content is now plain text. (Yay, Jekyll!)
For Any Mac Developers Out There
I’m putting this entire site’s content online in GitHub. Not because that’s where it’s hosted or deployed from, but simply so other people can poke around and hopefully find some useful snippet. Along with all the Jekyll stuff, you’ll also find quite a few PHP scripts buried in my Mac app folders. These are all the integration scripts that connect this site to Shine – the indie Mac dashboard I use to run my little software business. These scripts do things like process upgrades, serve downloads, display changelogs, etc. It’s all there. Just go exploring and you’re bound to find them. And if you have any questions about how/why I did something, feel free to ask.
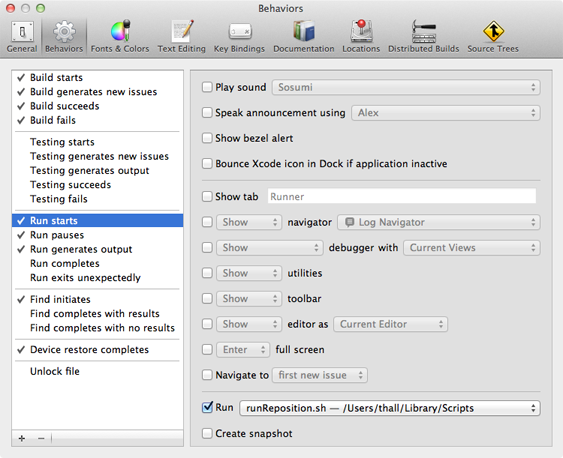
If you work with two monitors of different sizes, Xcode has an annoying bug of launching the iOS Simulator partially off screen — forcing you to manually drag it into position using the mouse. It’s not that bad the first time, but after a full eight hour working day with hundreds of launches, it gets very tedious.
Luckily, we can solve this with Xcode 4’s new “Behavior” settings and a little AppleScript.
Open up your favorite text editor and create the following script:
#!/bin/sh
osascript -e 'tell app "System Events" to set position of window 1 of process "iOS Simulator" to {-864, 134}'
Where where {-864, 134} are the {X, Y} coordinates you’d like the simulator positioned at.
Save the script somewhere appropriate and select it as a new “Run” command in Xcode’s “Run Starts” behavior.
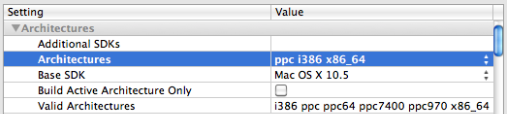
Last week I released a minor update to VirtualHostX. Shortly thereafter, my inbox was flooded with reports of an “unsupported architecture” error on launch. After a quick lipo test I verified that somehow I had managed to build and ship the app as Intel only — no PowerPC support.
I went through my git revision history and was able to track down the error. From what I can tell, the Xcode 3.2.6 update removes the default universal binary option. That’s fine for new projects, but I was completely taken by surprise to see it modify the build settings of an existing project.
Regardless, now that the (once famous) universal binary checkbox is gone, here’s how to add PowerPC support back.
In your target’s build settings, change “Architectures” to “Other” and specify “ppc i386 x86_64”.
Note: It’s entirely possible this whole episode was my fuck-up and not Xcode, but there are a bunch of similar reports online. So who knows? It certainly wasn’t mentioned in the release notes.
I spend about ten hours a day staring at two 27-inch Apple cinema displays. It makes coding great. But, with that much screen real estate, I keep losing my mouse cursor. I’ll have to jiggle it around for half a minute trying to find where it’s disappeared to.
No more!
Yesterday I discovered OS X has an option in the Universal Access Preferences pane that lets you adjust the size of the cursor from normal all the way up to holy-gigantic. I have mine set to a comfortable 33% — which is just big enough to keep from getting lost, but not so large that I can’t tell where I’m clicking.
For the last twelve months I’ve been keeping detailed records regarding the number of users pirating my Mac apps and toying with different ways of converting those users into paying customers. I’m not foolish enough to ever think I could actually eliminate the piracy — especially since I believe there are a few legitimate reasons for pirating software — but I was genuinely curious as to what the actual numbers were, the motivations behind doing so, and if there were any way I could make a small dent in those numbers.
A quick summary for those who don’t want to read the full post (tl;dr)
Software developers are foolish if they think they can prevent piracy. The only goals worth pursuing are
Make it incredibly easy for honest customers to purchase your software.
Find simple, non-intrusive ways of encouraging pirates to become paying customers.
Retire to a sandy location with the tens of hundreds of dollars you’re sure to make.
A Bit of History and Harsh Reality
VirtualHostX 2.0 was released on July 19, 2009. Fake serial numbers first appeared (to my knowledge) on August 3, 2009. That’s fifteen days. Fifteen days for someone to take the time to engineer a fake serial number for a relatively unknown, niche app.
Nottingham was released on November 28, 2009. It took eight days for the first serial number to begin appearing.
Admittedly, the serial number scheme I used was incredibly simple. So it was no surprise that it was easy to crack. But seriously? Eight days? I doubt it took whoever did it more than an hour of actual work. I was just flabbergasted they cared enough to even take the time. A little honored truth be told.
So I did what any software developer would do. With each new software update I released, I made sure to ban the infringing serial numbers. Now, I fully realized the futility of what I was doing, but still — I thought that if I at least made it inconvenient for the pirating users to have to seek out and find a new serial number each time, maybe I’d win a few of them over.
Nope.
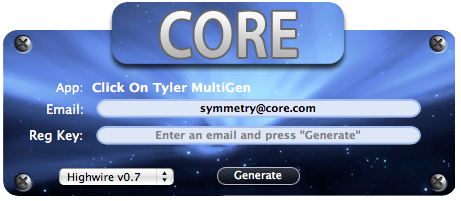
Rather than posting new serials, CORE (that’s one of the “teams” that release pirated software and serial numbers) simply put out “Click On Tyler MultiGen” — which was an actual app you can download to your Mac and use to create your own, working serial number for all of my products. Here’s a screenshot:
(It even plays music.)
So, with that out in the open (you can download it here), there was no point in banning serial numbers any longer.
Instead, I turned my attention towards measuring the extent of the piracy. I wanted to establish a baseline of how many users were stealing my app, so I could then tell if any of my attempts to counteract it worked.
I won’t go into the technical details of how I measured the number of pirated apps in use, but after a two month period I can say with high confidence that 83% of my users were running one of my apps with a fake serial number. Let that sink in.
Eighty-three percent.
Fuck.
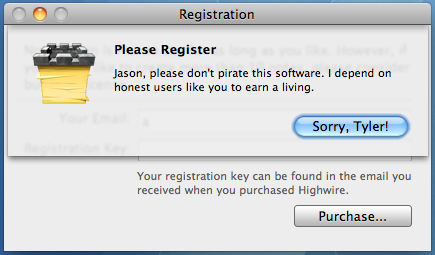
Experiment #1 – The Guilt Trip
My first attempt at converting pirates was appealing to their sense of right and wrong. (I’ll pause while you finish laughing.) I released an update that popped up this error message when it detected you were using a fake serial number:
Two things worth noticing:
I looked up the users first name (if available) from Address Book and actually addressed the message to them.
They only way to dismiss the message was the guilt-trip-tastic “Sorry, Tyler!” button.
Sure those things were cheesy — the folks on the piracy websites actually mocked me for it — but I thought adding a little humanity (and humor) might make a difference. And it did.
Over the next three months I saw a 4% decrease in the number of users pirating my apps. Now, is that for certain because of my silly message? It’s possible, but I can’t be certain. Nonetheless, I thought it was a strategy worth continuing.
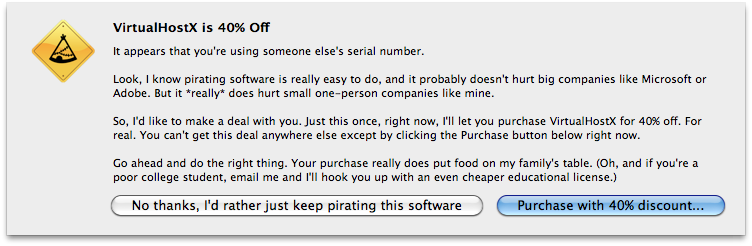
Experiment #2 – the guilt trip and a carrot
At the beginning of this year I decided to be a bit more proactive and actually offer users a reason to pay other than simply “doing the right thing”. So, I began showing this error message instead:
And I was serious. I presented the pirates with a choice. A one-time, limited offer that was only good right there and then. They could either click the “No thanks, I’d rather just keep pirating this software button” or they could be taken directly to my store’s checkout page along with a hefty discount.
(I was wary of doing this because I didn’t want to offend my real, paying customers who have been kind enough to part with their money at full price. I realize it’s not fair that honest users might pay more than the pirates. To them, I hope they’ll understand that I was simply trying to convert and make at least a little money off of users who were simply not paying to begin with. Hopefully the full-price you paid was worth it at the time and still is today.)
Did it work?
I was very careful to measure the number of times the discount dialog was displayed and the number of discounted sales that came through. The result? 11% of users shown the dialog purchased the app. I suspect that number might be a little higher as I’m sure some users saw the dialog more than once.
Despite 11% being a small number compared to the overall 83% piracy rate, I was thrilled. Most online advertisers would kill for an 11% conversion rate. I considered the experiment a success and let it continue on for a number of months until the numbers dwindled down to 5%, which brings us to today.
The Big Switch
Last month (April 2011) I released Nottingham 2.0 — and with it, a new serial number scheme that requires a one-time online activation. I’ve always been adamantly opposed to registration checks like this both as a developer and a user. But now that everyone is (almost) always connected, these checks don’t bother me as much as a user any longer. Especially if they’re unobtrusive and one time. Also, after seeing the raw numbers, the developer in me is now more concerned with buying food than lofty expectations.
I hope I’m not stirring up a hornet’s nest by saying this, but so far sales of Nottingham 2.0 are going well and piracy is virtually non-existent. Is that bound to change? Of course. I fully expect my scheme to be cracked at some point. But now that activation is involved, I have a much better view of when and how often it’s happening. Another benefit is that it’s no longer sufficient to pass around a serial number or even a key generator. Pirates will now need to patch the actual application binary (totally doable) and distribute that instead.
With those promising results in mind, I made the decision to convert my existing VirtualHostX 2.0 users to the new serial scheme as well. My goal — as always — wasn’t to stop the piracy but at least make a small dent in it.
My foremost concern was to make things simple for my existing customers. Under no circumstances did I want to annoy (or piss off) them. I couldn’t just invalidate all of their old serial numbers and send everyone an email with their new one. That would surely prevent someone from using the app right when the needed it the most. I had to make sure the switch was as frictionless as possible.
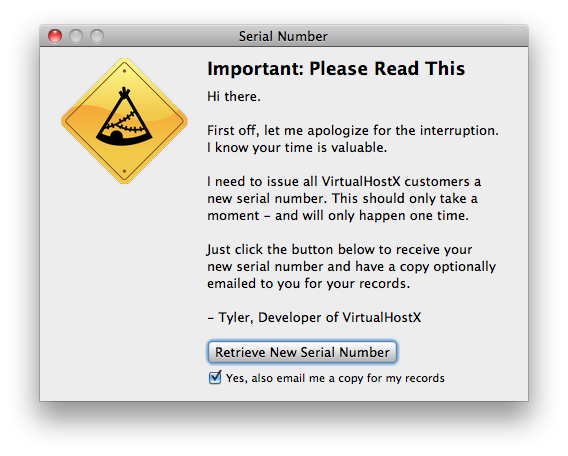
So, I toyed with different upgrade processes for a few weeks and finally settled on a system that I deployed with the 2.7 a few days ago. Here’s how it works.
The first time the user launches VirtualHostX after getting the automatic upgrade to 2.7, they’re shown this window:
I explained the situation as plainly as possible while also being upfront with the understanding that this is an inconvenience for them, not me, and the requisite apology. I also made it simple — one button to click — no other steps.
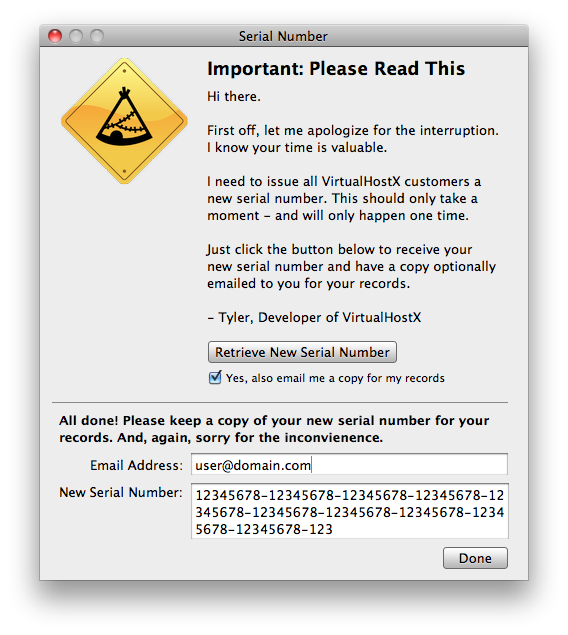
So, click the button, wait about five seconds and:
The app automatically connects to my server, validates their old serial number, generates a new one, and registers the app without any other user intervention. It’s all automatic.
So far the switch has gone well. I’ve seen about 30% of my registered users go through the update and have had exactly two emails — not complaining — but just confused as to what was going on. One customer even wrote in to say:
That was so painless. Great job on the messaging and single-click process. Very well done.
So that makes me feel good. Even though I wish I could have avoided the process, I’m glad it appears to be going smoothly. If any other developers ever find themselves in a similar situation, I can highly recommend this approach.
So That’s It
Many of the points I’ve written about are hardly new or exciting to anyone who’s written software or pirated it. So I’m not posting this as some sort of revelatory treatise. Rather, I just wanted to document the experiences I’ve gone through as a one-man software company who’s trying to earn a little money while keeping his users happy.
In the end, the most important thing you can do is be respectful of your users’ time by writing software they’ll love so much they can’t wait to pay for. Once you’ve got that down, then you can try and encourage the rest to pay up 🙂
Two years ago I posted some quick instructions on how I keep my Adium chat logs synced between Macs using Dropbox. I’ve tweaked my setup slightly since then. Here’s my new approach.
First, if you already have Adium on multiple machines, copy all your logs over to a single Mac. You can merge the folders easily with an app like Changes. Once you’ve got a canonical folder of all your combined chat logs, place it somewhere in your Dropbox. Then…
If the output lists anything other than i386 or x86_64 you’ll get rejected.
This was particularly painful for me because it appears this check is only run when submitting a new version of your app — PPC framework binaries don’t cause a rejection during the original app submission process. I thought I was going crazy since I had made no project changes since the first submission and running lipo on the app binary didn’t return anything unusual. Hopefully this will save someone else the hour of head scratching I just went through.