. @KevinBHayes If you release your 1.0 with awareness that you may not succeed until 5.0, you're in good shape.
— Daniel Jalkut (@danielpunkass) July 28, 2014
A Candid Look at the Financial Side of Building Mac Apps on Your Own
Earlier today, my friend Jared Sinclair published an incredibly brave and candid blog post summarizing the financial earnings of his iOS app, Unread.
To the extent that my wife is comfortable with, I’d like to share my own financial situation as another data point – but from the perspective of someone who has experienced slow and steady growth developing Mac – not iOS – applications since 2007.
If I were a betting man, I’d wager that Jared’s post was inspired by Brent Simmons’ blog post from last week. In it, Brent asks
Who at the Table is an Indie iOS Developer?
There are a ton of Mac and iOS developers in the Seattle area and almost all the iOS developers are making money either via a paycheck (they have a job) or through contracting.
The only local indie iOS-only developer I could think of was me and even that won’t be true for much longer, as we’re working on Vesper for Mac.
There probably are other local indie iOS-only developers, but I just can’t think of them at the moment. At any rate, they’re rare.
Looking at my own developer friends, I can’t think of anyone who is surviving solely on revenue from their own iOS (not Mac) apps other than Jared. Like Brent says, everyone I know is either employed full-time or relies on contract work to get by.
However, for two wonderful years in 2012 and 2013, I was living “the dream” – albeit by taking a slightly different route towards indie-hood. But before we get to the financial details, first, a bit of history.
I started building Windows desktop apps with Visual Basic when I was eleven. As I grew older, I became frustrated with the inability to get my software in front of people. This was the mid-90’s and there were certainly no app stores and very few people ever thought to download software from the internet. And, even if they did, how would they pay for it?
This frustration eventually led me to web development where I fell in love with the freedom of publishing a site and having it instantly available to anyone with the URL. The relationships I built with my visitors and customers sustained my interest in web development through college and turned into a profitable career. But I always missed the physicality of shipping desktop apps.
In 2003, when I switched to Mac full-time, I quickly fell in love with writing desktop apps again – this time with Carbon and Cocoa. I built tons of toy apps, but it wasn’t until 2006 that I finally began working on a real idea with the intention of selling the software. The internet had come of age and people were downloading and buying Mac apps from independent developers – and I wanted so badly to be one of them.
The app I chose to build was VirtualHostX. It’s a Mac app that gives you a graphical way to manage the Apache virtual hosts on your Mac. Version 1.0 shipped on August 27, 2007. Since then, the app has grown in scope, gained a companion subscription web service, and reached version 5.0. In between those releases, I’ve also published a number of other Mac apps and one iOS app. A few have been discontinued, a few are still around, but none have thrived the way VirtualHostX has.
I’m getting closer to sharing my financials, which is why you’re probably reading this, but before I do that I’d like to say that I’ve truly poured my heart and soul into this app. It started out small. So small, that my original goal was to earn $7,000 over the LIFETIME of the app so my wife and I could afford to refinish the wood floors in our house. As you’ll see, it’s gone way beyond that. And for the seven years of its life, I’ve spent many thousands of hours building the app, tweaking the website, and – perhaps most importantly – giving the utmost care and high quality customer service I can manage.
While VirtualHostX may be simple on the surface, it does mess with your Apache system configuration files. Novice users can easily mess things up despite the app’s best efforts to eliminate any risk to their system. I have, on hundreds of occasions, done deep dives with users over email, phone, and chat into their system files to figure out problems. Quite often the error is tracked down to a typo they cut and pasted from a 2005 linux admin forum post when they were trying to do things themselves without my software. Seriously. But, I always keep a cheerful tone and do my best to help them out. All of that customer service work has led to a loyal following that I know is the engine of my success. But, more on that later. Now for some charts.
So, how has my little business done? Here is my yearly revenue each year since I started selling my first app in August 2007.
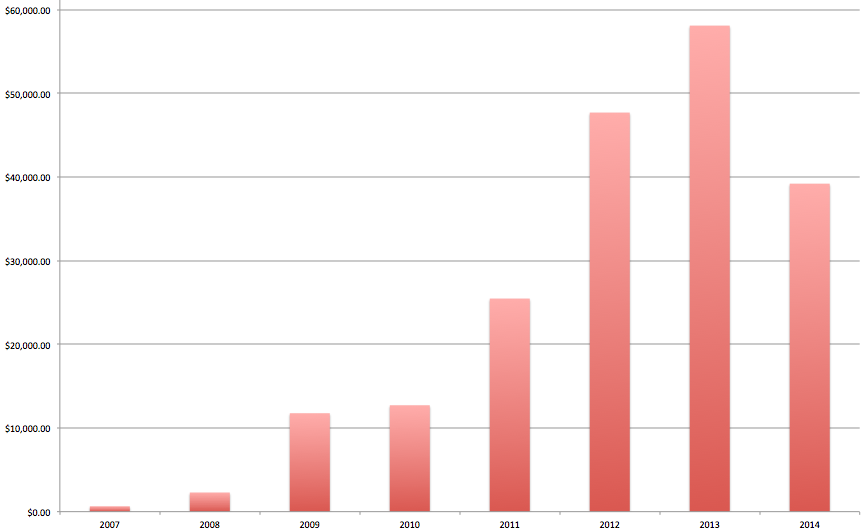
In 2008, my first full year, I made $2,288. Since then, sales have slowly and steadily grown primarily through word-of-mouth as I’ve done virtually no advertising. I’ve been fortunate to have quite a few smart people recommend the app on their blogs and through Twitter. With their help and my constant attention to improving the app, last year I brought in $58,093. Over the lifetime of the app I’ve earned roughly $200k – the majority of that coming in the last few years.
With the exception of 2012 and 2013, I always had other full-time jobs. My software company, Click On Tyler, was purely a side venture. However, as my revenue increased in 2011, I felt like I was nearing a tipping point where, along with my wife’s full-time income, I could take my side business and make it my only business. In 2012 I took that leap and went full-time indie.
For the most part, I believe my jump into indie-hood was successful. I credit my rise in sales in 2012 to the extra time I was able to spend working on VirtualHostX and my other (much smaller) apps. 2013 was equally as successful and I expect 2014 to be as well. However, with the birth of our first child in early 2014, my wife has decided to be a full-time mom and quit her job. So I’ve gone back to a salaried position and am relying on that – plus my app income – to support our growing family. While my app business is technically back to being a side project as it has been in the past, I’m no longer treating it as such. It’s now a full-time second income which replaces my wife’s previous job. We’re as dependent on it as we were her salary.
So, that’s the history of my software company and my development efforts. What have I learned and how is my business a better business than selling in the App Store?
Well, for starters, it takes a lot of patience. My sales didn’t appear overnight. It took five years for me to gain semi-stable financial independence. That’s something that I worry most iOS developers with indie dreams don’t appreciate. I’m not singling out Jared, but I think the “gold rush” mentality of the App Store leads many people to expect either instant success or epic failure. They lose sight that there might be a middle ground where you can grow your business slowly over time into something substantial.
I think part of that mentality comes from the relatively quick half-life of App Store apps. Most apps are launched feature complete on or near day one. They rarely continue to grow and gain additional features over time. Likely to blame for this is the severely restricted product focus that iOS apps demand. Apps on OS X are typically more complex. I’d wager iOS’s intense focus lead to users disappearing once the app has solved their initial problem. Mac apps, with their extra complexity and larger feature set, keep users coming back.
And speaking of customers, when you’re developing for the App Store, who are they? The truth is, you have no idea. All sales are completely anonymous unless they specifically reach out to the developer with feedback or support requests. Compare that to my situation selling directly to the customer. I have the full name and email address of everyone I’ve ever done business with. I can market to them when there are significant app updates, and I can see their purchase history when they contact me with questions.
Unlike the App Store, I’m also able to sell upgrades to my customers whenever a major new version is released. Take a look at this chart of my revenue per month.
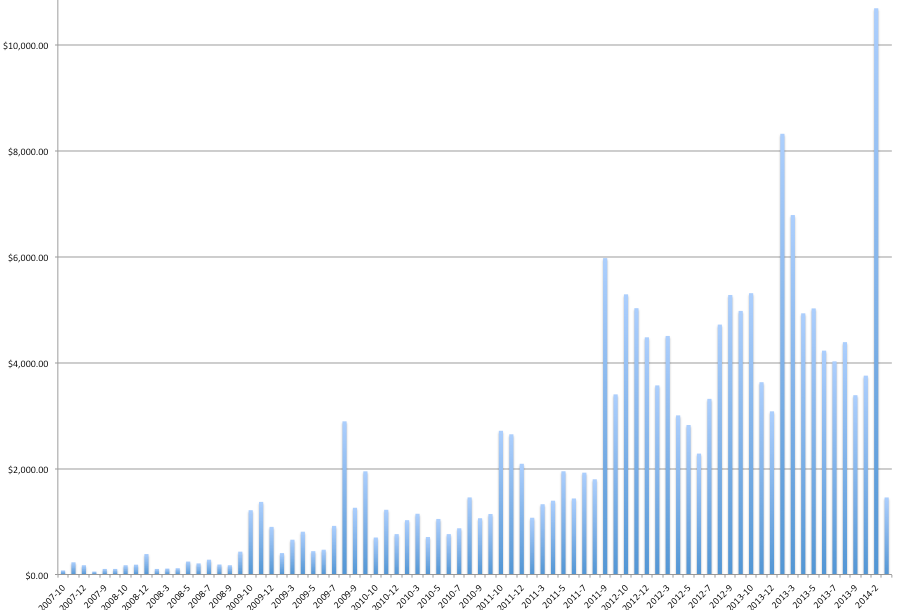
Like the first chart, you can see my sales have grown over time. But the monthly breakdown lets you see a few significantly larger sales spikes every 12 – 18 months. Those are the months where I release a major new version and market to my existing customers. Every year, that is my largest sales month by far. I’m not sure I could survive without that added boost. Sure, on the App Store you can release an upgrade as a new SKU, but you lose all of your existing customers and have no way to market to them. And there’s no way to offer them an incentivized upgrade price. Further, think back and remember the shit storm Loren Brichter created when he dared to charge a few bucks for version 2.0 of Tweetie.
And that leads me to another difference between developing for iOS and Mac. On the App Store, the price for apps has bottomed out. There are countless stories of developers, Jared included, failing to gain traction by setting an upfront paid price. Apps can require thousands of hours of work and yet can’t command a price of even $0.99. The only apps making money that I’m aware of are littered with scummy in-app purchases. For developers who take pride in what they build and don’t want to lower themselves to that level, there doesn’t seem to be a route to profitability.
With VirtualHostX, the opposite is true. In 2007, I priced the app at $7. Over time I raised the price to $9, $12, $14, $19, $24, $29, $34, $39, and, now, $49. With each price increase my total sales and revenue have only gone up. And, as an extra bonus, the quality of my customers has increased as well. I never received as many angry emails from customers as I did when the app was priced cheaply. Now that VirtualHostX costs “real money”, I weed out those users who aren’t willing to make a financial commitment to the app and my company.
On the App Store, it’s unheard of to charge what would have been a fair price pre-App Store. Very few companies are able to get away with such things. Those who do, (Omni, Panic, Day One), create complex apps that grow over time and are balanced by their Mac counterparts. They don’t go for the one-shot $0.99 apps. Instead, they build real apps of value and price them accordingly. Jared alludes to this in his post. He says
Unread launched at an introductory price of $2.99 USD. I rose the price to $4.99 two weeks later. In retrospect, I think I left a lot of money on the table.
I think he should have gone even further. If Unread truly is the premium app he believes it to be, which I tend to agree with, why not charge a more sustaining $19.99? Better yet, build a Mac counterpart and sell it to a customer base that still believes in paying for quality products.
So. What have we learned?
Well, it’s my experience that you CAN build a sustainable software business selling to consumers as an independent developer. You just can’t do it in the App Store any longer – if you ever could.
You need to start building for the Mac, where you can charge a fair price, sell directly to your customers, and charge for upgrades. Even then, success won’t happen overnight. But it is doable.
So, any thoughts? Since I’m in the sharing mood, any stats about my business you’d like to know that could be added to this post? Feel free to reach out.
How to Export Slow Motion Videos From iOS to Facebook
This was a puzzler.
I’ve had an iPhone 5S since last fall, but haven’t ever done much more than just play with the slow motion video capture feature. Yesterday though, I had a need to take a slow-mo video and post it to Facebook. I recorded the video easily enough, set the slow motion start and stop points, and then used OS X’s Image Capture app to export the video to my Mac. I figured I could then just upload the movie to Facebook.
Not so fast.
The video that Image Capture pulls off your phone is the raw 120FPS movie with no slow motion start/stop points. While this behavior actually makes sense, it’s not what I wanted. I need the version with the slow motion effect. I did some googling, and the only solution is to upload the video to Facebook using iOS’s native sharing feature. This gives the Photos app an opportunity to render the video at normal speed with the slo-mo effects in place. So I tried that, but the app complained the video was too large. Fine. I tried emailing it to myself – same problem. Too large. The Photos app wanted me to trim the video to a shorter length. I did some more googling but couldn’t find any way of exporting the full-res video with the slow motion effect in place.
Aha!
It dawned on me that Apple’s Photostream feature shares full-res videos to iPhoto on Mac. So here’s what I did…
- Create a new, shared Photostream that only you are a member of.
- Share the video to the new stream.
- Open up iPhoto on your Mac and navigate to the shared stream.
- Drag the video to your Desktop.
- Upload to Facebook/Instagram/wherever.
Boom.
Dropbox Photography Introduction
What follows is the first half of the introduction to the book I’m working on about organizing your photo library with Dropbox. I thought some of you might like to see what I’ve been working on as I get closer to launching in July.
I adamantly believe that our photos and home videos are the most important digital assets we have. They document our lives, remind us of our our best moments, and teach us who we were. Yet, most people rarely give a second thought to how they preserve, protect, and share those memories. They’re content to leave everything in a giant, digital shoebox that may or may not be backed up. Thousands of photos stored in your phone’s camera roll here, a smattering of memories uploaded to Facebook and Twitter there, and none of them organized, backed up, or protected in any way.
It didn’t use to be like this. For both my sister and I, from the day we were born until we turned eighteen, my mother kept a photo album for each of us for each year of our life. By the time my sister went off to college, our family room bookcase had amassed over forty albums – filled to the brim and overflowing with photos of our youth. My mother had a longstanding rule: if the house were to catch fire, my father’s first job was to get everyone out safely. He was then instructed to run back inside and save as many of those albums as he could. And in all seriousness, my mother wasn’t exactly kidding. Those memories meant the world to her. If she were to spill coffee on one of them she’d be sad. But if she were to lose all of them in a fire, she’d be devastated. Everything else in the house could be purchased a second time. But those albums were irreplaceable.
Today, things are much better. Sure we may print off and keep some of our family photos in actual albums, but most of our digital memories live on our hard drives, where we have plenty of opportunity to back them up and keep them safe. So why do so many of us go about our digital lives with our head in the sand? Every hard drive you own, whether in your laptop, your iMac, or even your super-expensive networked storage device, will fail. It’s a guarantee. One day, the photos and videos stored on it will be lost forever when the hard drive finally dies. So why wouldn’t you take a few simple steps and spend a little extra money to ensure that when it does happen, you have a backup in place?
I’m not sure when things changed, but I suspect it’s a two part problem brought on by our increasingly online lives. As digital cameras took over and people stopped paying to develop film, the actual price of each photo plummeted. And with it, the perceived value. Further, as the digital storage space available to us increased, people began taking more and more photos – eventually reaching the point where they could no longer keep track of their photo collections or find the tools to keep them organized and protected.
Instead of photo albums of family vacations and birthday parties sorted chronologically on a shelf, our digital photo libraries are a jumbled mess. Thousands of snapshots in a single camera roll on your phone, with no meaningful way to browse through them. The oldest ones haphazardly deleted and lost forever to make room for new ones. People mistakenly believe that they can always get their pictures back from Facebook if they ever need them. Or worse, they believe that Apple is somehow magically backing up all of their photos into iCloud. Neither one is true.
While researching this book, I had a conversation with two friends. Neither is technical at a developer level, but both are long-time Mac and iPhone users. They know their way around the platform.
My first friend, we’ll call him Ted, said he was having trouble with his iPhone. His photos and videos had grown to take up nearly 10GB of storage space. And with only a 16GB iPhone, his device was very nearly out of room. He wanted to know how to backup his photos off his device but still be able to access them when needed.
He assumed there was an Apple-centric way of doing this. He figured he could just buy more iCloud storage space. He was shocked when I explained to him that the only user-friendly solution I know of is Dropbox. I told him that even if he bought more than the default 5GB of iCloud space, he’d still be limited by his on-device storage limits. iCloud only backs up what’s currently on your phone. If you delete photos and videos from your device, they’re similarly deleted from your next iCloud backup.
I walked him through how the Dropbox app works. Install it on your phone, sign up for an account, and the app periodically uploads everything in your camera roll to your Camera Uploads folder in your Dropbox. Once uploaded, you’re safe to delete them from your device – freeing up space. Then, you can either use the Dropbox app to browse your photos, view them on your computer, or use a dedicated Dropbox photo app like the wonderful Unbound.
Ted thought that idea sounded great and was ready to sign up. But then I told him the catch – the free Dropbox plan only offers 2GB of space. He needed at least 10GB, which I said would cost $99 a year.
He was dumbfounded. In an age where seemingly every online service is free, why should he have to pay for Dropbox? I tried explaining the value it added and how much I loved the service, but he just couldn’t get past the idea that this was a service that Apple should be offering as part of owning the phone. I couldn’t really disagree with him. It does seem like a problem Apple should be solving, but they’re not.
My other friend chimed in. He said he wasn’t worried about his photos and videos because he was backed up. I asked if he were already using Dropbox or paying for one of the larger iCloud storage plans. He said “No, I bought the larger 32GB iPhone so all my data is backed up with Apple.”
This time I was flabbergasted.
He went on to explain that all of his data was safe because of iCloud. I let him finish and then had to break the bad news to him that iCloud only works for the first 5GB. Once you go beyond that, none of your data is backed up unless you’re a paying customer. Apple, through all of their flashy marketing around iCloud and promises of how it “just works”, has convinced a large set of non-technical users that their most precious data, their photos and videos, is safe when it’s actually anything but.
This is exactly the problem that I’m writing about in this book. I’m desperately trying to preach to users that the data you hold so dear isn’t being handled by Apple. If you lose your phone, in most cases, your photos and videos go with it. And as I talk to more and more people about this problem and explain to them how things actually work, so often I’m met with incredulous stares. Not that they’re surprised or outraged that their data isn’t safe, but at the sheer audacity that someone would suggest they need to pay for their data’s safekeeping.
In person and in this book, my goal is to make a solid case that your data is most definitely worth the measly $9.99 per month Dropbox charges. My sister was absolutely devastated when her iMac’s hard drive failed without a backup in 2005. She mistakenly thought that her iPod’s photo cache served as a full backup of her photos. I can still remember the awful look on her face when I explained that her four years of high school photos along with the first year of her college photos were reduced to nothing more than 160 pixel wide thumbnails.
Apple never marketed to her that her iPod Photo backed up her memories, but she still mistakenly assumed that when it asked to sync her photos. But now we’re in an even worse situation where Apple really is marketing to users that all of their data is safe. I can only cringe at the thought of how many customers go to a genius bar to get a replacement phone and are told “just sign into iCloud and all your data will be restored” only to find out that’s not the case.
My mother meticulously archived and organized our family photos into dozens of albums when we were growing up. All those albums and film development cost real money. Every roll of film, every trip to the camera shop, every album, and don’t forget all the time put into organizing and pasting photos into the albums. It was an investment. The idea that everything online should be free has created a pernicious entitlement culture where users are unwilling to pay a little money to safeguard their most precious digital memories.
It’s a terrible situation and one I’m trying to correct. This book is the antidote to most people’s digital negligence. It will teach you a simple method for organizing, sharing, enjoying, and protecting your most valuable memories.
Who this book is for
I should say up front that this book is for consumers. While the sharing and backup solutions I present may be of use to professional photographers, the organization and review strategies will likely clash with the workflows of people who take photographs for a living. I also won’t be covering how to handle and process RAW format photographs. Everything I write about will assume we’re dealing with JPG files from your camera phone, point and shoot camera, or your prosumer DSLR.
I should also say that the examples I present and the software I recommend are definitely Apple-centric. We’ll be covering ways to archive photos from your iPhone and iPad, ways to share those photos with Photostreams and Apple TV, and we’ll be using tools that, to my knowledge, are only available on Mac. Most of the ideas and tactics I write about can be used on Windows or Linux platforms, but the automation techniques are Mac only.
Why listen to me?
Hopefully everything sounds great so far. But you may be wondering why you should listen to me. What makes me the expert? The simple answer is that I’ve been thinking about today’s digital photography challenges constantly for the last few years as I’ve watched my own collection become more and more unwieldy. I’ve honed my workflow to be as simple and, most importantly, automatic as possible. I’ve learned that I lose focus and things grow unorganized as the complexity of my workflow increases. But, by keeping things simple, repeatable, and efficient I’ve found a happy medium where I’m able to keep my photo library under control without devoting too much time to curating it. It’s the techniques I’ve settled on over the last few years that I plan to share in this book.
Those techniques are modeled after the principles I’ve learned practicing David Allen’s Getting Things Done methodology for the last ten years. In his book, he teaches a series of concrete steps that can be taken to reign in any complex system. I’ve simply adapted his teachings into a workflow for managing your photo library.
Further, my background as a long-time Mac app developer provides me with additional insight into finding the best software tools and automation techniques for the job.
If you follow the steps I outline, you’ll quickly find yourself with an organized photo library that’s accessible on all your devices, backed-up in case of disaster, and shareable to all your friends and family.
Bellroy Note Sleeve Wallet Review
For six years I carried a bright green, nylon, kid’s wallet I bought from Target. I enjoyed the simplicity and “funness” of it. But last year I finally decided to grow up and buy a real, adult wallet. I hate fat, George Costanza wallets and, as a rule, only carry the absolute bare minimum of cards. So when I started shopping around my top priority was finding something equally as slim as the old kid’s wallet I had been carrying.
After reading lots of reviews I settled on a blue, leather Note Sleeve from Bellroy. It’s been a year since I started carrying it and I couldn’t be happier.
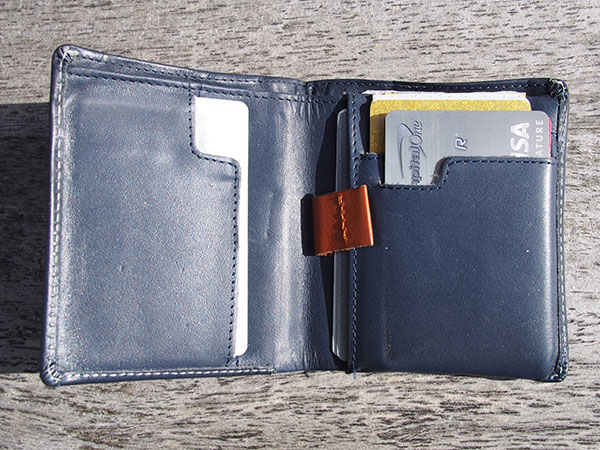
The wallet has two slots on the inside right side for your most frequently accessed cards. Each slot can hold two cards comfortably. Beneath that area, is storage for two or three less frequently used cards. There’s a small, leather pull-strap that allows you to slide the cards out for easy access. On the left is a single slot where I keep my driver’s license. Every wallet I’ve previously carried kept your license behind a plastic window so you could just show people your age. But, in practice, every restaurant or store I visited always insisted I take the card out and hand it to them. Prying it out from behind the plastic window was always a pain. I have no trouble accessing it with this wallet. I can pull it out and slide it back in without trouble.
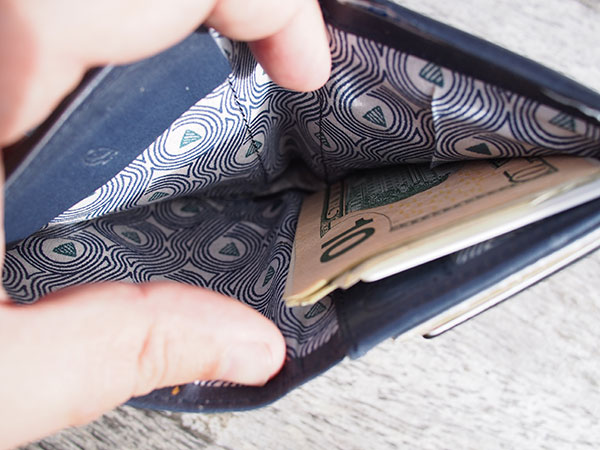
Like most wallets, the Note Sleeve has a full-length pocket for cash. This model is barely wide enough to fit unfolded American currency, so I normally just fold my bills in half. I really like the pattern inside the pocket. Of course, no one ever sees that except for me, but I like it anyway.
Inside the cash sleeve is a secret, hidden pocket. I use this slot for my auto and health insurance cards. I rarely ever use them, but always need them with me, so this extra, hidden pocket is great for that purpose.
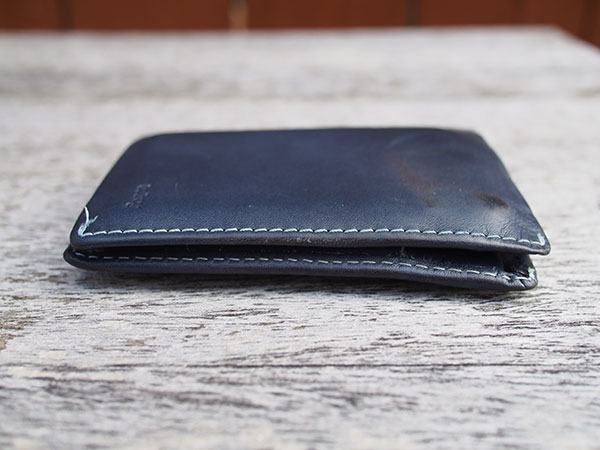
When folded in half, the wallet lays quite flat. I’ve compared it to a few of my friends’ wallets and the Note Sleeve is always the slimmest.
As I said above, I couldn’t be happier with my choice. It’s slim, very well constructed, and looks nice. I finally feel like a real adult.
Day One Journal Total Word Count
After my previous post I got curious as to the total number of words I’ve written in Day One so far. A quick Google search didn’t turn up any obvious solutions, so here’s a short PHP script that gives you a total. Just pass it a path to your .dayone journal file at the command line like so
php count.php /path/to/journal.dayone
A Happy Side-effect of Journaling Every Day
Back in October I wrote a post about how I’ve adopted a routine of journaling what I’m currently working on throughout the day in addition to a final recap of the whole day each night before bed. My one year anniversary of starting my journal passed back in February with little fanfare. But looking at it now, I’ve logged 626 entries and have a streak of 428 days in a row. As far as total word count, I’m guessing I’ve written somewhere between 75,000 and 100,000 words. That’s a whole book! Reflecting on that today has caused me to look back at everything I’ve accomplished this calendar year – a period where, because of the birth of my son, I thought I’d surely get very little done. Highlights include…
- Launching a brand new responsive website design
- Beginning work on a new book.
- Building and shipping a major new update to my flagship app, VirtualHostX.
- Building a shipping a new app and the accompanying web service.
- Recommitting myself to writing more on this blog – 10,000 words so far!
All while holding down a day job and learning how to care for a newborn. Not to brag, but I’m damn proud of myself for continuing to push my business forward these last three and a half months. And that’s caused me to think about what’s contributing to my productivity. What am I doing differently that’s keeping me on track and motivated.
The biggest factor I can identify is that my habit of journaling each day is finally starting to pay dividends. My nightly recap has forced me to be more aware of how I’m spending my time – precisely because every night I take five minutes and write down what I accomplished that day. On days when I don’t have much to write or when I fail to do one concrete thing to move my business forward, I don’t necessarily feel like a failure, but I do feel a little guilty. On the flip side, days where I do accomplish something give me a bit of a high – and the more days in a row I keep the chain in tact, the better I feel.
Because I’m now more aware of how I spend my time, I’m no longer haphazardly working on stuff in the moments in-between everything else in life. Instead of turning to my work simply because I’m bored elsewhere or I happen to have a free moment, I’m setting aside dedicated time each day for work.
My kid goes to bed at seven and my wife at nine. After that, the house is quiet and I’m free to do whatever I want. I’ve chosen to deliberately make those hours from 9pm until midnight all about my work. That’s not to say I don’t open a beer and have a baseball game playing in the background, but those three hours are now sacred to me. They’re when I get shit done. I no longer approach that time hoping I’m in the right mood and mindset to work. Because I have the daily journal entries to prove I’m capable of doing work at that time, I sit down at 9pm with renewed confidence knowing I’m capable and have a consistent track record of performing.
I can’t emphasize enough how important journaling has become to me. It’s caused me to be more aware of how I spend my time, which ups my confidence as I’m able to reflect on all the many things I’ve accomplished. Like a productive vicious cycle, that only serves to motivate me even more.
Rockwell – Sort of like a private Foursquare meets Fire Eagle
Back in 2008, when I worked for Yahoo!, I had the good fortune of chatting with Tom Coates a few times about the now defunct Fire Eagle location brokerage service. Fire Eagle was my absolute favorite product to come out of Yahoo! during my time there. I’ve always been fascinated by real-time location data and sad that Fire Eagle’s intersection of privacy and ease of use never caught on.
Anyway, fast-forward to last Summer, I was bummed that although so much of my life is documented through photos, tweets, and journal entries, my location data was missing. A few products tried to solve this problem post-Fire Eagle. Google Latitude (née Dodgeball) gave you a way to seamlessly track your location and view your history, but they’ve since sunsetted that product. And, besides, it was a little creepy having Google track your every step. (Which I realize they still are via Google Now, but that’s another conversation.) There was also other apps like Rove and Foursquare, but none of them offered quite the feature set I was looking for. In 2010, I even went so far as to reverse engineer Apple’s Find My iPhone API so I could remotely query my phone’s location. That worked great, but doing so on a regular basis killed my battery life. But, with iOS 7’s advances in background location reporting, I knew there had to be a better way. I wanted something that would automatically track my location as precisely as possible, respect my phone’s battery life, keep that data private by default, yet still offer the ability to granularly share my location as I saw fit.
So I did what I always seem to do. I built my own app. It’s called Rockwell, and it’s available on GitHub.
Rockwell consists of two components. An iPhone app that monitors your location and allows you to annotate where you are using Foursquare’s database of named locations. And a PHP/MySQL web service you can install on your own server that the app talks to.
As you go about your day, the iPhone app uses iOS’ significant location change reporting feature to ping the web app with your location. The web app stores your location history and allows you to go back and search your history either by date or by location.
Further, since the website knows your most recent (current) location, you’re able to share that with others. In my opinion, one of the reasons Fire Eagle failed was it was (by design) very difficult to get location data out of the service. You had to go through an intricate OAuth dance each time.
With Rockwell, you simply choose the location level you’re comfortable sharing – either precise lat/lng coordinates, current city, current state, etc – and a format – plain text or JSON – and Rockwell generates a short url you can pass around. You can use that URL to embed your plain text location on your blog, or you can use the JSON version to do something more API-ish with it. There’s no OAuth shenanigans to deal with. You can have as many short geo-links as you want, and each one can be revoked at any time.
One more thing I’d like to explain. The iPhone app reports two types of check-in data to the web service. The first kind is dumb. Just your latitude, longitude, and timestamp. Many apps like Rove and Foursquare use this data to try and generate automatic location check-ins. Based on your past history, your friends’ location, and your location, they try and guess where you might actually be at a given time. Doing this well is the holy grail of location reporting. The problem is that I’ve yet to see any service get it right. In a dense urban area, with hundreds if not thousands of locations per square mile, there’s just no reliable way to figure out where you really are with precision. (At least not without some serious machine learning, which I assume Foursquare is working on.) Rockwell dances around this problem by allowing you to augment your dumb check-ins with annotated ones. Just launch the app, tap “Check-in”, and Rockwell pulls a list of nearby locations from Foursquare. Just tap on one and you’re done. It’s saved to the web service alongside the rest of your location history.
Rockwell is working great for me currently. All the basics work. The majority of the remaining work is around coming up with nice ways to show your location history in a useful way. The code is available on GitHub. I’d love it if you gave it a try, sent feedback, and maybe even a pull request or two.
Minion for Mac
In case you missed it, I’ve been working on a new Mac app for the past month or so. I spent the last few days polishing things and getting it into an MVP state – not quite as full featured as I’d like, but complete enough that I felt comfortable sharing with the world. So, yesterday evening I launched Minion.
What is Minion?
It’s a simple concept. Minion watches for events to happen on your Mac and then notifies you when they occur. Right now, those notifications go to your email or your phone via SMS or the Minion iOS app.
The initial idea for Minion came from my good friend Mike over at Divergent Media. Back in his video editing days, he’d spend hours waiting for export jobs to finish. I have a few friends who do animation for a living, and they confirmed that, yes, waiting for a render to complete is boring and can take hours. But with Minion, you can point the app at whatever job you’re waiting on and go someplace else. Minion will buzz your phone when the job finishes.
How does Minion know when the job is done? It watches for what I call “triggers”. Things such as whether or not a file exists, if a file has reached a certain size, or if a file’s size hasn’t changed in the last five minutes. Minion can also monitor the titles of your windows or the color of a pixel on screen. Does the app you’re watching throw up a progress bar? Point Minion at a pixel at the end of the bar, and when it fills in, Minion will notify you.
But this is just the start. My long term goal for Minion is to create a local IFTTT service for your Mac. Choose from a long list of triggers to watch, and then pick a task for Minion to carry out when that trigger fires. Put the two together and you’ve got recipes you can save, reuse, and even share with other power users.
This is just the beginning.
The Thrill
Yesterday, Daniel Jalkut tweeted
The only things better than shipping an app are the thankless months of hard work that go into making it halfway presentable. Yep, it’s fun. — Daniel Jalkut (@danielpunkass) April 4, 2014
That’s an apt way of describing the strange mix of joy and awe programmers feel when, after hours, days, maybe even weeks or months of work, the computer does what you tell it to do.
I’ve been working on my new app, Minion, for the last four weeks. And, today, I finally had my first successful end-to-end test run of the app. Everything on the client side worked beautifully and then successfully talked to the web service and delivered a notification to my phone. It’s a thrill to see everything come together. A high that I’m not sure I could achieve so frequently if I were in any other profession.