Deactivated

It’s time.

The more men are freed from privation; the more telegraphs, telephones, books, papers, and journals there are; the more means there will be of diffusing inconsistent lies and hypocrisies, and the more disunited and consequently miserable will men become, which indeed is what we see actually taking place.

I read  The Kingdom of God Is Within You in college. I think I was too young at the time to fully digest it – for it to have the impact on me that it has had on others. Nonetheless, Tolstoy’s ideas have stayed with me in the seventeen years since then. Particularly the bit I quoted above. It seemed prescient at the time during the post-9/11 run-up to the war in Iraq when every news organization collectively lost their minds and got drunk on the power they found by turning up the volume, channeling fear, and scrolling sensationalized chyrons 24/7.

And now in 2020? There’s no need for me to spell it out. It’s all become exponentially worse in just a few short years.

Other than my unhealthy addiction to Twitter (which is clearly a huge part of our problem), I reached the point two or three years ago where I would only log in to Facebook once every few months. But I would never post anything. My Instagram account was made private long ago after a bunch of creepers started adding comments to photos of my kids they came across because I had (stupidly) tagged the images with the state park we were visiting.

Once all the old-guard tech companies realized there was no money to be made from instant messaging, they shut those networks down. Everyone I cared about migrated to text messages. I poured one out for Adium and haven’t even launched that app since 2016.

All of my close friends and family share exclusively through iCloud photo albums. (Oops.)

By the time 2020 arrived, I had sort of made peace with the idea that all those hundreds of friends I had on Facebook weren’t really very good friends after all. And I was honestly sad at the thought of no longer seeing my high school classmates’ kids grow up in photographs – even though I hadn’t seen or spoken to them since the day before graduation twenty years earlier. Except for that one click to confirm a friend request, of course.

As far as I was concerned, I was done with Facebook. And mostly Instagram, too. A quick look at my 1Password shows 842 website accounts. How many of those have I logged into in the last five years? How many of those services even still exist? I just assumed Zuck’s empire would become one more abandoned piece of my personal online history. And I was content to let my accounts lay dormant forever.

But then I read this article.

I’ve thought a lot about that story over the past twenty days. And in the course of writing this blog post I’ve taken the time to re-read it, gather my thoughts, and try to pin down exactly what it is that I find so objectionable. So anathema.

And I can’t do it.

It’s not just one thing. Or even a final straw. It’s all of it. Everything at once. An entire decade’s worth of shit, greed, hubris, and billions of people (myself included) who are both the perpetrators and victims.

What I think affects me the most is that I know how these things are built. And it infuriates me. I’m a developer. I’ve also worked in Product. And I’ve worked in Marketing. To a degree, all of these social networks are founded and grown organically. And perhaps they even become unicorns organically, too. But at some point we all have to admit that they do not continue to grow unbounded, continue to make disastrously poor, costly, and harmful decision after decision without morally bankrupt leaders and equally indefensible low-level workers purposefully and consciously choosing to do the wrong thing all in the hopes of upping engagement a sliver of a percent so they might earn one extra dollar.

Real people – every day – are going to work and continuing to build these systems. They plan the sprints. Write the code. Review the copy. And push to production. They speak at conferences and post on Medium about the hard problems they are solving.

Fuck them.

Fuck all of my old Silicon Valley friends who remain at these companies and participate in this fraud just to get one more stock grant.

But I’m done. As of last week my accounts are closed. (Well, except for Twitter. I am a professional hypocrite after all.)

This is just a decision I’m making for myself. For my mental health. And to continue being morally OK with existing online. I’m not advocating for anyone reading this to close their accounts, too. If you find a particular social network beneficial, go for it. The world is on fire, and we can all use happiness wherever we can find it.

This is just my choice. And I’m not even anywhere near the first person to come to it. But already in the last week I feel like a weight has been lifted.

Next

So, what comes next?

For me, that means continuing to interact with the same people I already care about by sharing and posting even more with them now that I’m not feeding the machine. And I’ll do that by owning my own platform.

For me, that means blogging with WordPress because that’s the publishing tool I’m most comfortable with.

I’ve already setup a new website to replace Instagram and to a lesser extent Facebook. It’s public facing, but I’m not going to share the URL here. It’s just for friends and family. If you happen to find it, then I hope you enjoy the many photos of my lunch as well as my kids being annoyingly cute.

But I am happy to share how I made it. Specifically, the tool I wrote to import fifteen years worth of Facebook and Instagram posts to seed my new blog and keep my old content alive and history preserved.

How it Works

Of the accounts I closed, Facebook and Instagram are the only two I care about preserving my history. Fortunately, both services offer comprehensive data export options to let you get a copy of all of your data in both human readable and machine readable formats.

I’ll leave the exact instructions as a google exercise for you, but in a nutshell the process is this…

  1. Export your data. You’ll be emailed a link to a zip file.
  2. Create a new WordPress blog somewhere.
  3. Run the PHP scripts in this GitHub repo.
  4. Profit.

The two scripts (one for Facebook, another for Instagram) will crawl through your exported data and make some (I think) clever decisions about what data to import and how to import it in a blog-friendly way. The result will be a blog with all of your old photos and videos, along with captions, and (optionally) location data inserted chronologically with the same date/time that you posted the original content.

One extra-special thing about this script I want to point out is that I also approached it from the point of view of a parent. I want to be able to share this new website with friends and family – many of them not the least bit tech savvy who frequently call me for help because they’ve forgotten their Facebook password…again.

So the last thing I want to do is lock all of this content behind yet another account they have to remember.

But at the same time I don’t necessarily want detailed personal info about my kids just floating around online before they’re of age to consent to that themselves.

So, like I said above, importing the location data attached to your old content is optional. But also, the script allows you to define a list of replacement words. The idea being, I added my kids’ names to the blacklist in settings along with a replacement. Then, when the script imports everything, any post caption containing names (words) like “Trevor” or “Jacqueline”, will be replaced with “T” and “J”.

This allows me to maintain the context of what I originally posted and/or captioned my photos with without being too revealing. If a stalker is determined to find out the names of my kids, there’s nothing I can do to stop them. But that doesn’t mean I have to make their identities easily googlable.

Here’s what the finished product looks like…

It’s every Facebook and Instagram post I ever made that included a photo or video, on my own domain, set to the date and time they originally appeared. It’s almost like Facebook was just a bad dream.

Furious Conclusion

So that’s my small contribution to make things better. It likely won’t matter. But it does give me some relief to have done something. Anything.

I’m filled with rage and despair and also just sad thinking about what we in the tech industry unintentionally unleashed upon the world – and then willfully made worse through greed and arrogance.

Let’s do better. And, above all, be kind.
I May Have Gone Overboard with My Keyboard Shortcuts

The other day a coworker was making fun of me (in a good natured way) after we spent some time coding together and they realized just how many keyboard shortcuts I use. And it wasn’t about me having all the standard macOS shortcuts wired-in as muscle memory or even obscure hotkeys specific to a given app. It was all of the custom, global keyboard shortcuts I use to automate repetitive tasks on my Mac in the hope that what I’m telling my Mac to do with my hands might just barely be fast enough to keep up with what my brain wants it to do.

In my head I think of apps, websites, and folders on my Mac as “places”. I don’t just open an app or visit a website. I go there. For me, much like traveling in real life, getting to my destination as fast as possible is usually the goal. And so the majority of the keyboard shortcuts I use are about launching things on my Mac that would otherwise take too many mouse clicks or key presses.

I live and die by my keyboard. And here are the shortcuts I couldn’t do without.

Controlling windows

Let’s start at the highest level. Everything you do on a Mac takes place inside a window. And constantly having to reposition new widows by delicately dragging their edges and titlebars into place drives me mad. It’s the GUI equivalent of busywork.

I’ve played around with automatic window layout managers on Linux – and even a few that have been ported in spirit to macOS. But they were all a little too fiddly and unforgiving for my taste. (Which is great for some people!) As you’ll see below, while I generally want my windows arranged in an orderly fashion, sometimes I do need to break away from my grid-based system and arrange them freeform like a sane, normal person.

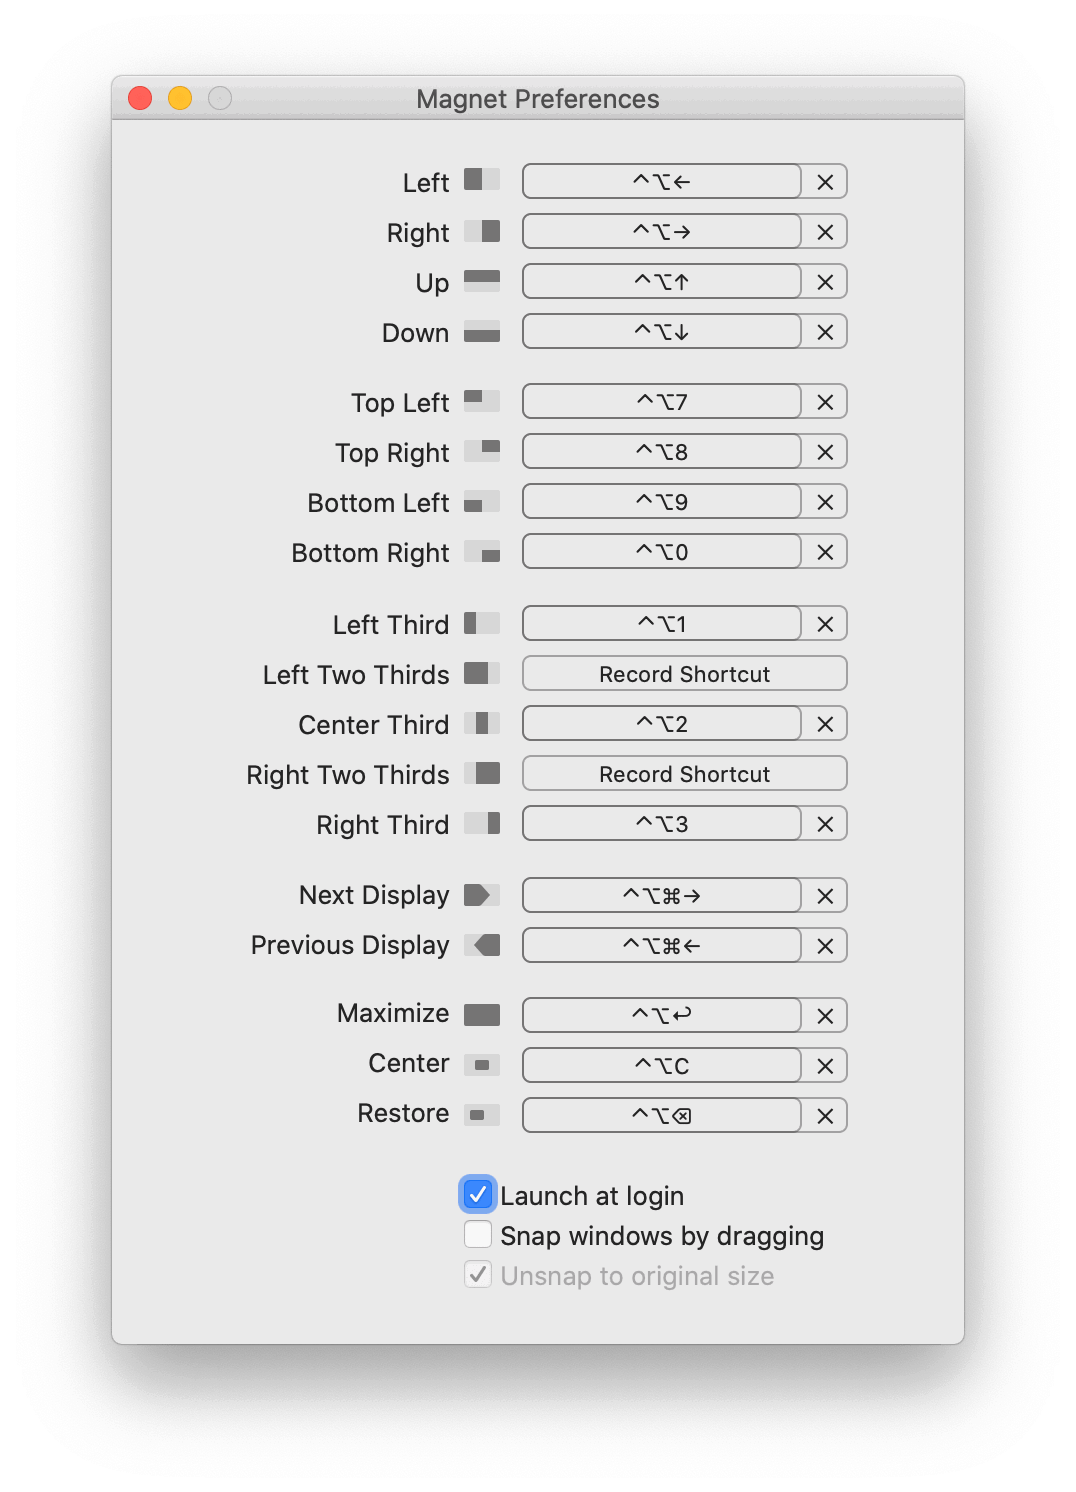
Years and years ago I used and was a huge fan of MercuryMover. But at some point I switched to another app that I no longer remember before finally settling on Magnet in 2012. It’s simple and works great. Here are the keyboard shortcuts I’ve setup in it…

Magnet allows for a fair amount of positioning options without going deep into the weeds. The system I use divides my screen into three arrangements: halves, thirds, and quadrants. (Along with a few miscellaneous commands that I’ll describe.)

At first glance many of my window position shortcuts might seem arbitrary, but they make sense to me. Each one is prefixed with the ^⌥ modifier keys and then a trigger key that sort of mnemonically maps in my head to what the window position should be.

Two Halves

In my head I divide my screen into top / bottom and left / right halves, which I position windows with using…

  • Left half of screen ^⌥←
  • Right half of screen ^⌥→
  • Top half of screen ^⌥↑
  • Bottom half of screen ^⌥↓

Three Thirds

Here’s how I see my screen in the thirds layout:

And I use these shortcuts to position my windows…

  • Left third of screen ^⌥1
  • Center third of screen ^⌥2
  • Right third of screen ^⌥3

Four Quadrants

And similarly, I also visualize my screen like this:

  • Top left of screen ^⌥7
  • Top right of screen ^⌥8
  • Bottom left of screen ^⌥9
  • Bottom right of screen ^⌥0

Second screen support

Magnet works great in that the window position commands apply to the screen that the window is currently on. But if you want to quickly send a window to the next or previous screen, you can do that, too.

  • Send to screen on the left ^⌥⌘←
  • Send to screen on the right ^⌥⌘→

Miscellaneous window positioning commands

And here are the remaining miscellaneous commands I use for a few special window positions.

  • Full screen ^⌥⏎: This does exactly what you’d expect. It makes the window fill the entire screen, but, crucially, does not activate macOS’ fullscreen mode for that app. It just makes the window as large as it can be.
  • Center on screen ^⌥C: This takes the active window and centers it horizontally and vertically on the screen without adjusting its size.
  • Undo ^⌥⌫: If you use Magnet to position a window using one of the above commands, this hotkey will restore the window to its previous size and position.

And, finally…

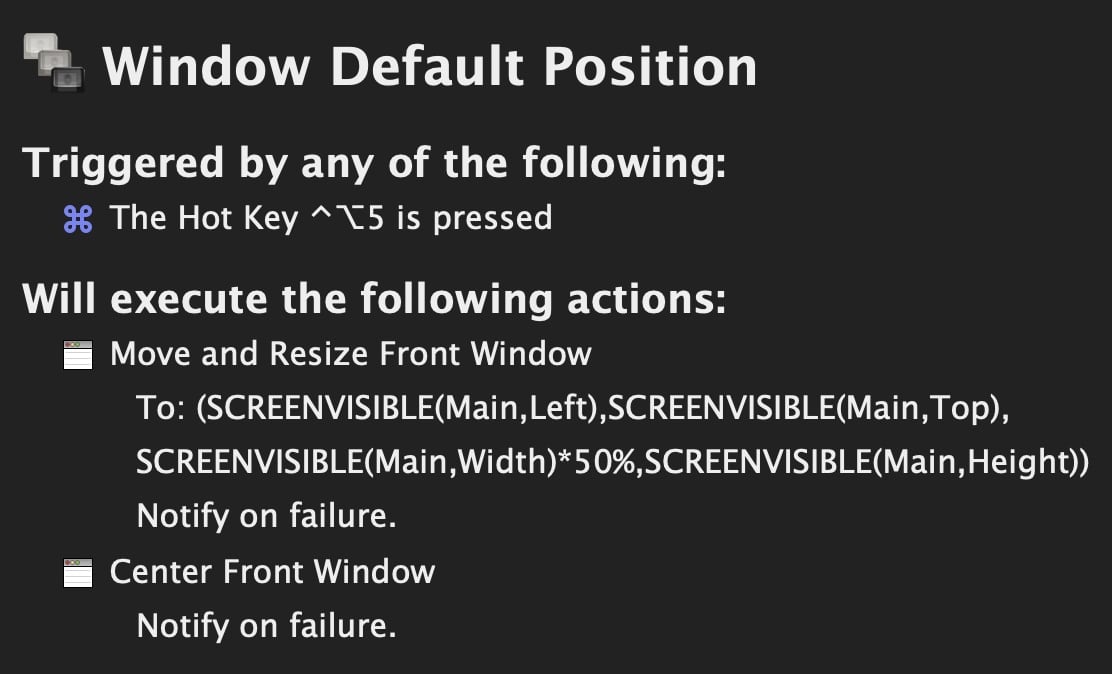
  • Default position ^⌥5: This is a hotkey controlled by KeyboardMaestro – not Magnet. It sizes the window to be as tall as possible and 50% of the screen width, and then centers it on screen. I call this my “default window position”. I often use it when I want to bring my focus to a specific task. (For the curious: I chose “5” as the trigger key because the “5” key is phsyically in the middle of the keyboard between the 1-3 and 7-0 keys I use with my other window shortcuts.)

Here’s the macro in KeyboardMaestro:

Launching Apps

Next up are what I call my “launchers”. They quickly bring up the apps I use most often. Nearly all of them are built, again, using KeyboardMaestro.

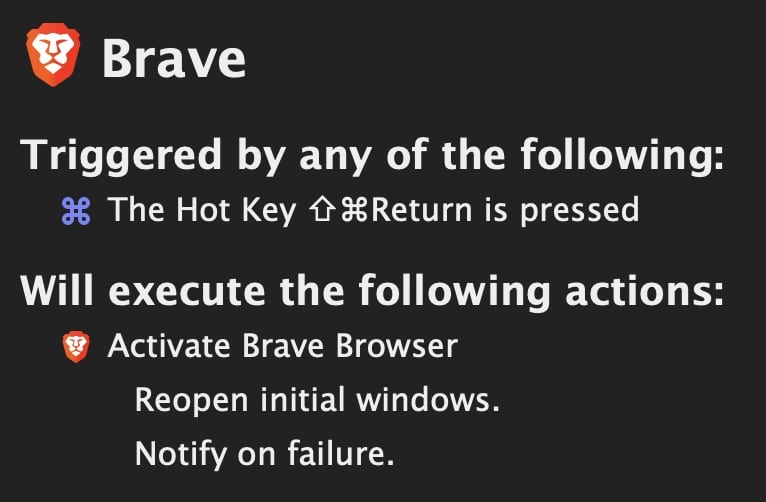
  • Web browser ⇧⌘⏎: Like most people, I’m constantly opening my web browser. This hotkey will launch Brave if it’s not already open. If it is running, it will bring its windows to the front. And if no windows are open, it will make a new one.

Even more apps with dedicated hotkeys…

  • Open SnippetsLab ⇧⌘F7
  • Open Dash ⇧⌘F10
  • Open Bear and create a new note: ⇧⌘F11
  • Open Drafts ⇧⌘F12
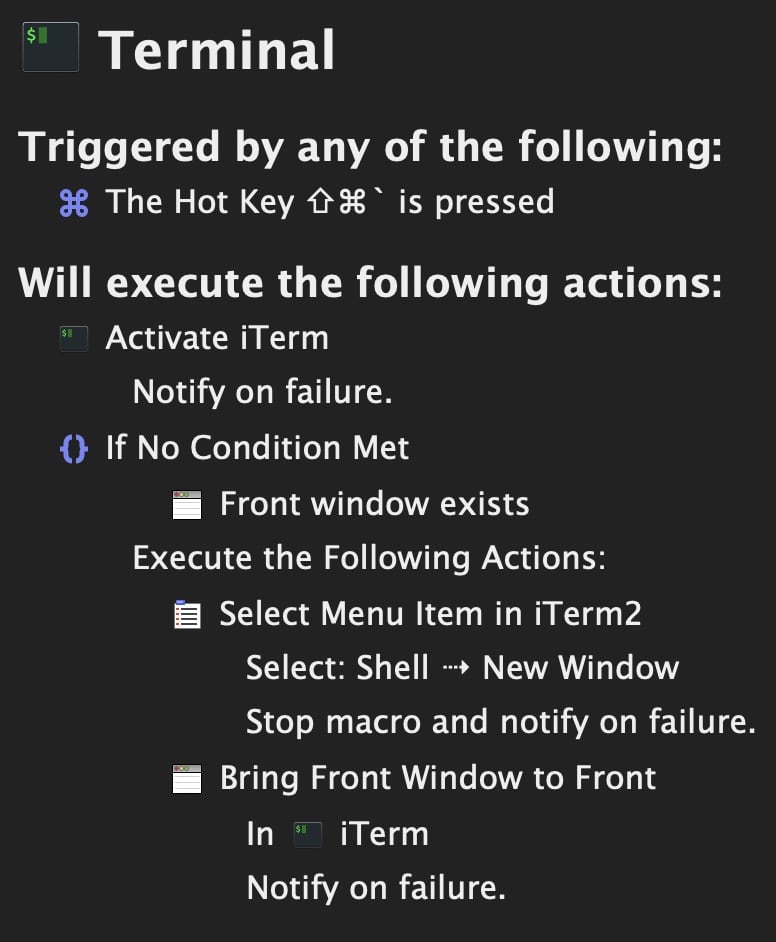
  • Open iTerm ⇧⌘: This one is slightly interesting as I needed a way to either bring iTerm to the front or open a new window if one didn’t exist. For some reason the app didn’t follow the standard new window behavior, so I had to script around it.

1Password

I trigger 1Password with ^⇧⏎ and am very happy with how this macro turned out.

I take security seriously and so when I’m out and about with my laptop, I want 1Password to automatically lock itself after being idle, etc. I’m more than happy to have to enter my long, master password to unlock it. But when I’m at home working on my iMac that never leaves my house, I hate having to type in that password over and over again.

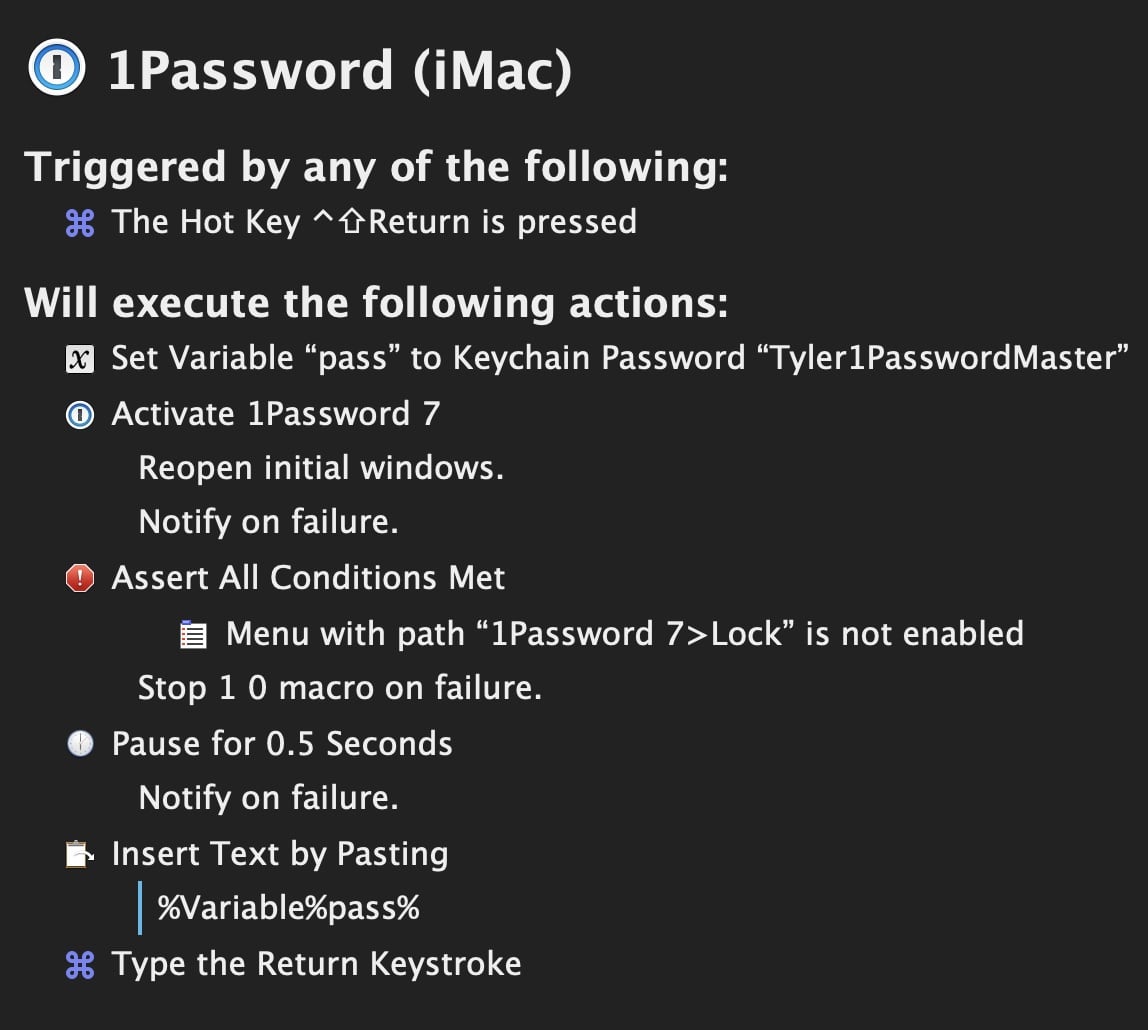
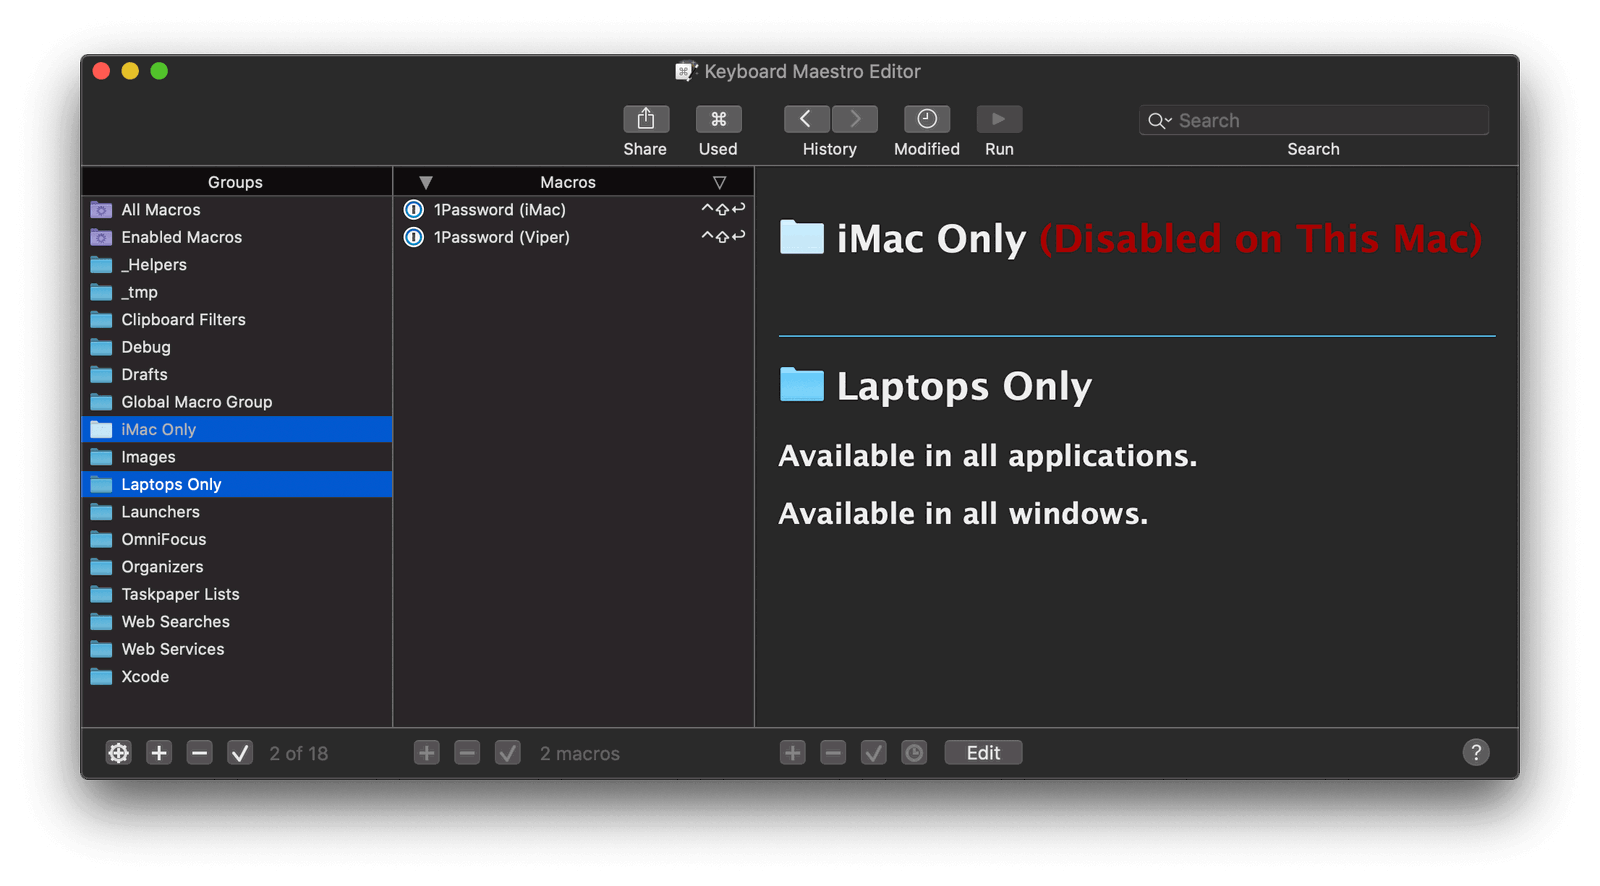
So, the macro I use to launch 1Password is actually two macros with the same hotkey. However, one is only activated when I’m at home and the other when I’m using a laptop. They both launch 1Password, but the iMac specific one then fetches my master password out of the system keychain and types it into the 1Password window for me. This lets me open and unlock the app with a single hotkey. Some might call this incredibly insecure, but I call it a small security trade-off for extra convenience 🙂

Here’s the iMac macro…

And I make use of KeyboardMaestro‘s ability to disable certain groups of macros based on what computer you’re using. In this case, you can see that I’m writing this post on my laptop right now, and the iMac group is disabled.

(I wanted to include a video of this macro in action, but in the end I decided it was too much trouble because I would have had to blur out all of my data in 1Password once that window opened.)

My final two launcher commands deal with navigating the Finder.

The first is one I wrote about recently that lets me quickly select and open my favorite folders with ⇧⌘9.

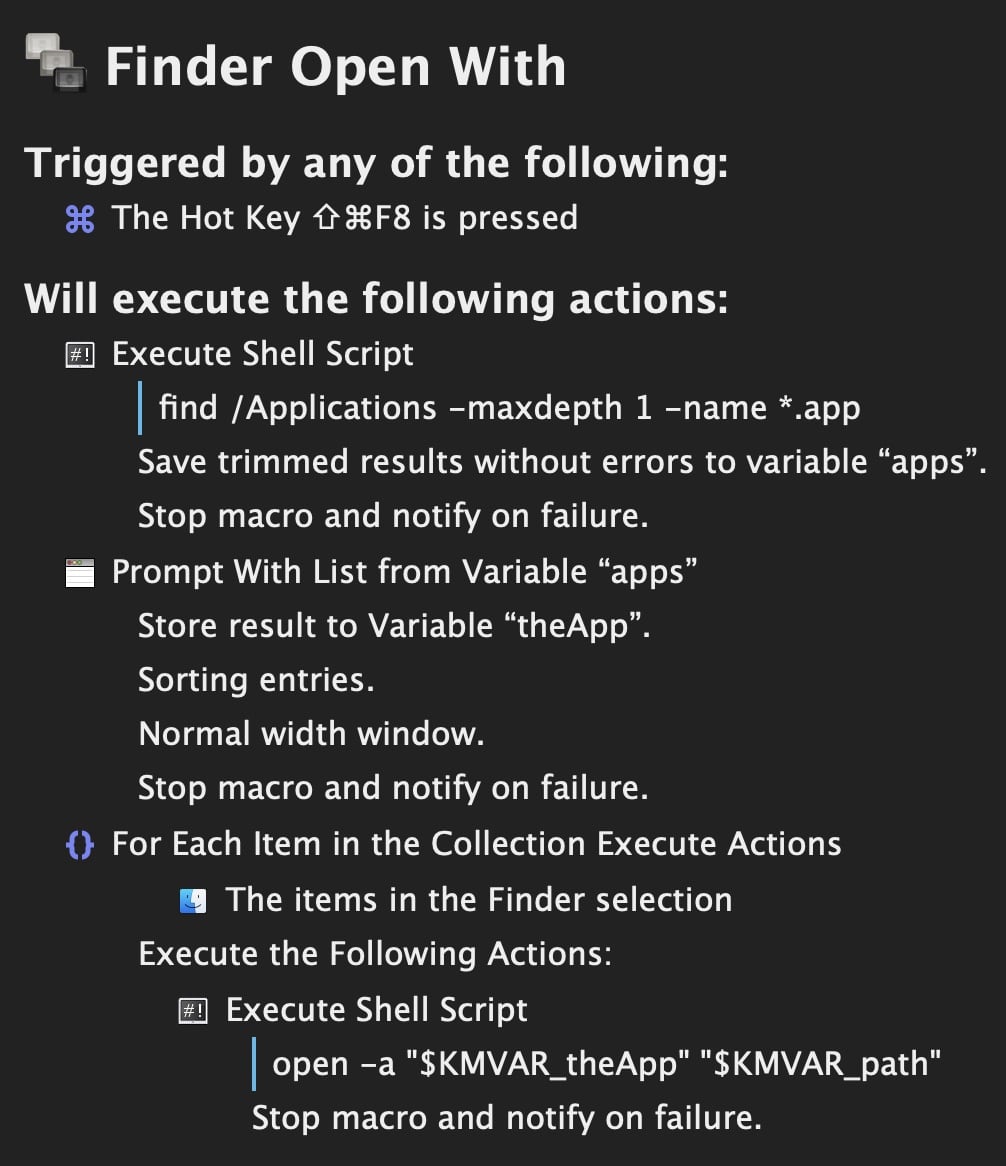
The other is probably my most used of any shortcut. Pressing ⇧⌘8 will prompt me to type the name of an application on my Mac. I can then arrow down the list of matching names and press return to select it. Then, KeyboardMeastro will open the selected Finder items (can be one file or multiple files) with that app.

Example: Often I’ll have a bunch of images selected in Finder. By default, ⌘↓ will open them with Preview. But I can just as easily hit ⇧⌘8 to open them in Acorn. Or, I might want to make a quick edit to a source code file but don’t want to wait for Xcode to spin up. Again, with ⇧⌘8 I can immediately open it in TextMate instead.

I know there are probably a million other ways to accomplish this – I think Alfred probably does it somehow – but it was faster for me to quickly write this script a couple years ago then dig around a for a specific app to do the job. Here’s what it looks like in action…

And the macro…

In / Out

These next commands are all about data. Getting data into some apps and out of others.

First, there is, of course, my beloved OmniFocusquick entry window shortcut key ^⌥␣ which immediately brings up a floating window to jot down whatever task just came to mind, and then just as quickly disappears so I can get on with my work.

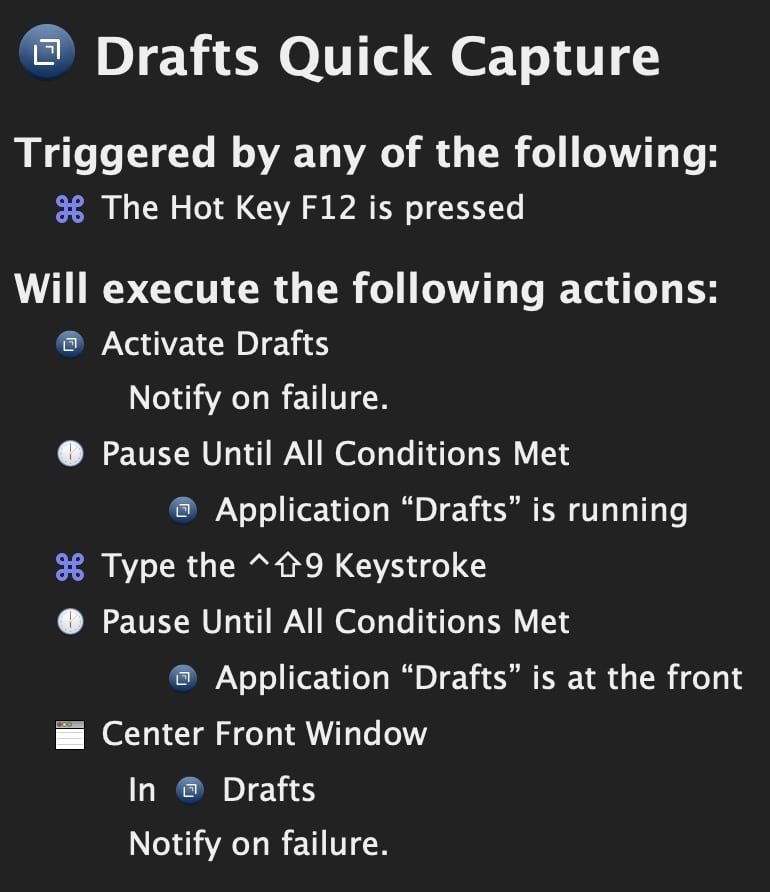
I use F12 for creating a new note in Drafts. I could use Drafts‘ native hotkey support, but by going through KeyboardMaestro I get the option of launching Drafts if it’s not currently running. That’s just one less point of friction to worry about. (If there’s already a way to do this with Drafts itself, I missed it. Sorry, Greg!)

I use Pastebot to manage and sync my clipboard and so should you. The system paste hotkey is ⌘V, so naturally my shortcut for opening Pastebot’s history window is ⇧⌘V.

And, finally, I have tons and tons of other macros that I don’t use everyday or that simply don’t warrant a dedicated hotkey. However, pressing ⌘⇧ will open KeyboardMaestro‘s macro search window. I can then just start typing the name of the one I’m searching for and then press to run it.

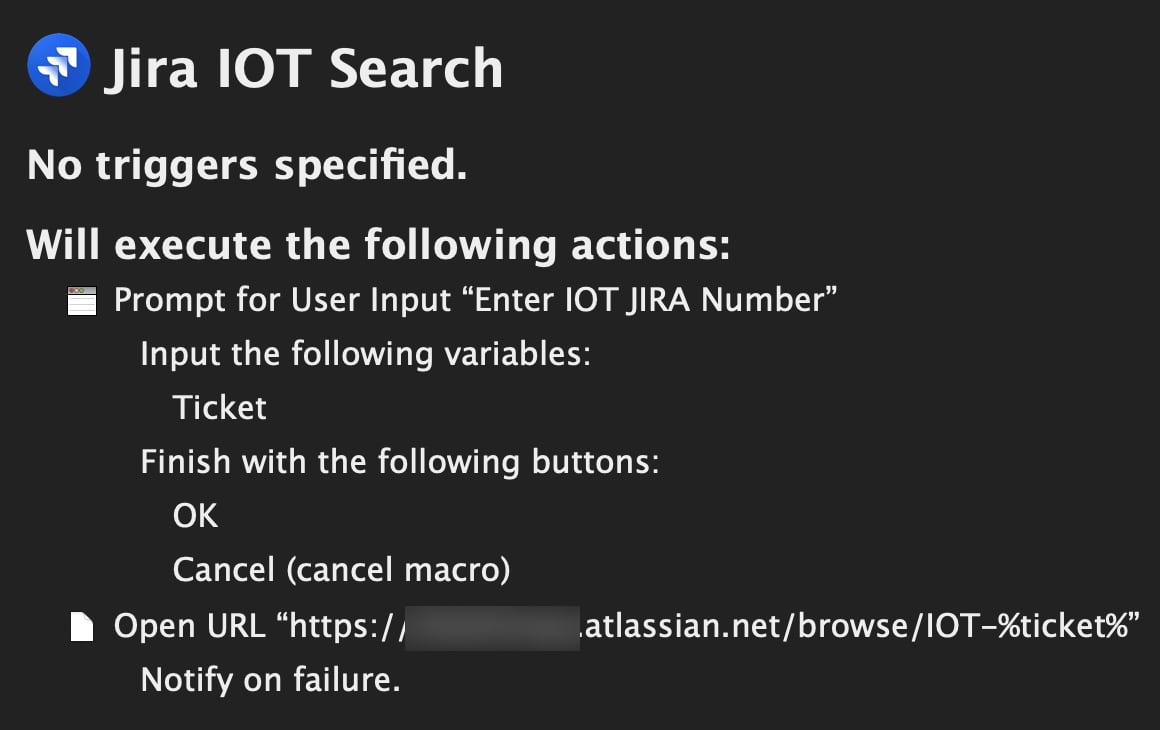
Lastly in the launcher category is my Jira ticket opener hotkey. If you’re lucky enough to use Jira everyday, then you know it’s considered a dumpster fire by everyone who doesn’t just use it to generate reports. And navigating to a specific ticket – especially if you don’t already have a browser window open and loaded up on the appropriate page – is often a 10 to 15 second journey done tens if not sometimes a hundred times a day.

Using the macro search shortcut above (⇧⌘), I can then type jira⏎ to open a textfield that prompts me to enter the numeric portion of the ticket number. Press again and KeyboardMaestro opens a new browser window (or tab) directly onto that ticket’s detail page.

Sure, it still takes forever for atlassian.net to load, but it’s way faster than going to an intermediate page first, then needing to click into a search field, and then wait for an awful AJAX request to hydrate the data I’m actually interested in.

(Oh. And the first time my coworker saw me execute that macro, they said “Of course. You of all people would have a hotkey for Jira.” ?)

Miscellaneous Shortcuts

I’ll call out just a few others. The first are a few hotkeys I use for performing various tasks in Xcode. And the last is an amazingly useful macro that I just wish I were smart enough to have come up with on my own.

Xcode

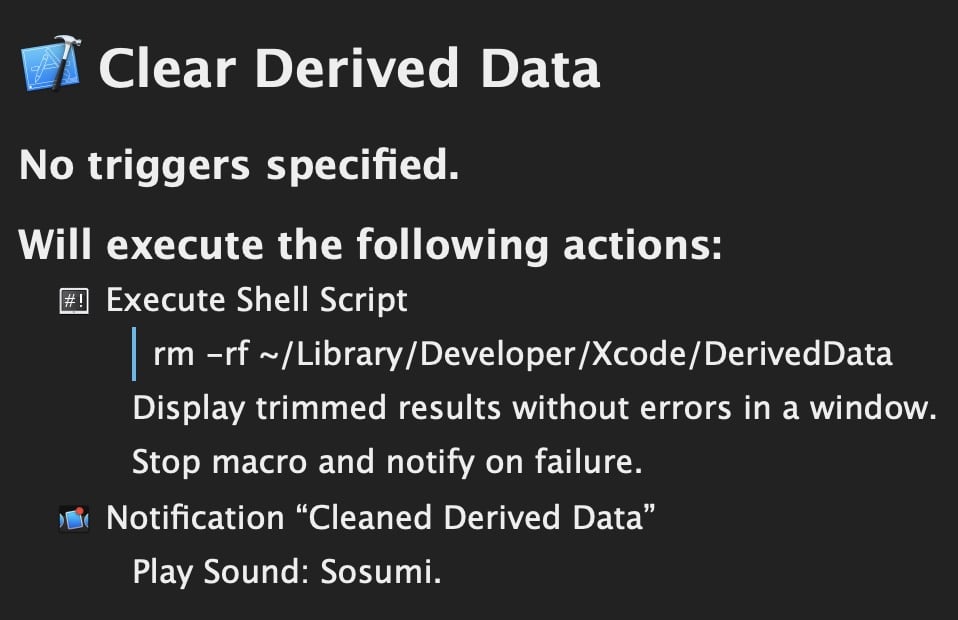
If you use Xcode, there’s no need for me to explain how useful it is to have a lightning fast way to blow away your DerivedData folder.

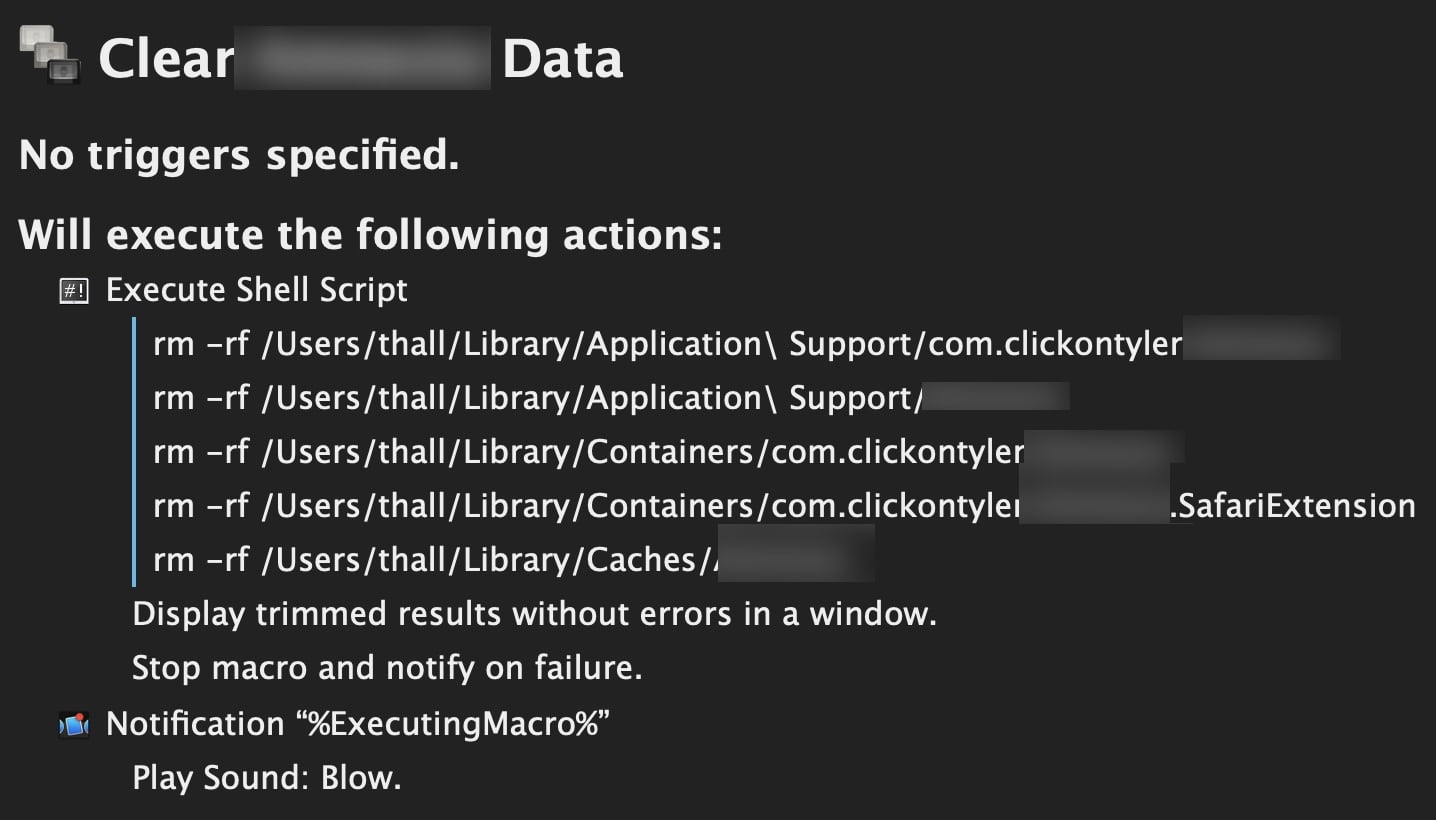
Along those same lines, I also have a similar macro that wipes out all of the ~/Library/Application Support and ~/Library/Preferences files and folders for the apps I’m working on. This is super useful for resetting data when you’re testing sync logic or when you’re iterating on database schemas.

Next, long-time readers of this blog will probably realize I’m quite insane and particular about my computing habits. (So will those of you who have made it this far in this blog post.) I especially like Xcode arranged in a certain way when I’m writing code vs debugging / running an app.

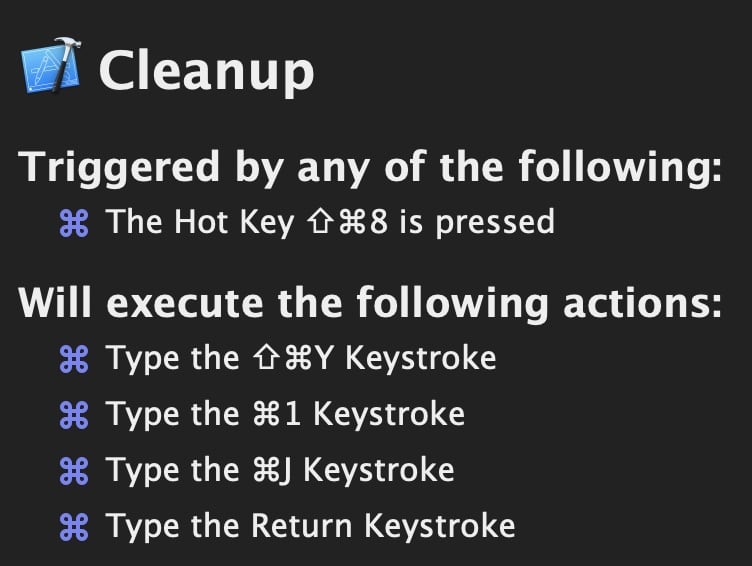
When I launch an app, I let Xcode do it’s normal behaviors to show the console, swap the sidebar to a different view, etc. But when I’m done testing, I want a quick way to get back to my coding mode. I’ve assigned ⇧⌘8 to be my Xcode “cleanup” macro.

In case you don’t have every Xcode shortcut memorized like I do, that does the following:

  • ⇧⌘Y Close the bottom console pane
  • ⌘1 Swap the sidebar to show my project’s file structure
  • ⌘J Open the window pane selector (what is this thing actually called?)
  • Select the main editing pane so I can start typing

Basically, the macro maximizes the visible space for the text editor, shows me my most used sidebar view, and makes the editor the first responder so I don’t have to manually give it focus to start typing. Here it is in action…

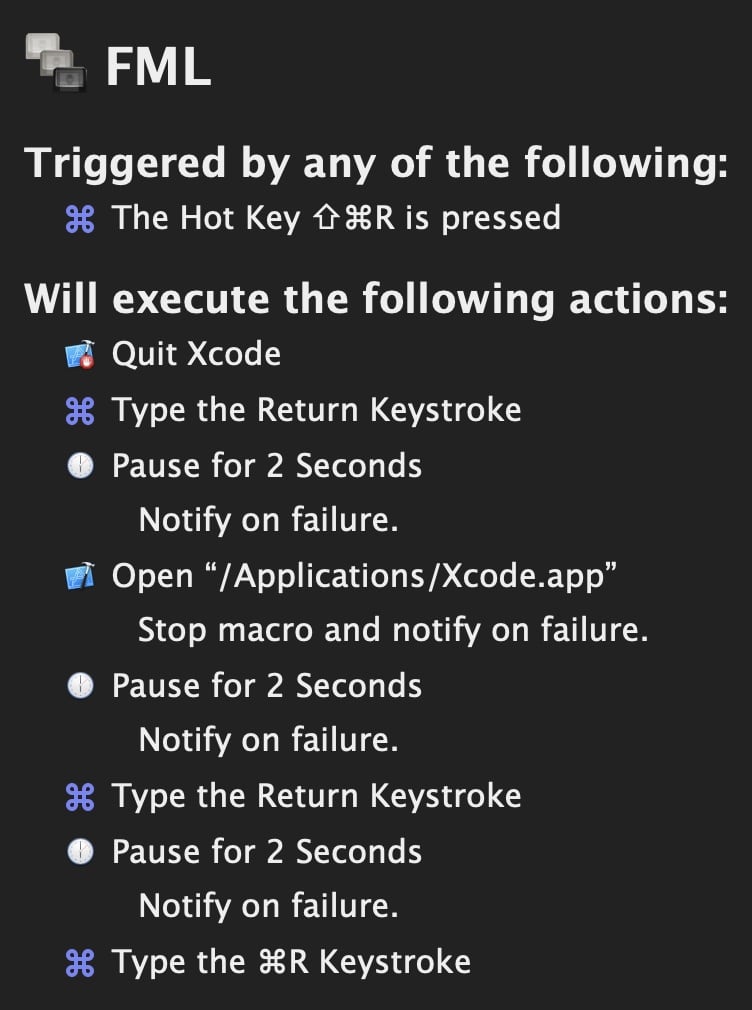
Last on the list of my Xcode shortcuts is one I simply refer to as “FML”, which I launch with ⇧⌘R. (The meaning of that abbreviation is an exercise for the reader.)

So, so, so many times I’ll try to build and run my latest code changes and Swift and/or Xcode (I’m not sure where to draw the line or what is actually responsible) will vomit into my error logs and refuse to build. I can even do a ⇧⌘K to clean the build folder or, if all else fails, use my earlier macro to wipe out DerivedData. And, yet, still no luck building code that I ? know is fine.

But if I simply quit and relaunch Xcode – and make no code changes – my project will build and run.

This macro automates that process of quitting Xcode, pausing, opening it again, then opening the most recent project, and building. Voilà!

And, finally…

(And I do really mean finally this time.)

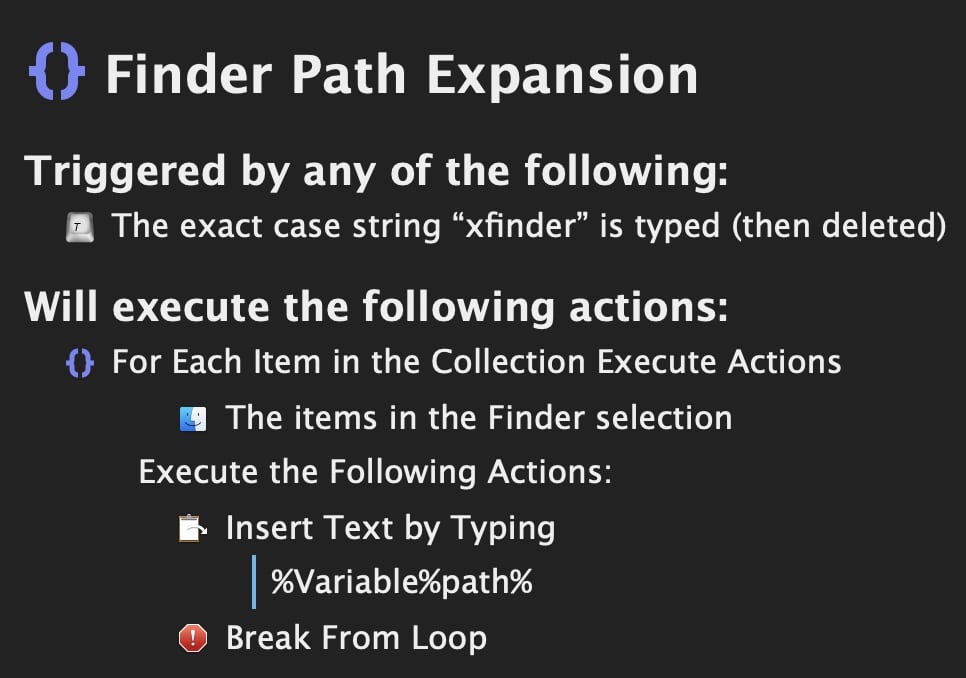
This macro takes advantage of KeyboardMaestro‘s text snippet expansion capabilities. If I type the phrase xfinder, KM will replace it with the full path of the selected item in the Finder.

I really wish I could remember where I came across this brilliant trick. It seemed like black magic the first time I read about it.

⌘Q

So, yeah. After writing all of the above, I’m now thinking maybe this post should have been titled A Love Letter to KeybaordMaestro.

That app, along with Magnet, are indispensable to my daily workflow. Many of the shortcuts I highlighted are extremely niche and built to suit my own, weird way of doing things. But hopefully, even if you don’t find any of them specifically useful, they do give you inspiration for ways you can remove all the little papercuts and friction you run into everyday.

How to Set Custom Display Values and Localize NSPredicateEditor

This weekend was my first time ever needing to use NSPredicateEditor in one of my apps. I don’t know who else needs to know this, but just in case…

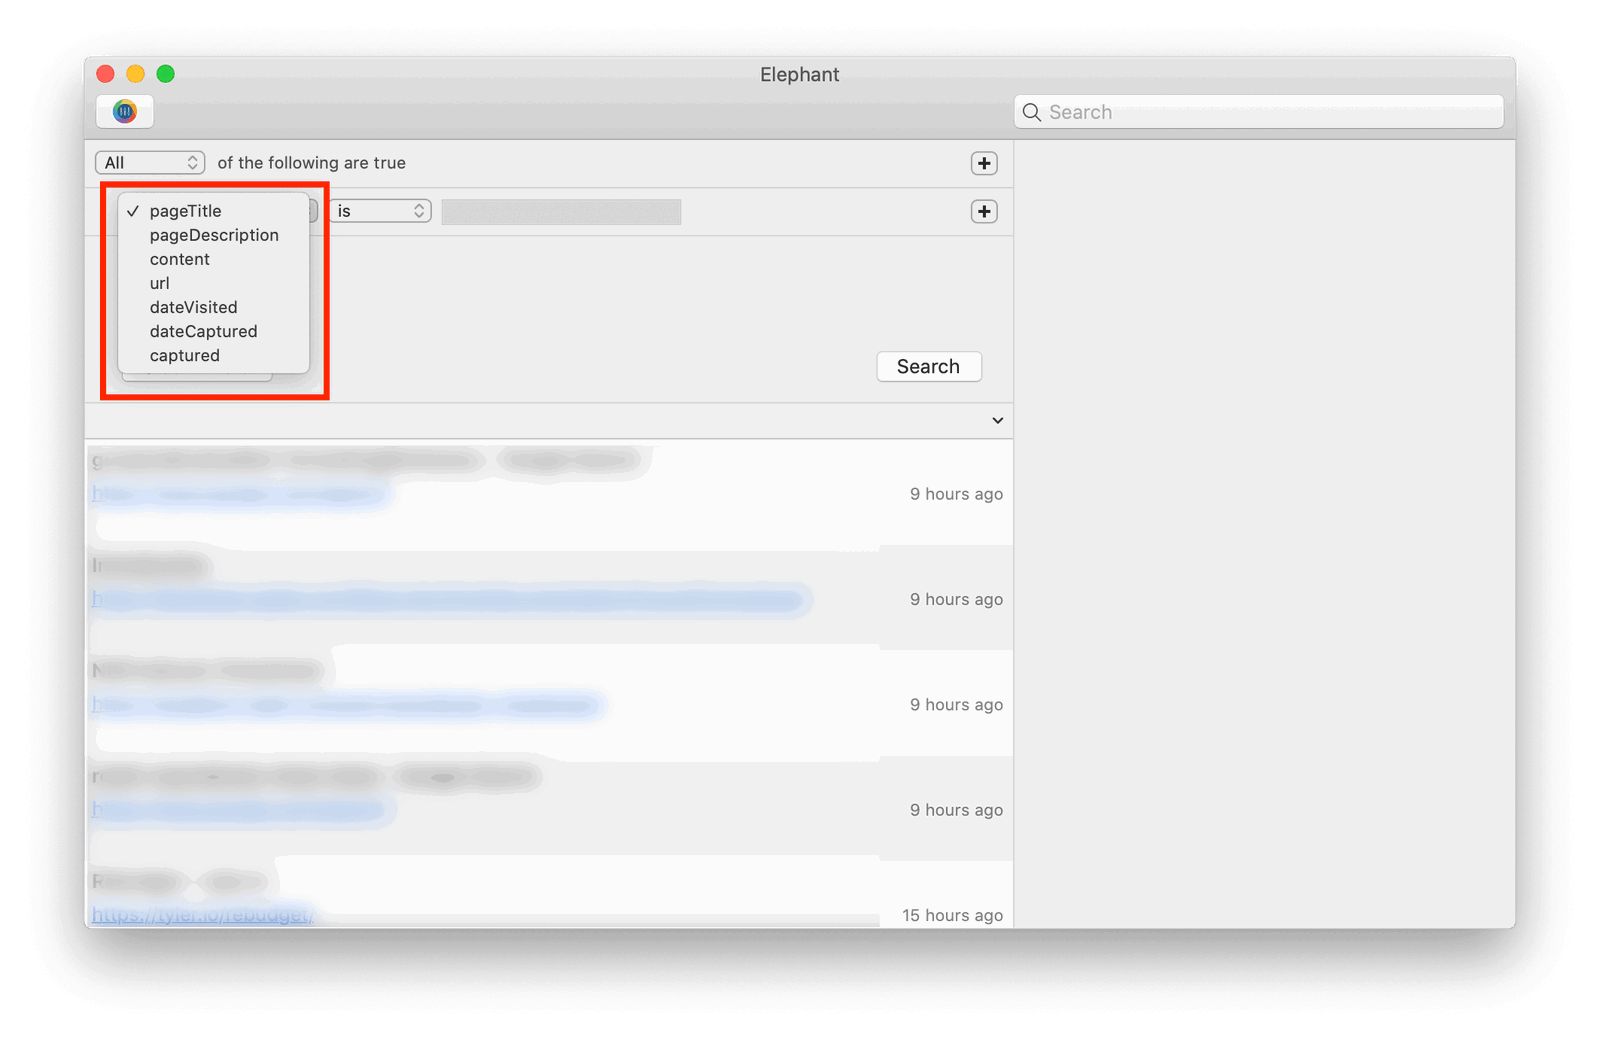
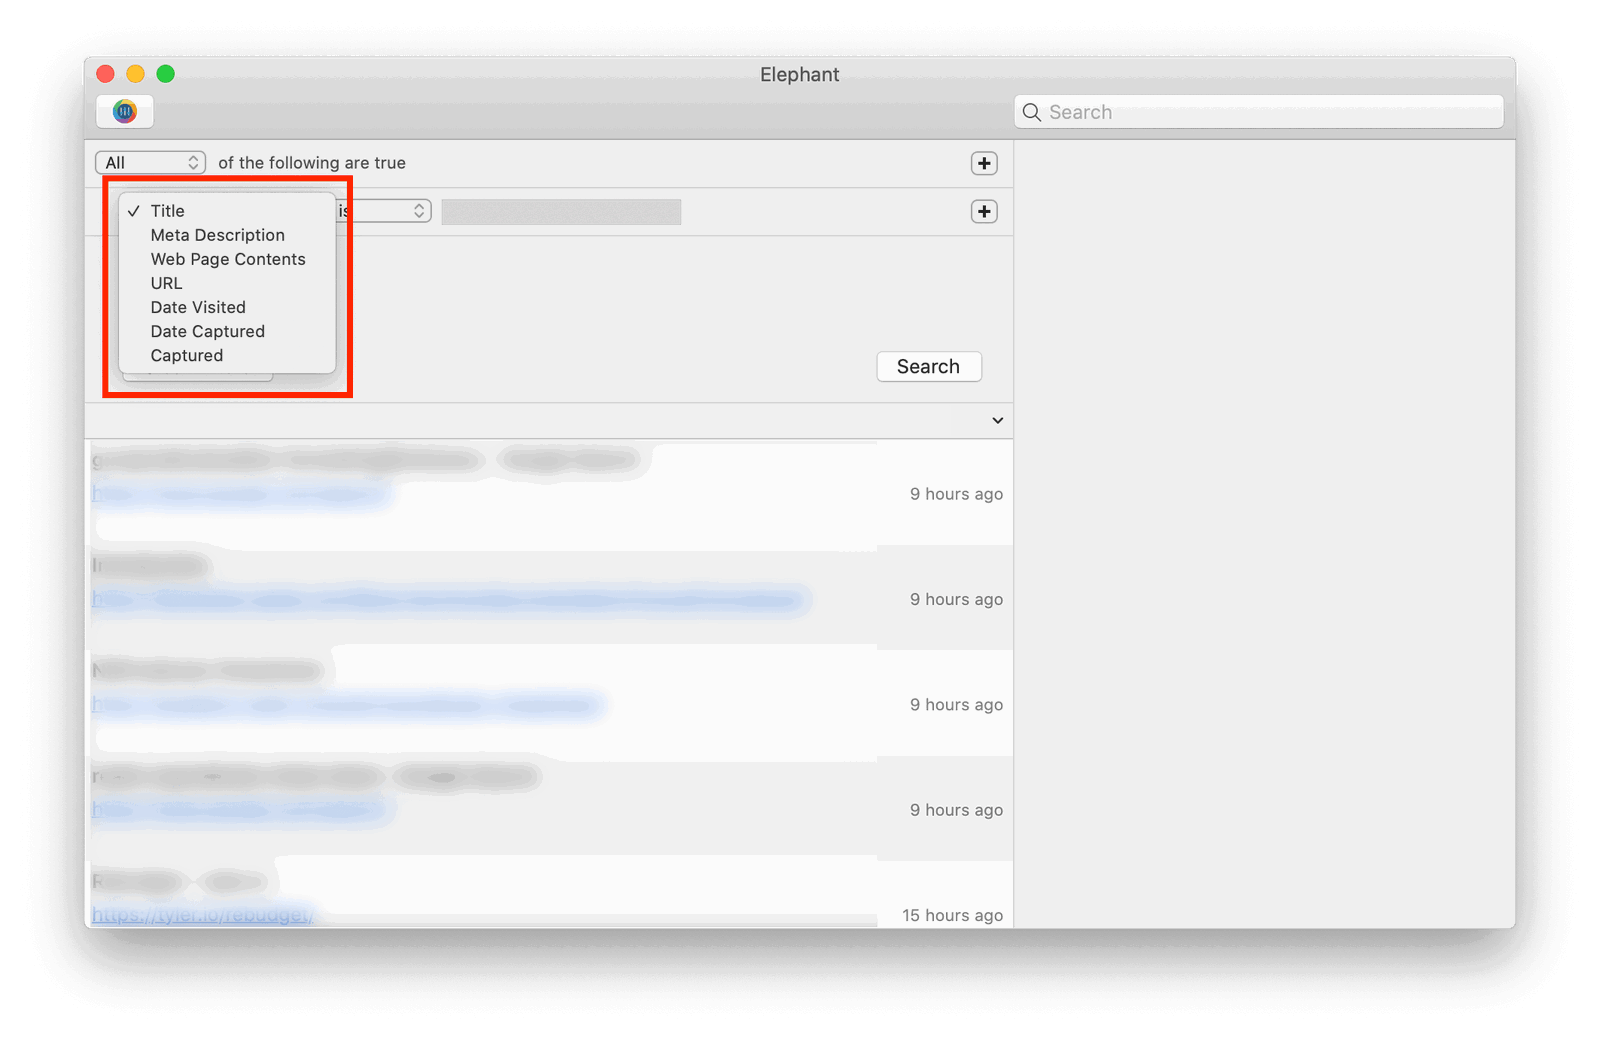
Maybe the documentation has disappeared online, or maybe it was only ever available via word-of-mouth fifteen years ago, but I lost about four hours the other night trying to figure out how to make the dropdown choices in my NSPredicateEditor show user-friendly names instead their actual key paths.

Here’s what I had…

And here’s what I wanted…

Unlike its parent class NSRuleEditor, NSPredicateEditor doesn’t ask a delgate for display values to use in place of the key paths. I had found arcane whisperings in dark, ancient parts of the web mentioning needing to use the formattingDictionary dictionary property, but for the life of me couldn’t figure out what to do with it.

Only after hitting my head on a wall for half a night did I finally stumble across this twelve year-old cocoa-dev mailing list post on the eighth Google results page behind a bunch of Chinese StackOverflow scraping websites with a solution.

On Oct 28, 2008, at 3:57 PM, Peter Ammon wrote:
Here’s something that may help – there’s a method on NSRuleEditor - (NSData *)_generateFormattingDictionaryStringsFile. It gives you a strings file (as UTF16 data) appropriate for that control – write the data to a .strings file and then you can start translating it.
That method should never be called in production code but it can be useful for generating the strings file.

God bless the Apple engineer that wrote that private API method because it absolutely does what it says on the tin. Add all of your NSPredicateRowTemplates as you would expect using your key paths, call that method, and you get output suitable for dropping into a strings file that NSPredicateEditor will read from and localize itself with. My strings file looks like this…

Here’s the NSPredicateEditor category I added to my project that lets me generate the strings on demand…

You can call it from your Swift code like this…

So, yeah. That took longer than I expected.

Hopefully the absurd amount of SEO keywords I stuffed into this blog post will help future developers find this info now that the old web is disappearing from Google.

Quick Access to My Favorite Folders with Keyboard Maestro

After last year, I’m gonna try really, really hard not to bitch about Apple if at all possible in 2020. But what good are New Year’s resolutions if you don’t break them before the end of January? So, here’s a small bug that for the life of me I can’t figure out along with my solution.

I have a number of what I call “working folders” on my Mac. They’re the main folders where my projects, source code, temporary files, and other in-progress files live. I’m constantly navigating to them, dragging files in and out of them, etc. In no particular order they are…

  • ~/Downloads
  • ~/Dropbox
  • /Dropbox/_Inbox
  • ~/src
  • ~/tmp

~/Downloads is exactly what you expect. It’s where everything from my web browsers go.

I live in my synced cloud folders. I was a paying Dropbox customer from 2008 until 2018, then switched to Google Drive because I was also paying for Google Photos and decided to cut costs, and then had a quick dalliance with iCloud Drive in the first half of 2019. But, it turns out every sync service is horrible and awful except for Dropbox. So, I’m happily back on the wagon – even after they raised their prices and destroyed their Mac app. That means I am constantly diving deep into ~/Dropbox to find reference material, share files, etc.

I went paperless over a decade ago. Every physical paper worth remembering or that I might possibly want to reference in the future along with all of my kids’ artwork and schoolwork gets captured in Scanbot (RIP my beloved ScanSnap) and automatically uploaded into /Dropbox/_Inbox. It’s the temporary staging area for all the documents and files I need to process before I rename and sort them into their final storage locations.

~/src is, you guessed it, where all of my source code lives. Everything is in a git repo, so there’s no need for anything in this folder to be in ~/Dropbox.

And, finally, ~/tmp is a sort of working directory where I put files that don’t need to sync across machines and also large files that I don’t need long-term but can’t put on my Mac’s ~/Desktop because that syncs to iCloud and I don’t want to waste the bandwidth.

Anyway, the point of all the above descriptions is to make the case that those are the five folders I deal with all the time if not literally every five minutes. And blame it on my crazy personality, but I hate wasting time clicking around in Finder windows. I need fast access to them.

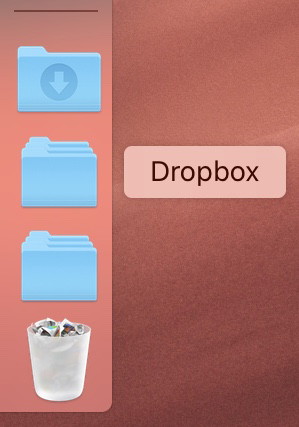
For a number of years the solution was simple. I just added aliases to each of them in my Dock.

That let me open them with a click, or even navigate into their subfolders. I could also drag and drop files into and out of them. It was great.

But then sometime around the later stages of Mojave, the folders would just disappear. I’m serious. I’d reboot my Mac and they’d be gone from the Dock. So, I’d add them back. And then a day or two later – even though I hadn’t yet rebooted a second time! – they’d vanish again. I wasn’t running Mojave betas, and the problem has persisted through today running stable Catalina 10.15.2.

When weird things happen I’m usually pretty good at tracking down if not the cause then at least what conditions trigger the bug. But this one has had me stumped for the better part of a year. I’m so confused I’m not even mad.

I tried to work around the problem by adding folder aliases on my ~/Desktop, but that just wasn’t as convenient. One afternoon I thought I was especially clever and tried to write a shell script that manipulated one of the Dock’s .plist preference files to automatically re-add the folders when my Mac restarted. But I never got that to work reliably.

So, I started looking for any 3rd party apps that might help. I tried Yoink, Dropzone, and a few others, but none were really quite what I wanted.

I’ve also been a heavy user of Alfred ever since Quicksilver gave up the ghost, so I know about its “Quick File Search mode” setting in Preferences. That’s great for getting to obscure files/folders quickly, but it’s just not fast enough for me for these five particular folders. For some reason having to hit the apostrophe key to enter Alfred’s file search mode just screw ups the next few letters I type every time and I always end up making typos and regretting my life choices.

So, I did what I almost always do when I face a situation of deep despair on my Mac. I reached for the greatest Swiss Army knife of them all – Keyboard Maestro – and came up with an incredibly lo-fi solution that isn’t as feature rich as what those other apps offer or as convenient as Dock folders (when they don’t disappear), but it works for me!

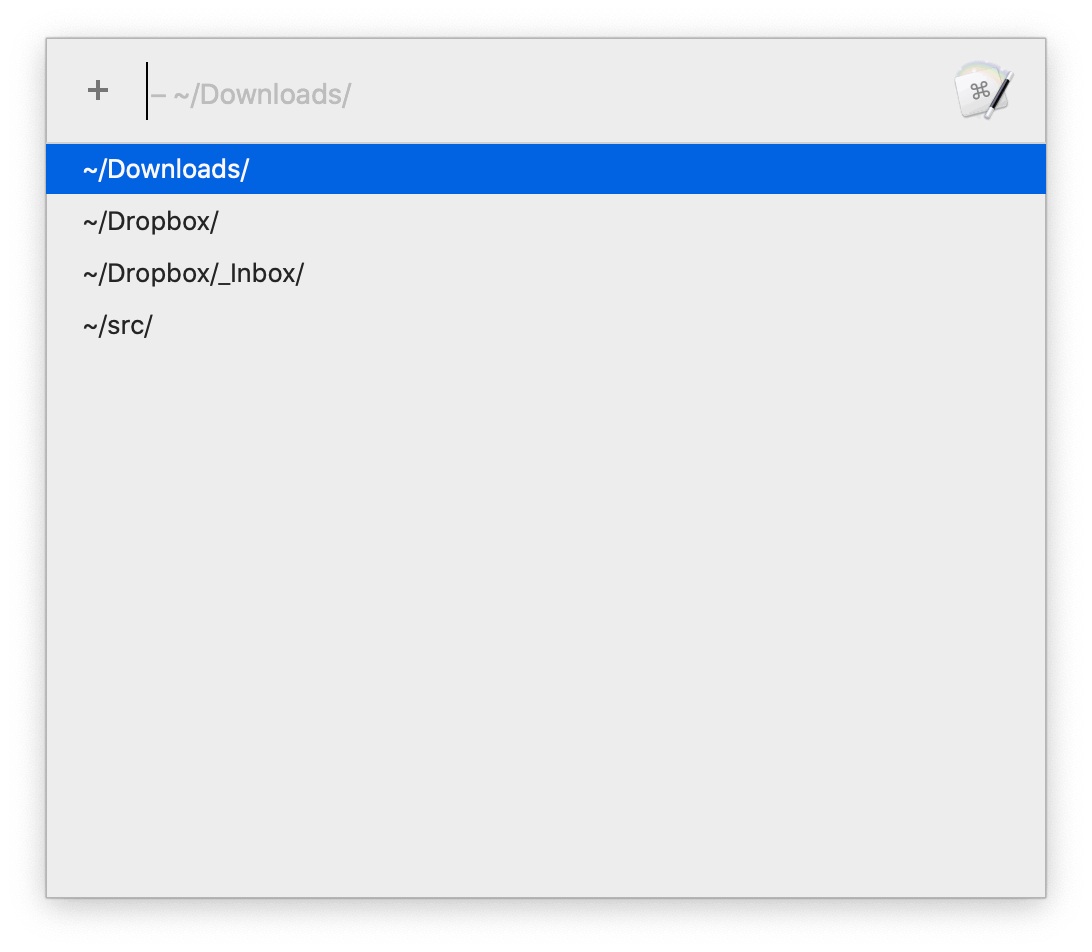
It’s a Keyboard Maestro macro that I’ve assigned a global hotkey to. When invoked, it displays a list of those five folders. I can arrow up/down to select one, or type to filter, and then press return to select. The picker window goes away and Keyboard Maestro opens a new Finder window with that folder.

Here’s the picker window…

And a quick video of it in action…

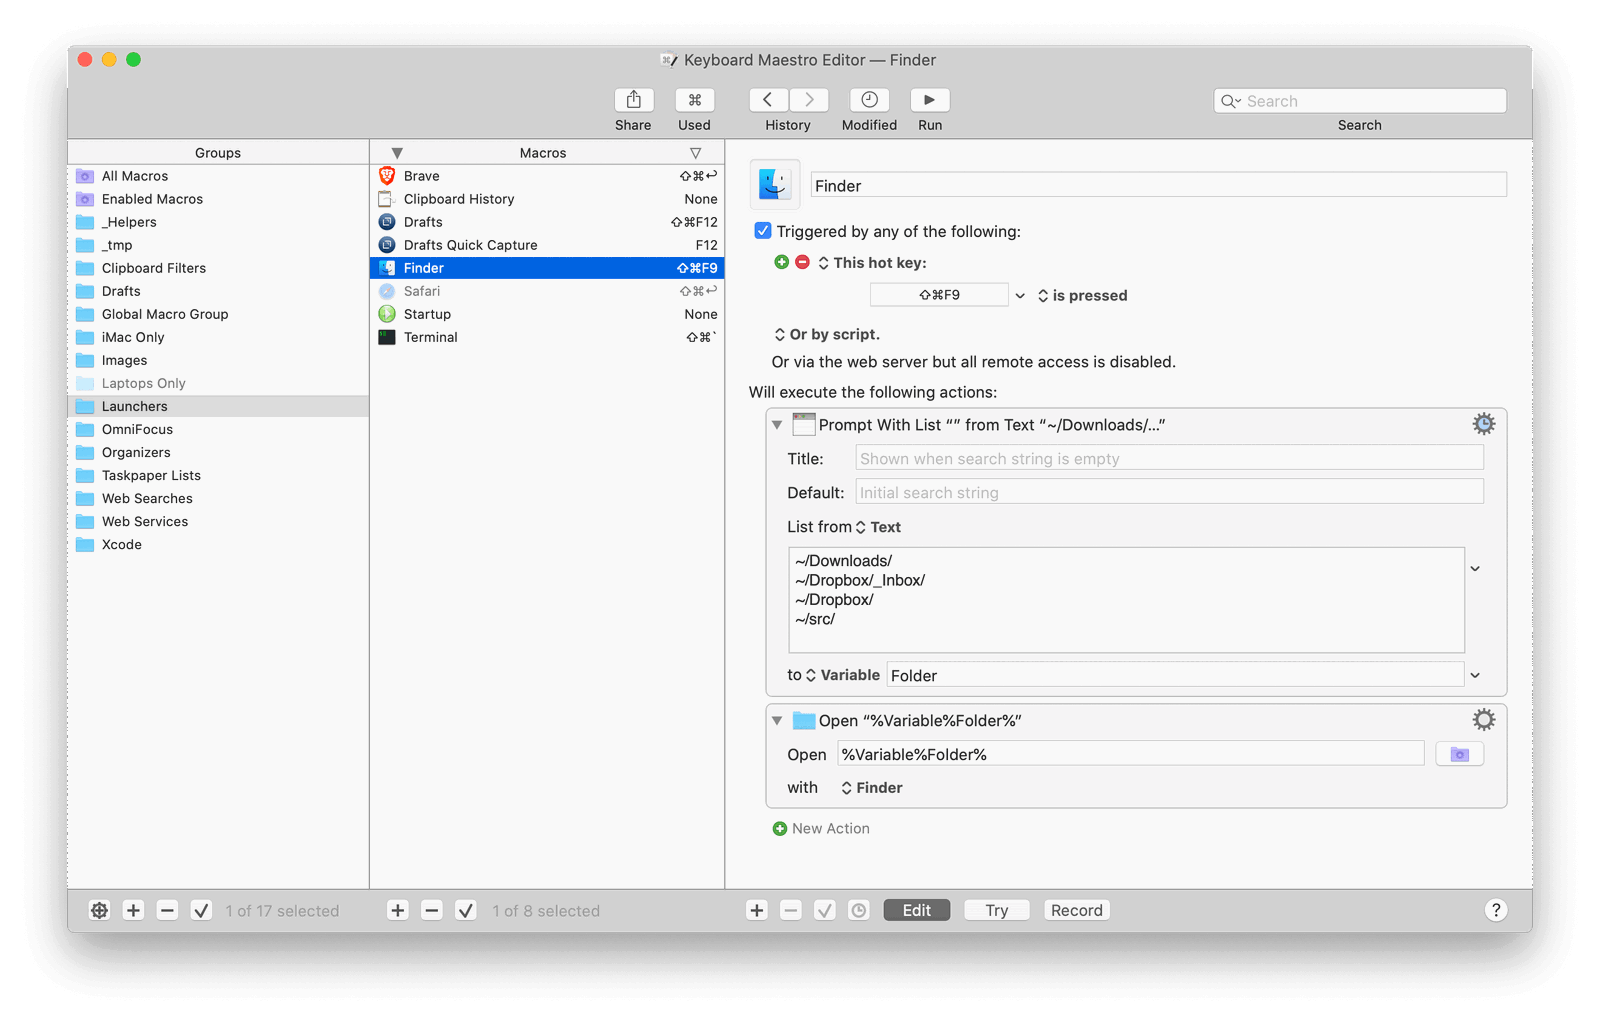
And the macro itself…

The whole thing is stupid simple. But I’m happy with it. Especially since the bug this is designed to work around is over a year old and, well, you know.

You can download the macro and import it into KeyboardMaestro here.

Focus

Quick question. Take a look at these two screenshots…

and

That’s my Mac right now at work with Spark and Slack running fullscreen in Split View.

In the first screenshot, one of the apps has focus. And in the second screenshot the other app has focus.

Can you tell which is which?

I’ve never been a big fan of Spaces or full screen on macOS, but I’ve been giving them a try again recently just to see if I can improve my workflow. And after a day or two of having a dedicated space for Slack + email, I found it maddening.

It turns out that I really enjoy having my noisy, communication windows segregated from the apps and windows I actively use to do work, but every time I’d switch to that space and either try and type into Slack or use the keyboard for navigation, I’d invariably realize the wrong app has focus.

Why? Because there’s no way to tell which is which.

Ok, technically that’s not true. You can tell. I’ve highlighted the difference below…

When that little 4px by 64px, gray bar is visible it means Slack is focused. Or something. I don’t know. Probably no one does.

Like I wrote about on iOS a few months ago, there’s been a trend in the industry ever since the iOS 7 redesign to get rid of UI affordances – or as Apple puts it, “subtle and appropriate” “adornments”. I don’t know if these changes are deliberate, due to a lack of empathy for the user, or just inexperience. But as apps deviate further and further away from the HIG with custom UI, whether for design reasons or in the pursuit of a mythical, cross-platform code base that management thinks will cost less, we lose the benefits of a well reasoned platform that was formerly easy to work with and a joy to use. And if we’re gonna go down that road, then let’s just give up and put everything inside a web browser. At least then we can see which tab has focus.

Running commands remotely on a Mac that you don’t have access to using Hazel and Dropbox

Last May I wrote about how I was keeping alive a persistent SSH tunnel back to my home network. Specifically, it connects to an iMac Pro that I use as a home media/automation server. I frequently need to screen share, view a web service hosted on it, or just access its command line. It also serves as our build server at work. An SSH tunnel is basically a poor man’s VPN. And I feel more secure about using that then just outright opening up ports in my firewall.

Anyway, nine months later, it’s proven to be a great solution. However, there is an occasional quirk.

The launchd job that controls the tunnel is set to automatically restart the process if it dies. And, sure, when it does die launchd does the right thing and restarts it. But in some situations the tunnel won’t actually terminate when it fails – it just hangs or becomes unresponsive. I was able to reproduce the issue a few times by making my WiFi flake out. So, I turned off the iMac’s wireless and hardwired it into my router. That was a big improvement, but I still saw the occasional oddness and found myself locked out a number of times when trying to connect back from work, the coffee shop, etc.

Thankfully, before I wasted too much time debugging, I recognized this problem for what it was: a giant rabbit hole.

I knew damned well that I could absolutely lose (and enjoy!) a whole evening or entire weekend running tests, debugging, and trying to figure out the cause of the intermittent failures. I’ve done it a thousand times with other piddly little problems. But, as Oliver Wood might say, “I am wiser now.” I’ve got better ways to spend my time. So, let’s just fix it.

My thinking went like this:

  1. When the network goes down, the tunnel will close, the ssh process will quit, and launchd will keep restarting it until it connects again. That part works fine.
  2. The problem is figuring out when the connection has stalled or experienced some other type of unresponsive fuck-up. How do I detect that?
  3. Me! I’m a smart human. It should be me detecting the issue instead of wasting hours trying to find a way to make the computer catch it. When I try and connect to the tunnel and it doesn’t work, that means something is broken. And since I only care if it’s broken when I’m actually trying to use it, that’s when I need to fix it. Automatically detecting any and all failures simply isn’t necessary.
  4. So, when I notice the tunnel is down, how do I tell my iMac to kill the process and let launchd restart it when I don’t have access to the machine in the first place? I could just kill the process automatically on a set schedule. But that might interrupt me when I was actually using it. Also, if it were down, I’d have to wait until the next interval for it to come back up. I need to send a command while remote and without having access to the machine – preferably in a way that I can also do from my phone.
  5. <Spidey sense starts tingling>
  6. Hazel! Dropbox! And a small shell script! My three favorite tools.

First, let’s figure out how to kill the existing (stalled) ssh process. From my original blog post, you can see that launchd runs this command to start the tunnel:

/usr/bin/ssh -N imacvpn

So, we can figure out the pid of that process by greping for the imacvpn keyword like this:

ps -ax | grep imacvpn | head -n1 | cut -f1 -d " "

That’s a four part command

  1. First, it lists all the running processes under my account.
  2. Filter to just those that contain the name of the SSH tunnel. That will typically return two results. The real SSH tunnel command and also the grep command itself.
  3. So, grab just the first line which will be (should always be?) the real tunnel process.
  4. Split that line of text using a space as the delimiter. The first token will be the pid which we’ll use to identify and kill the tunnel.

With that pid, we can then kill the process like this:

That’ll find the ID of the SSH tunnel process, kill it, then launchd will take over and start it back up again.

Great. But how to make that script run on command? That’s where Hazel and Dropbox come in.

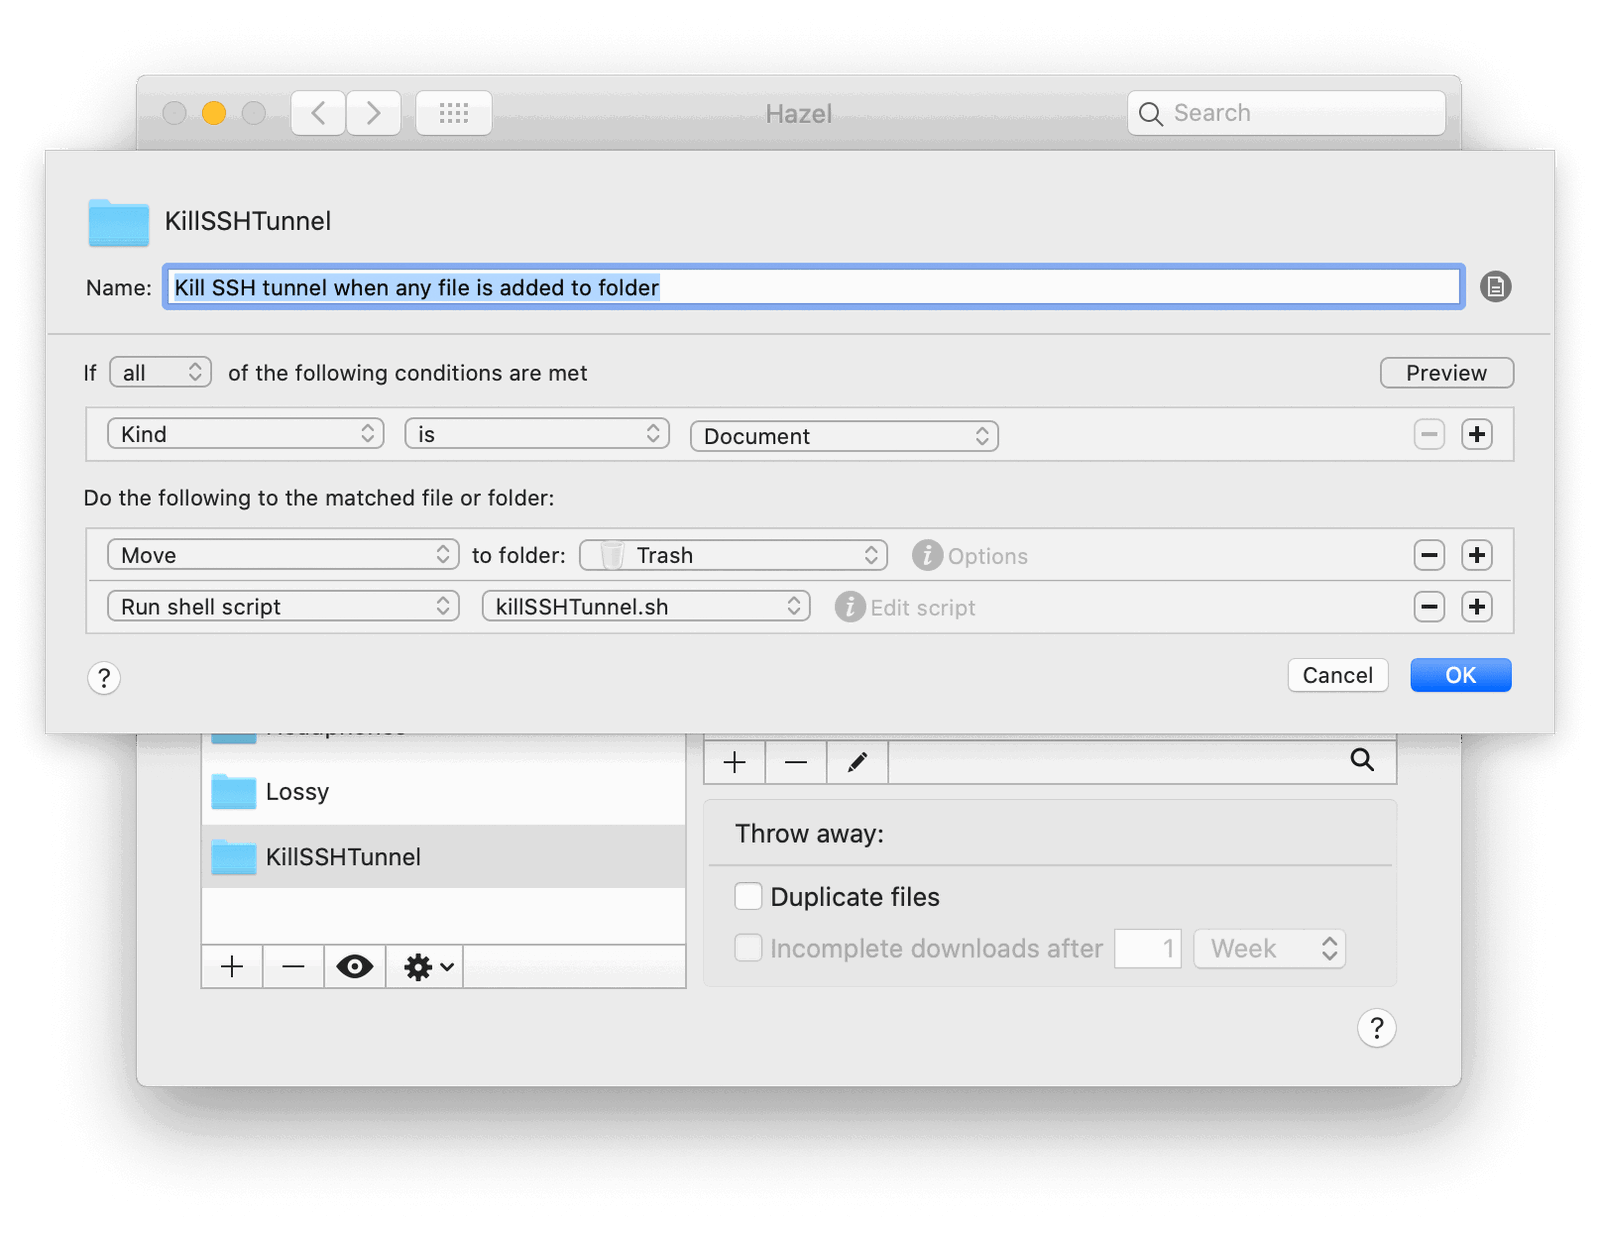
If you don’t know Hazel, go here. What we’re going to do is tell Hazel to monitor a specific folder inside my ~/Dropbox/. Whenever a new file is added to it, Hazel will detect the change, delete the file (since we don’t actually care about the file), and then run the above shell script.

Here’s how the configured Hazel rule looks:

Basically, we’re using Dropbox as a way to trigger a filesystem change that Hazel will detect and run whatever command we ask it to.

It’s great because if I’m on my computer at work or my laptop in a coffee shop, I can just save a blank text file into that folder. Dropbox will sync it to my iMac. Hazel will see the change and run the script.

And if I’m somewhere with just my phone, I’ve found the easiest thing to do is open up Photos.app and save a photo into Dropbox.app using Files.app via the system share sheet.

So that’s the dumb solution to my problem that I came up with. I’m still not sure what the actual technical reason is for the SSH tunnel occasionally crapping out on me. I’m just glad I’m to the point in my nerd existence where I can be happy applying a fix and not caring about the real underlying issues that don’t concern me.

Update:

After reading this post, Leo Kennis wrote to me:

A slightly safer option would be to change the command to:

ps -ax | grep imacvpn | grep -v grep | cut -f1 -d " "

The part with grep -v is a negative grep (find all lines that do not match “grep”)

This way it doesn’t matter which of the two results is listed first.

That’s one of my favorite things about shell scripts – there’s a million approaches to every problem. The above is a great way to make sure the correct pid is chosen. Thanks, Leo!

Rebudget

If you’ve been following along at home, you might remember that I started building a Mac app for managing my personal finances last April. Think of it as a powerful, privacy-focused, native alternative to Mint.com. Quicken, but not awful.

Since then, I’ve helped shipped a huge redesign to the app at my 9-5 job as well as two major updates to VirtualHostX and CommandQ. Complicating matters, VHX Pro is my first product ever to use a subscription pricing model. So, in addition to all the dev work that went into the app itself, I also had to write the server infrastructure to handle recurring billing, etc. I’ve been busy.

Nonetheless, I continued tinkering with my finance app all year. It’s basically my white whale at this point. And I’m happy to say it’s reached a point where I rarely if ever log into my bank’s website. Everything is done through my app.

But it’s not nearly ready yet. The UI and feature set is still too much in flux. However, while experimenting with different ways of managing and forecasting a budget within the app, I decided to prototype a few ideas as small, standalone Mac apps so I could build and test them in isolation. One of them took hold and became incredibly useful to me in real life as my wife and I made adjustments to our finances and tried to repair the damage from 2018.

I shared the app with a few friends and received some encouraging feedback. And then last month, with the end of the decade just a few weeks away, Twitter blew up with people posting about how they spent the 2010s and what they accomplished. I sure had a hell of a decade. But I wasn’t in the mood for reminiscing. I wanted to look ahead. So, I got the idea to put something new out into the world on January 1st and turned to my little budgeting app as it was the closest thing I had ready to go.

And here it is.

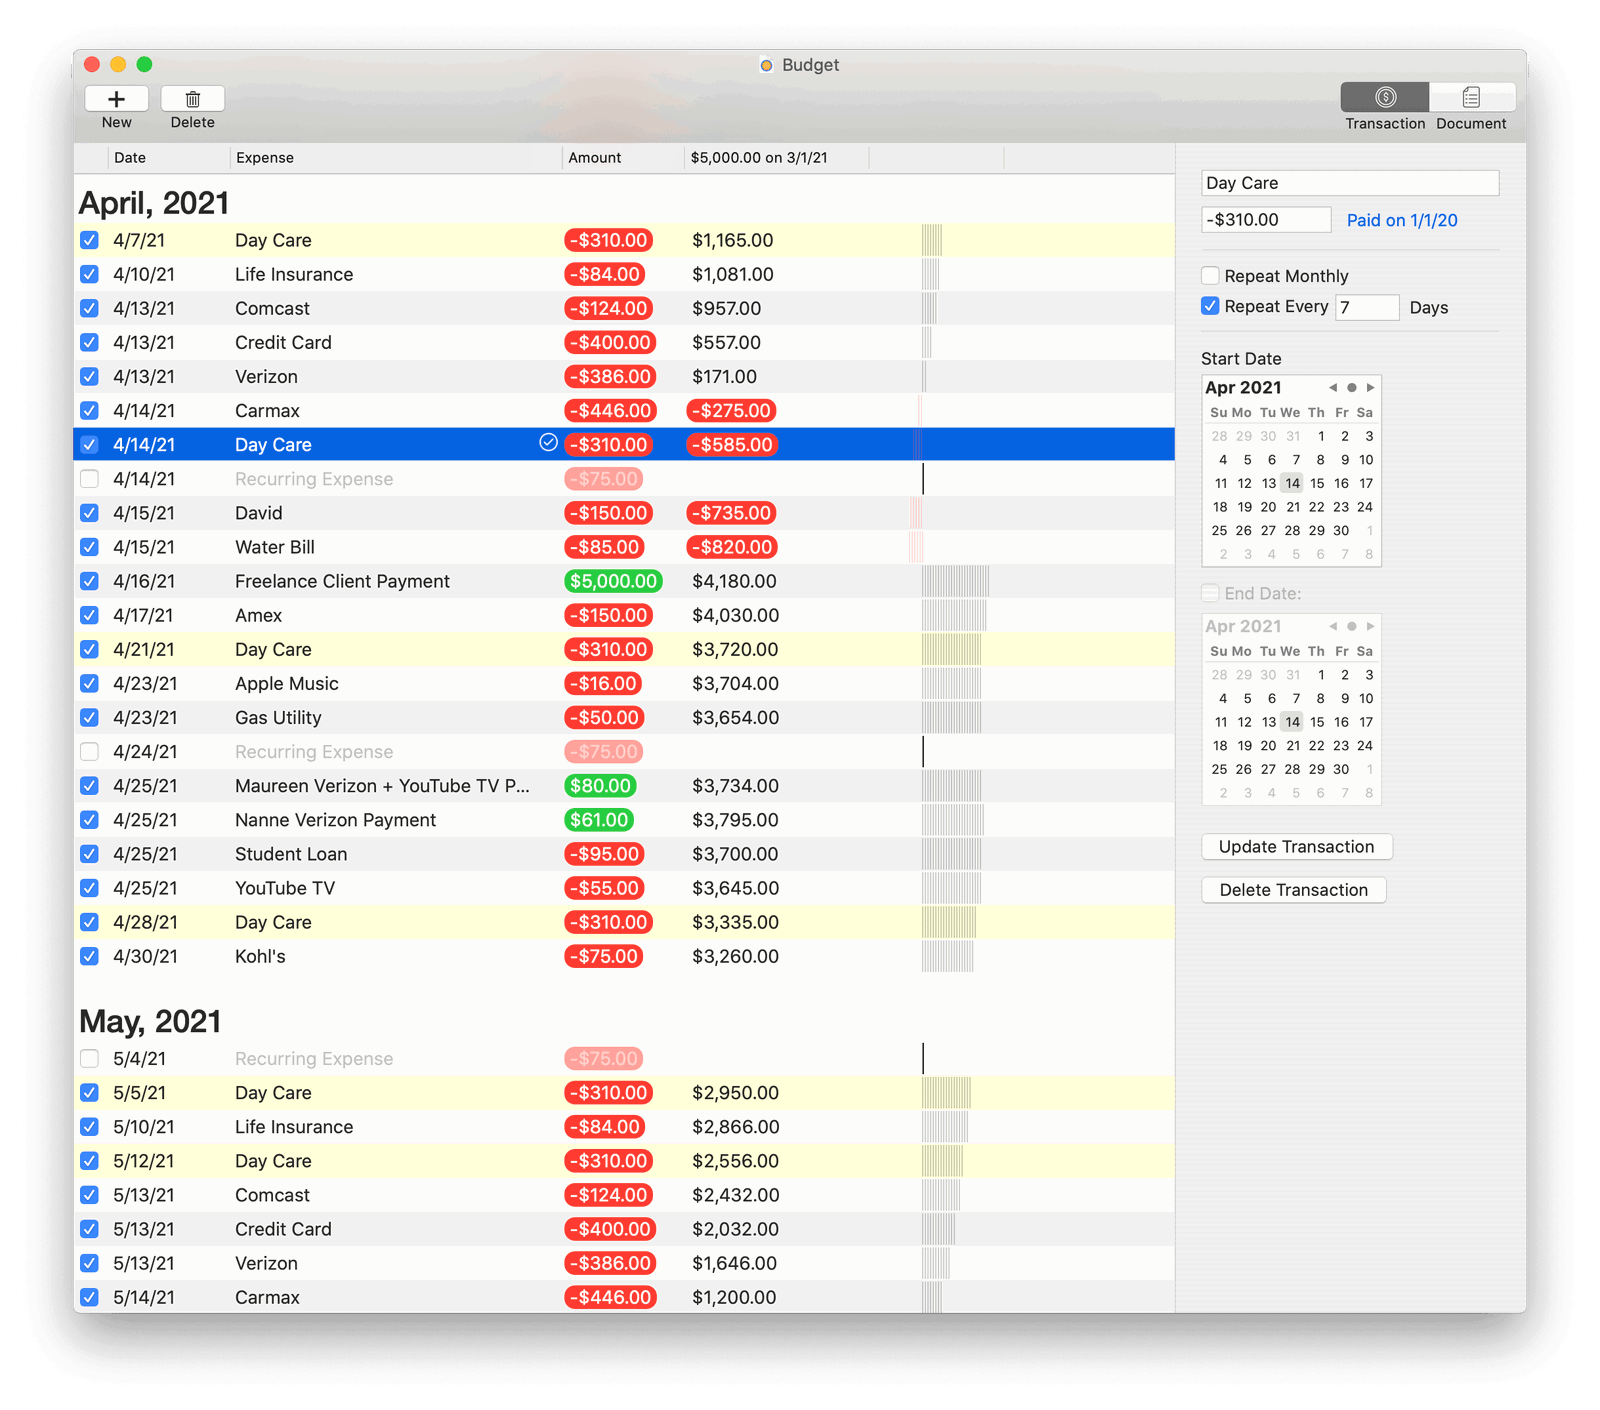
Rebudget Main Window

It’s called Rebudget, and it’s a wonderfully simple way to visualize your personal budget over time. See the natural ebb and flow of your account balance as paychecks arrive, recurring bills go out, and unexpected expenses arise.

The app isn’t meant to be an identical mirror of your bank statement. (That’s what my other, larger finance app is for.) Rebudget is a tool for planning and forecasting. Use it to see if your money is heading in the right direction. Use it to see if you can afford to take on a new car payment this Summer or if you should wait till next year. Figure out if you need to ask your new freelance client for a 50% deposit up-front or if you have enough cushion to wait for a final payment when the project is finished.

And that’s kind of the idea. If you’re already financially secure and never stress about your bank account, great. Rebudget isn’t for you. But if you freelance for a living or have other income that doesn’t arrive on a strict once or twice a month schedule – or if you’re recovering from a financially disastrous year where it seemed like everything was spiraling out of control, I think Rebudget can be a great way to plan or at least sanity check your finances. It’s certainly helped me in recent months.

I built the app to work the way I think. And that meant focusing on flexibility. I like to work with and visualize different scenarios at once. So rather than making Rebudget a typical shoebox Mac app with a canonical datasource, I went with our good friend NSDocument. That means you can have as many budgets as you want. Open them up side-by-side in different windows and compare how certain financial decisions effect things eighteen months from now. Or, quickly toggle a recurring bill on or off to see if it’s worth cutting that expense.

I have an early iOS version in the works, but until then I still wanted a way to have my data somewhat available on the go. So, I added an option to sync your bills and their due dates with Reminders.app. That way your bills show up on your calendar and you get alerts when they’re due. Also, if you check off a bill in Reminders, Rebudget sees the change and marks that bill as paid in its own database.

Here’s a quick, two-minute demo.

That’s Rebudget. I wanted to put a brand new thing out into the world to begin the new decade, and that’s what I came up with. I find it useful. I hope you enjoy the app, too.

Subscriptions or Bust

Two things prompted this post:

  1. Last week I moved my oldest and best selling Mac app to a subscription model.
  2. Ryan Christoffel wrote about The Iconfactory announcing that their amazing app Linea Sketch will be doing the same in 2020.

I work for a company that primarily builds hardware, but software is my true love. I’ve been programming in some form or another for twenty-seven years. It’s my job and my hobby. It’s the thing in life I’m most passionate about (other than my family, which I guess I’m required to say). I love the high I get from solving a difficult problem in my own apps and seeing the even more amazing accomplishments other developers pull off.

And when I see a well-crafted, beloved indie app (or entire company!) go under, it kills me. So, here’s my unsolicited thoughts on the state of software subscriptions both as a business owner and as a customer.

The first dollar I ever made from a piece of software I wrote myself was from a website I built in 2002 called IHateClaire.com. (Fun story: In 2009 someone bought the domain and turned it into a revenge-porn site.) For a one-time payment of $5, you could upload as many photos to the website as you wanted, and using a specially crafted file format that I reverse engineered, my server would send the photo to your SprintPCS flip-phone for you to use as a wallpaper or caller ID image. It certainly didn’t make me rich, but I was able to buy the occasional sandwich on the way to my college job at RadioShack.

Other small projects like that followed, but my first, real commercial endeavor (at least as I view it) was VirtualHostX in 2007. Originally costing $7 for version 1.0, over the next six years it would mature and gain new features until finally settling at $49 in 2013; a price that lasted until November 2019.

VHX followed the typical up-front pricing model. Your one-time payment got you all minor updates until the next major release. At that point you could upgrade at a discounted price or stick with your current version as long as it kept working for you.

Over the course of twelve years I released seven paid upgrades – each time offering existing customers a discount of 15 to 50% off. And even with those discounts, my upgrade revenue typically dwarfed my income from new customers more and more with each passing year.

Here’s a chart of total new customers gained each month from 2007 through last month. You’ll see that I’ve had to rely on revenue from existing customers as the number of new users buying my app has fallen.

From 2012 through 2014 it was my only job. But with the birth of my son (and then daughter), my wife left her job to raise them while they were babies and I went back to a 9 to 5 job plus my software business.

I won’t bore you with the gory details – because they’re both personal and quite boring – but in late 2017 the business came crashing down. And by May 2018, my one-person indie company was essentially bankrupt. Burnt-out and slightly devastated, I called it a loss and tried to move on.

But like I said at the top of this post, my heart is in software and I wasn’t getting that type of satisfaction from my day job. With the help of a small angel investment, I got back to work later that year and put out version 8.0 in October 2018.

Since that time, I’ve been trying to win back my customers’ trust and make the business viable again. The plan for doing so started this past January and finally came to fruition with me ditching version numbers entirely and releasing what would have been version 9 as a rebranded VirtualHostX Pro with a subscription model (kind of).

As I said, I rely on upgrade revenue to stay afloat. And I typically put out a paid release every 18 to 24 months. But that simply wasn’t sustainable.

(Ok, now let’s get to the part about other developers and our industry in general.)

I have it extremely easy. My apps aren’t in the App Store. They wouldn’t be allowed even if I wanted to go that route. And that’s awesome! That means I have to do everything myself – from online storefronts, to payment processing, licensing and order fulfillment, etc. I’m not under Apple’s control (for now), and I don’t have to throw away 30% of every sale. My fees, all inclusive, are just under 9%.

But for developers who only (or primarily) target iOS? Fuck. 30%? Capricious App Review enforcement? Competing against scam artists? (Admittedly better) review times? Getting locked out of your developer account? And, the point of this whole blog post, a trillion dollar tech company that refuses to work with its most passionate and loyal customer base to figure out a sustainable business model? (Haha, just kidding. There’s no great mystery to figure out. Just fucking allow paid upgrades already.)

In the App Store your options are:

  1. Release a paid up-front app and ship new features and bug fixes free, forever.
  2. Release a paid up-front app and let it die a slow painful death due to abandonment and/or bankruptcy.
  3. Riddle the app with in-app purchases.
  4. Ship version N+1 as a brand new SKU every so often and hope (with zero promotional help from Apple or the App Store) that your customers buy again.
  5. Turn to a subscription model.

Options 1 and (obviously) 2 aren’t sustainable – especially in today’s increasingly cloud-connected and service-oriented world where nearly every app has a web service component and simply costs the developer money for the app to continue to function.

But let’s play Devil’s advocate. Let’s ignore the recurring costs of the backend infrastructure or the time (which equals money) it takes to build, test, and ship new features.

iOS (and now macOS) are not Windows XP. Apple (and I don’t truly blame or criticize them for this) doesn’t give two shits about backwards compatibility. They move fast because, one, it’s in their financial interest to keep shipping new, shiny things, and, two, they have a genuine love for the cutting edge – old software be damned. (Again, as a macOS developer, I have this way easier than my iOS counterparts.)

We kill ourselves for four months every year just making sure our software continues to work with what Apple announces in June and ships in September. (Most recently in my day job, one developer spent about three weeks just focused on implementing UIScene support and dark mode.)

Option 3 is a possibility for some developers (Launch Center Pro attempted this with some success I think), but gating new features behind IAP paywalls is confusing (and sometimes deceptive) to customers and a nightmare for developers who have to if/else the crap out of their code on top of dealing with the ridiculous struggle of verifying more and more complex App Store receipts.

And say you do go the feature flag route. That still means you have to keep features that customers previously paid a one-time price for updated and compatible with iOS changes. And then you’re right back in the same unsustainable boat as up-front pricing except now you’re managing lots of a small purchases instead of one larger one.

And as for Option 4, if you’re going to regularly ship entirely new SKUs as a de-facto way of doing paid upgrades, well then you might as well go the subscription route (Option 5) because customers are going to have to keep paying for the app to continue working in either case.

The Iconfactory writes:

We spent over 200 hours on the Linea 2.7 update. A majority of that time was not even spent adding new features, instead it was spent making sure that everything looked right with the operating system’s new Dark Mode!

Changes to the operating system are obviously outside of our control but they must be dealt with or else the app risks becoming unusable. For example, prior to our work to properly handle dark mode, if you went to select a new template, you were presented with a menu that had black text on a black background.

Apple has recently begun to make a distinction between “iOS” for the iPhone and “iPadOS” for iPads. We expect that we are entering a period where new iPad-specific features will require a lot of maintenance in the coming years. If we don’t keep up-to-date, you’ll be working with a broken or unusable version of Linea sooner rather than later.

For a small software company whose product really is the app – as opposed to a SaaS with a companion app, or some other type of business that can bankroll an app by virtue of their real source of revenue – I don’t see any other sustainable path forward than subscriptions.

At least here on the macOS side of things outside the Mac App Store, Apple hasn’t willfully destroyed the perceived value of software as a way to juice hardware sales. So charging a premium (fair?) price is still realistically possible. But it is becoming more and more difficult.

So what can be done? What can literally keep food on developers’ tables and still be fair to our customers? (Other than paid upgrades in the App Store, of course, but that’s just silly, right, Apple?)

A common refrain from customers is they just want to pay for an app one time. I GET IT. But if we, developers, don’t get paid for our time, it is simply unsustainable to ship updates. And every app out there will 100% eventually die and cease to work without maintenance work. The breakneck pace of iOS ensures that.

And so I view it as a very simple calculus for customers. If you buy an app for $0.99 with the intention of only using it a few times for a specific use case, then who cares if it breaks next September? But if it’s an app you regularly use or – gasp! – actually depend on? Why would you not want to do your part to ensure it has a future?

Here’s a short Twitter conversation between Drew McCormack (Agenda) and Matthias Tretter (MindNode):

This made me think about the subscriptions I have for apps. It’s a grand tally of one: Tower. It’s a tool I need for work, and it cannot hold my data hostage. I don’t trust any other creational tool with a subscription. Perpetually renting access to my own data doesn’t appeal.

@drewmccormack agreed. which is why we will offer a free editor and always allow to export your documents, with our without an active subscription

@myell0w Sounds like the right way to do a subscription. IMO a lot depends on the “lock down” that is applied. If you can’t do any edits at all, it could be very frustrating. Eg. see a typo and have no choice by to pony up for another year to fix it.

Drew makes a great point. It’s the “lock down” that can be the key to a sustainable balance between what’s fair to customers and you staying in business. VirtualHostX’s new pricing structure follows the Sketch model: the app works forever – just no new updates after your subscription expires.

But, still, subscription fatigue can certainly be a real thing for people. My biggest gripe, however, as a developer, are those who still balk at paying anything for apps they use – up-front price or subscription.

I’m incredibly fortunate to earn a good living. And so I try very hard not to project my financial prosperity on to other people who may or not be in a situation I understand. But our customers are walking around with an – at a minimum – $500 supercomputer in their pocket. In addition to a larger, equally expensive slab of smart glass in their bag – if not also a laptop or smart watch, too. All of those combining for at least $60/month in service fees to the cell carriers.

The Iconfactory announced Linea will be $0.99/month or $9.99/year. If you love that app, why would you not fork over less than a dollar a month to continue using it?

I target a smaller, niche market and have way less sales than they do, so I have to adjust my pricing for a smaller set of customers. VirtualHostX Pro is $5/month or $49/year. I have a major advantage in that for a large percentage of my user base, my app is a business write-off because they rely on it to do their job. (Not knocking Linea or other apps. I’m sure many of their customers use it professionally, too.)

So when I did my big release last week and announced my new pricing model, I was extremely nervous and wary of what the response would be. But so far I’m very lucky that I’ve have had few complaints. (I’m sure there are lots of folks who are pissed and will just never tell me or buy from me again.)

Here’s two unsolicited quotes I received from customers last week:

Sorry, I don’t do subscriptions. It’s not a pricing model I support as a user. I’ll be moving to alternative software.

I replied to this user that while, yes, VHX is a subscription now, it’s following the Sketch model. If you let your subscription expire, the app keeps working forever. You just don’t get new updates.

Anyway, they never replied back. So I looked up their previous order history and their only purchase was three years ago when they bought the app on sale from a bundle website for $0.99. So, you know what? Fuck that guy. You can’t please everyone.

Even more from The Iconfactory:

The only way for us to continuously preserve access to your work is for us to keep the app up to date as best we can. To be able to afford to do that, we need your support.

If you still don’t agree, then feel free to export your work and move on.

But back to my customers, here’s the type of engaged customer that makes my job a joy:

Now a subscriber. I am happy to support a sustainable future for the project. I had to jump ship for a while when you had decided to no longer support the earlier version, so it was great to be back in the fold when you brought it back to life! I think you are making a good choice with the subscription option.

Will the Sketch model pan out and keep my tiny company afloat? I have no idea. I don’t know if it will save Linea or anyone else. The rise of advertising supported software, VC funded apps that can operate at a loss for years, and companies who finance their apps via alternative streams of revenue have conditioned users to believe that software is a cheap commodity not worth paying for. We started heading down that path with the Web 2.0 bubble, and the rise of the App Stores have only accelerated that trend.

So, now it’s subscriptions or bust. Because, obviously, Apple is smarter than all of us and knows that paid upgrades aren’t a viable solution to a problem that was solved thirty years ago. That, or they’re simply not self-aware enough to realize that they, too, rely on upgrades – just in the form of hardware sales instead of software.

Addendum

And just to prove that I eat my own dog food, here’s a screenshot of my App Store Subscriptions screen:

Making Siri Shortcuts run automatically – even when iOS doesn’t want you to

I never seem to end up writing the blog posts I intend to.

This evening I wanted to followup on this morning’s release of VirtualHostX Pro and my reasons for switching to the new subscription model pricing structure I went with.

Instead, I’m burnt out from three weeks of pushing hard to get the app and the necessary server infrastructure out the door. So, that post can wait.

Let’s talk about something fun and related to my new obsession with Siri Shortcuts and CarPlay. Namely, how to trick iOS into running Shortcut automations that the OS doesn’t typically allow you to do.

A week ago I posted about how to triage your email in the car with Siri and a little server-side magic. Tonight I’m going to hack together a Shortcut that automates something I’ve done nearly every afternoon, five days a week, for the last thirteen years: tell my wife I’m leaving work.

I have a shitty commute each day from one side of Nashville to another. The mornings aren’t too horrible, but my afternoon drive home is almost always an hour. And the first thing I do as I pull out of the work parking lot is tap Waze to get a traffic estimate and either text or call my wife to let her know I’m leaving and how long it’s probably going to take. This didn’t matter so much the first eight years of our marriage, but now with two kids who have school schedules of their own, every little bit of coordination helps.

If you’ve played around with Shortcuts.app much, you’ve probably noticed two things:

  1. There’s an intriguing action to compose and send a text message to someone.
  2. In iOS 13 there’s a new (it is new in iOS 13, right?) “Automation” tab that lets you schedule certain shortcuts to run automatically.

I’m a big fan of automating my computers as much as possible. So this suddenly being available on my trouser Mac has my mind spinning with the possibilities.

Sadly, a ton of the endless automations I can dream up are just not possible because Apple simply restricts what can happen automatically. I assume this is for privacy reasons. And I can’t really blame them. As an example, what if someone got ahold of your phone and set a shortcut to automatically text your most recent photos to everyone in your address book every time you left the location of your favorite night club? Not good.

But, as a power user, I crave this type of, well, power over my device. I would love an “I’m not an idiot” switch to bypass these safety protections. Until then, here’s what I’m doing to hack around it.

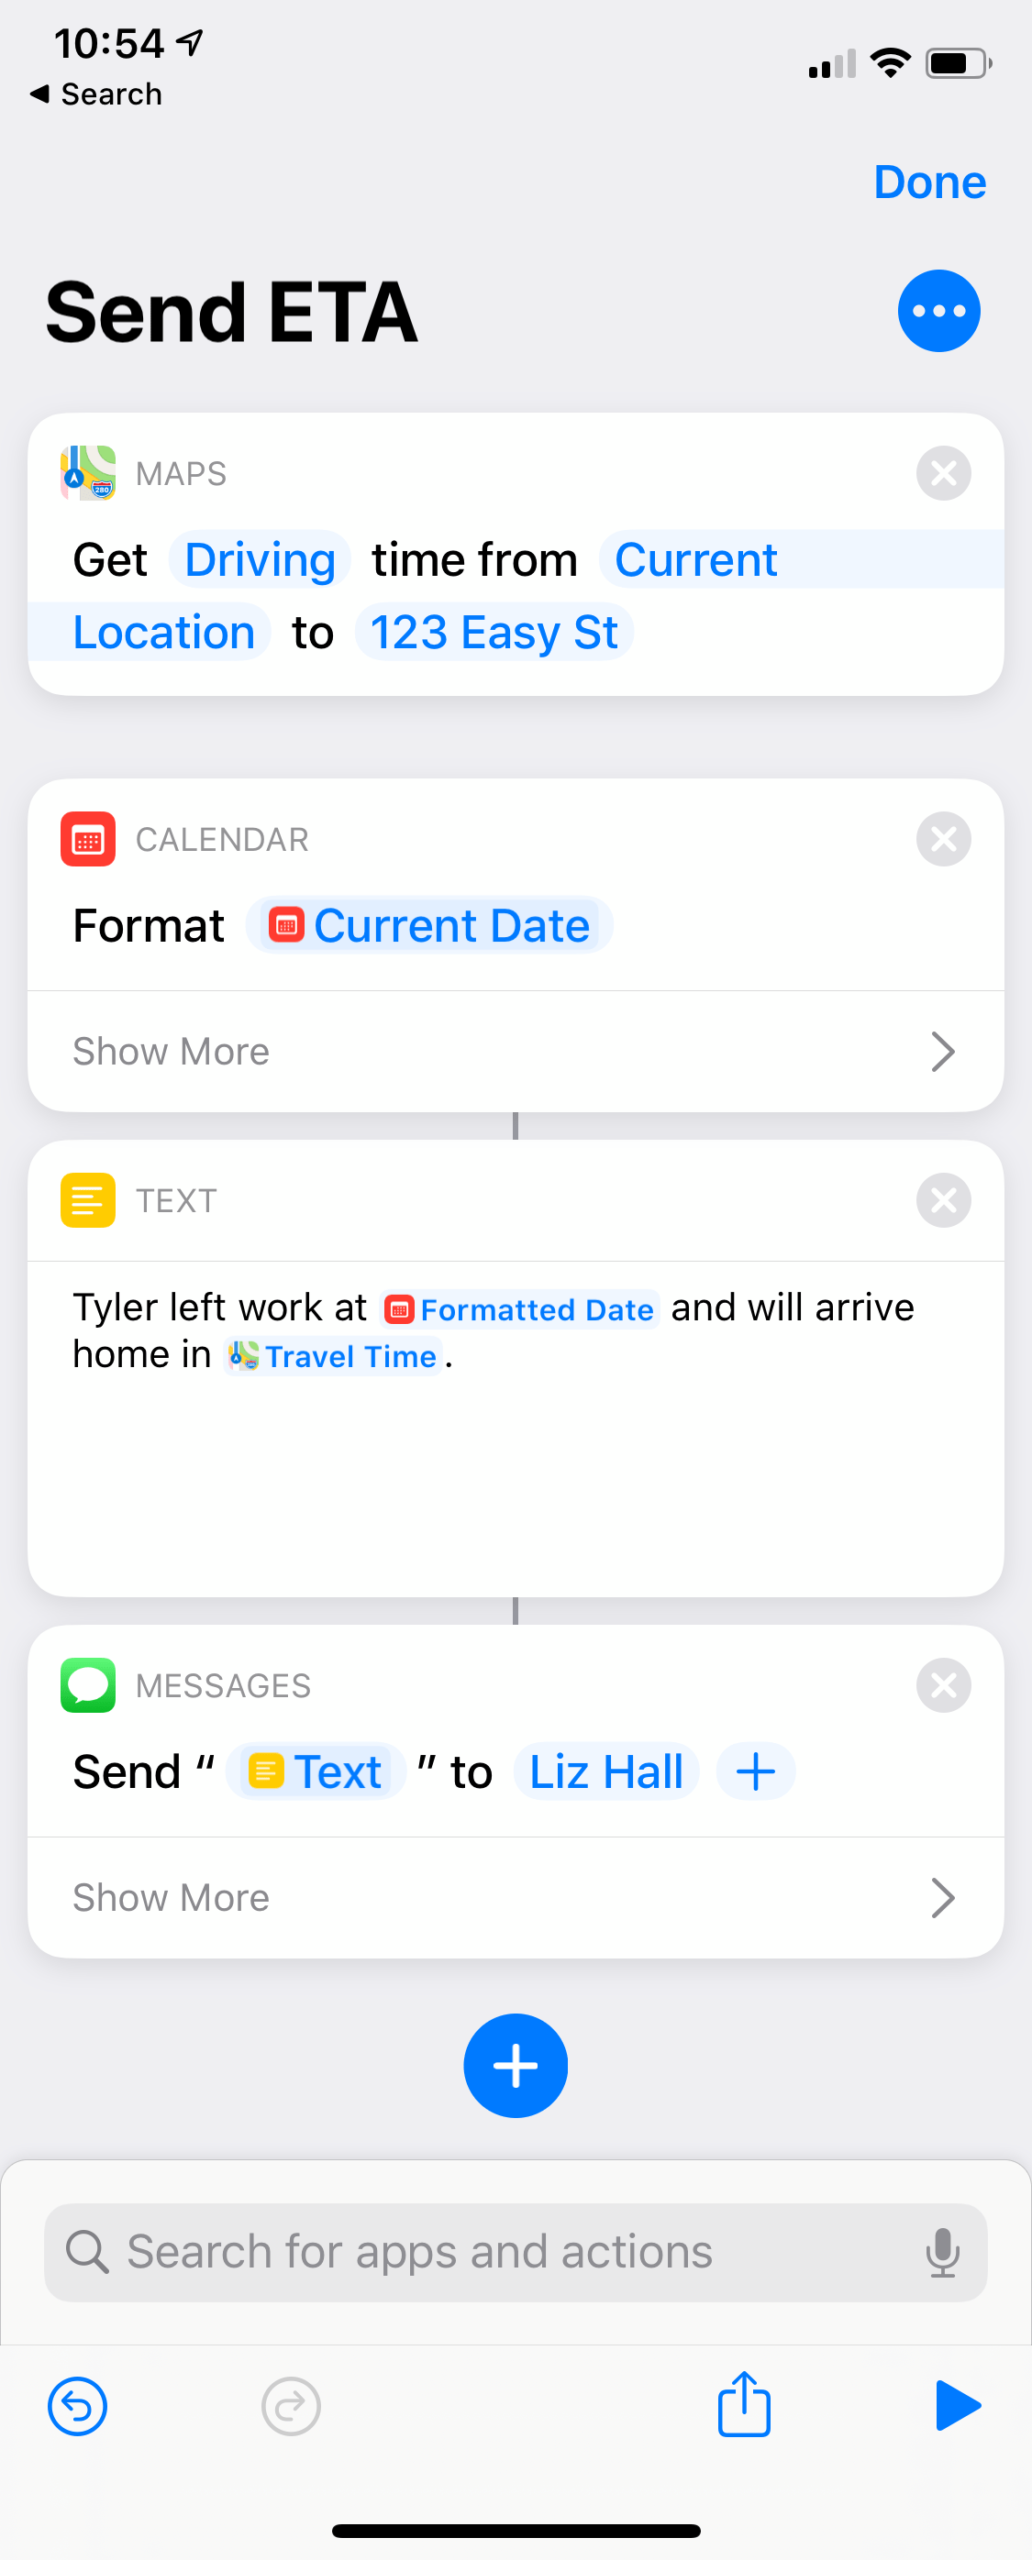
My ideal use case is this: when I leave work in the afternoon, fetch the estimated drive time home and text it to my wife. It’s that simple. Here’s what the Shortcut would normally consist of…

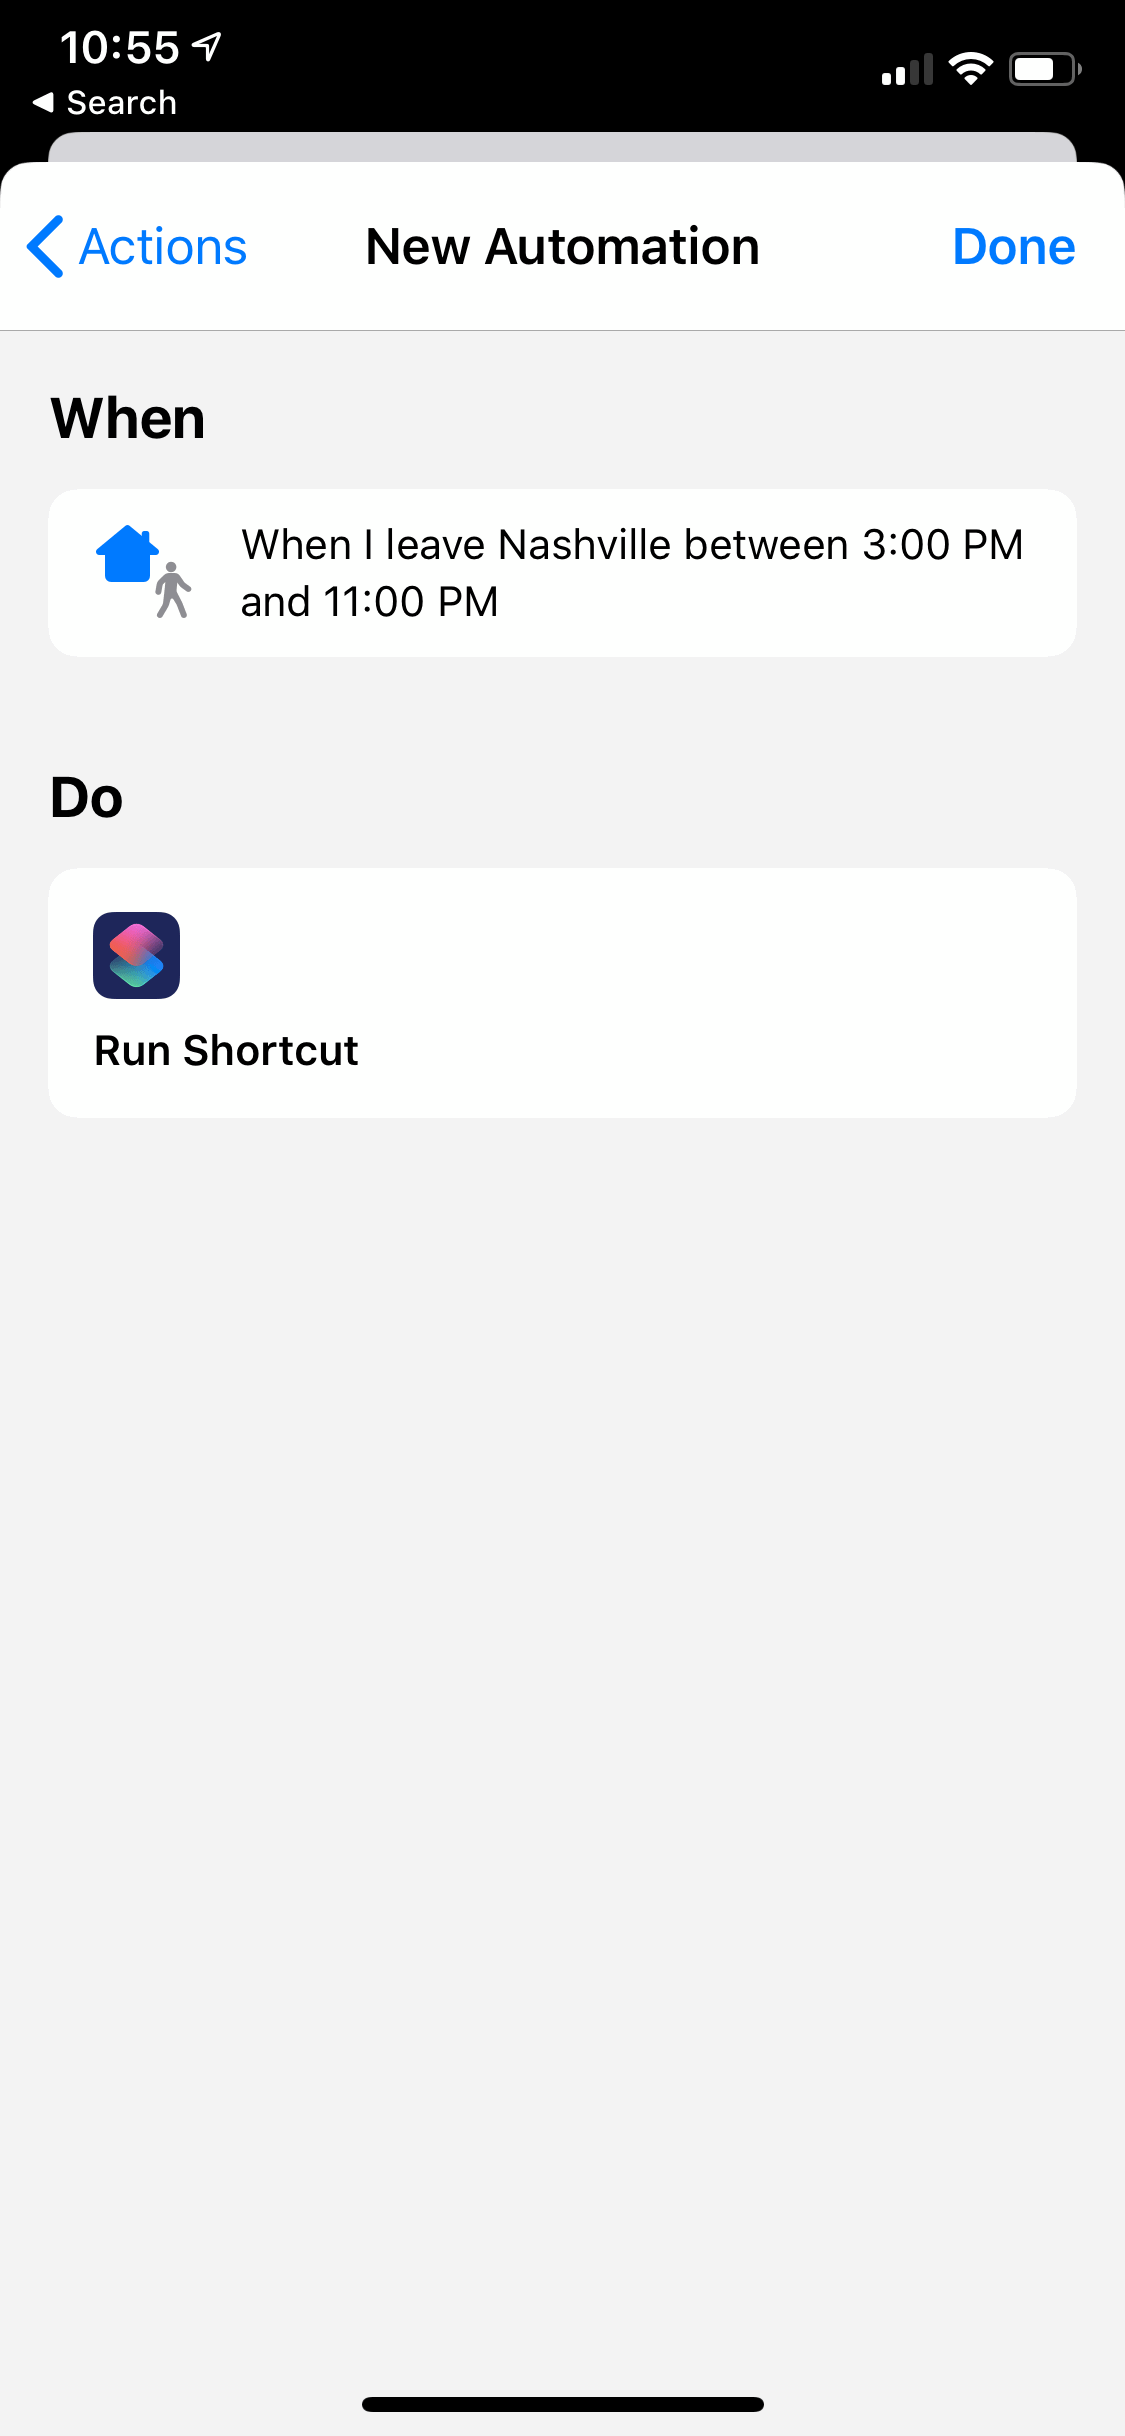
And then you’d just hook it up to an automation that runs it when you leave work in the afternoon like so…

But, like so many of iOS’s restricted Shortcut actions and Automations, sure, it’ll run – but it doesn’t actually do anything until you tap on a notification it presents and then unlock your phone to give it permission.

We can do better.

At first I thought: “OK, I have a ton of server side experience. I’ve written code to work with Twilio’s awesome SMS sending service many times. If iOS won’t let me send an iMessage automatically, I’ll just make it ping my server and send a real SMS for me.”

Cool, cool.

So I whipped up a quick PHP script that accepts a message POSTed to it from the Shortcut and then texts it to my wife via Twilio. And it works great!

But! I quickly discovered that not only are some Shortcut actions restricted from running automatically, but certain Automations are as well. And location based triggers are one of them that iOS won’t run without your consent each time.

After doing a ton of googling, I found this Apple support document that reads:

The following automations cannot be run automatically:

  • Arrive
  • Before I Leave
  • Bluetooth
  • Leave
  • Time of Day
  • Wi-Fi

Crap. So, I can’t trigger the Shortcut based on leaving a location. But higher up in that support doc are triggers that do run automatically…

  • The following automations can be run automatically:
  • Airplane Mode
  • Alarm
  • CarPlay
  • Do Not Disturb
  • Low Power Mode
  • NFC
  • Open App
  • Watch Workout

Bingo. I added CarPlay to my Subaru recently. I can set the Shortcut to run when I connect to CarPlay.

But that’s not quite right. I don’t want her to get a random text from me every time I get in my car. Only when I’m leaving work in the afternoon.

The solution I came up with took some fiddling to get just right, but it works flawlessly. Here’s the full Shortcut, which I’ll explain below:

Since I want this Shortcut to run automatically, I need to hook it up to an Automation that can run things automatically. In my situation, that’s my phone connecting to CarPlay.

But, I only want the Shortcut to actually execute when I leave work. That means, it needs to be gated by the following conditions so my wife doesn’t receive unnecessary texts:

  1. I have to be currently at work. (So that the Shortcut runs when I’m leaving work.)
  2. It has to be at the end of the day. I don’t want it to trigger when I leave on my lunch break.

So, the first action gets my distance in miles from my current location to my work address (blurred out).

Then, if I’m within a quarter of a mile, the Shortcut continues. (Funny: my first pass at this script had the distance threshold set to one mile. She got a text when I left work, and then five minutes later when I left the gas station after buying a Zebra Cake.)

Next, we need to restrict it to the end of the day. For me, I consider this after 3pm. That’s well past when I would leave for lunch. But also early enough for when I do occasionally leave to pick up my kids instead of her.

And that time restriction was tricky to implement. Maybe there’s a simpler way in Shortcuts.app, but I couldn’t find a way to compare times – only dates. So, I first had to construct a data value for 3pm on the current day. And then compare that to the current date and time. If that computed date was earlier than the current date, that means it’s past 3pm and we’re good to finish running the script.

And then the final step is to POST the travel time home to my web server which handles sending the text message to my wife since even with an automatically run automation, iOS still prevents you from sending a text message without confirmation.

So, that’s it. Like my previous post about Siri and email, I’m beginning to realize that you can do a little server-side processing to augment and flesh out what iOS allows the Shortcuts app to do. And I think we as a community are just beginning to scratch the surface of what might be possible in the future as these always-online, location-aware devices become more and more capable of doing our bidding.

Triage Your Email in the Car with Siri

Installing a CarPlay system into my ten year-old Subaru is easily one of the best purchases I’ve made in years in terms of how it’s changed the way I go about my day. Right up there with the original iPhone. I know lots of folks who swear by their iPad, and, sure, I like mine. But iPad has always seemed like a product in search of a problem. CarPlay feels like a product that is a solution.

CarPlay has made my morning and afternoon commutes far more enjoyable. And with so much dead time between home and work, I’m now trying to see if I can make some of that a bit more productive, too.

I’ve got a big ass post about using Siri Shortcuts with OmniFocus coming soon (I hope), but for now I want to talk about email.

I understand that Apple wants to limit what’s possible while driving for safety reasons, but Siri’s constant “I’m sorry, I can’t help you with that while you’re driving” responses are slightly maddening. All I want is for Siri to read my unread emails.

If I cheat and leave my phone unlocked while barreling down the interstate at 75mph, Siri will read my recent email. But that’s kind of it. I can’t perform common actions like archiving, deleting, marking as read/unread, etc. I can’t even reply. (Or if you can, I haven’t discovered the correct voice incantation to make Siri do so.) You can compose and send a new email though, so there’s that at least.

Nonetheless, what I’m really after during my morning commute is the ability to triage my inbox and prepare for my daily standup call that happens as soon as I arrive at work. Between the time I wake up and when I finish dropping my kids off at school and start my drive in, I simply don’t have time to read everything that came in overnight or from my coworkers in earlier timezones.

What I want is to process and clear out all the junk (not in the literal spam email sense) and get a handle on any messages that need action before the people who sent them blindside me about their status during our phone call.

So, I built something to do that. I call it Voxmail, and it’s free on GitHub.

There are two components.

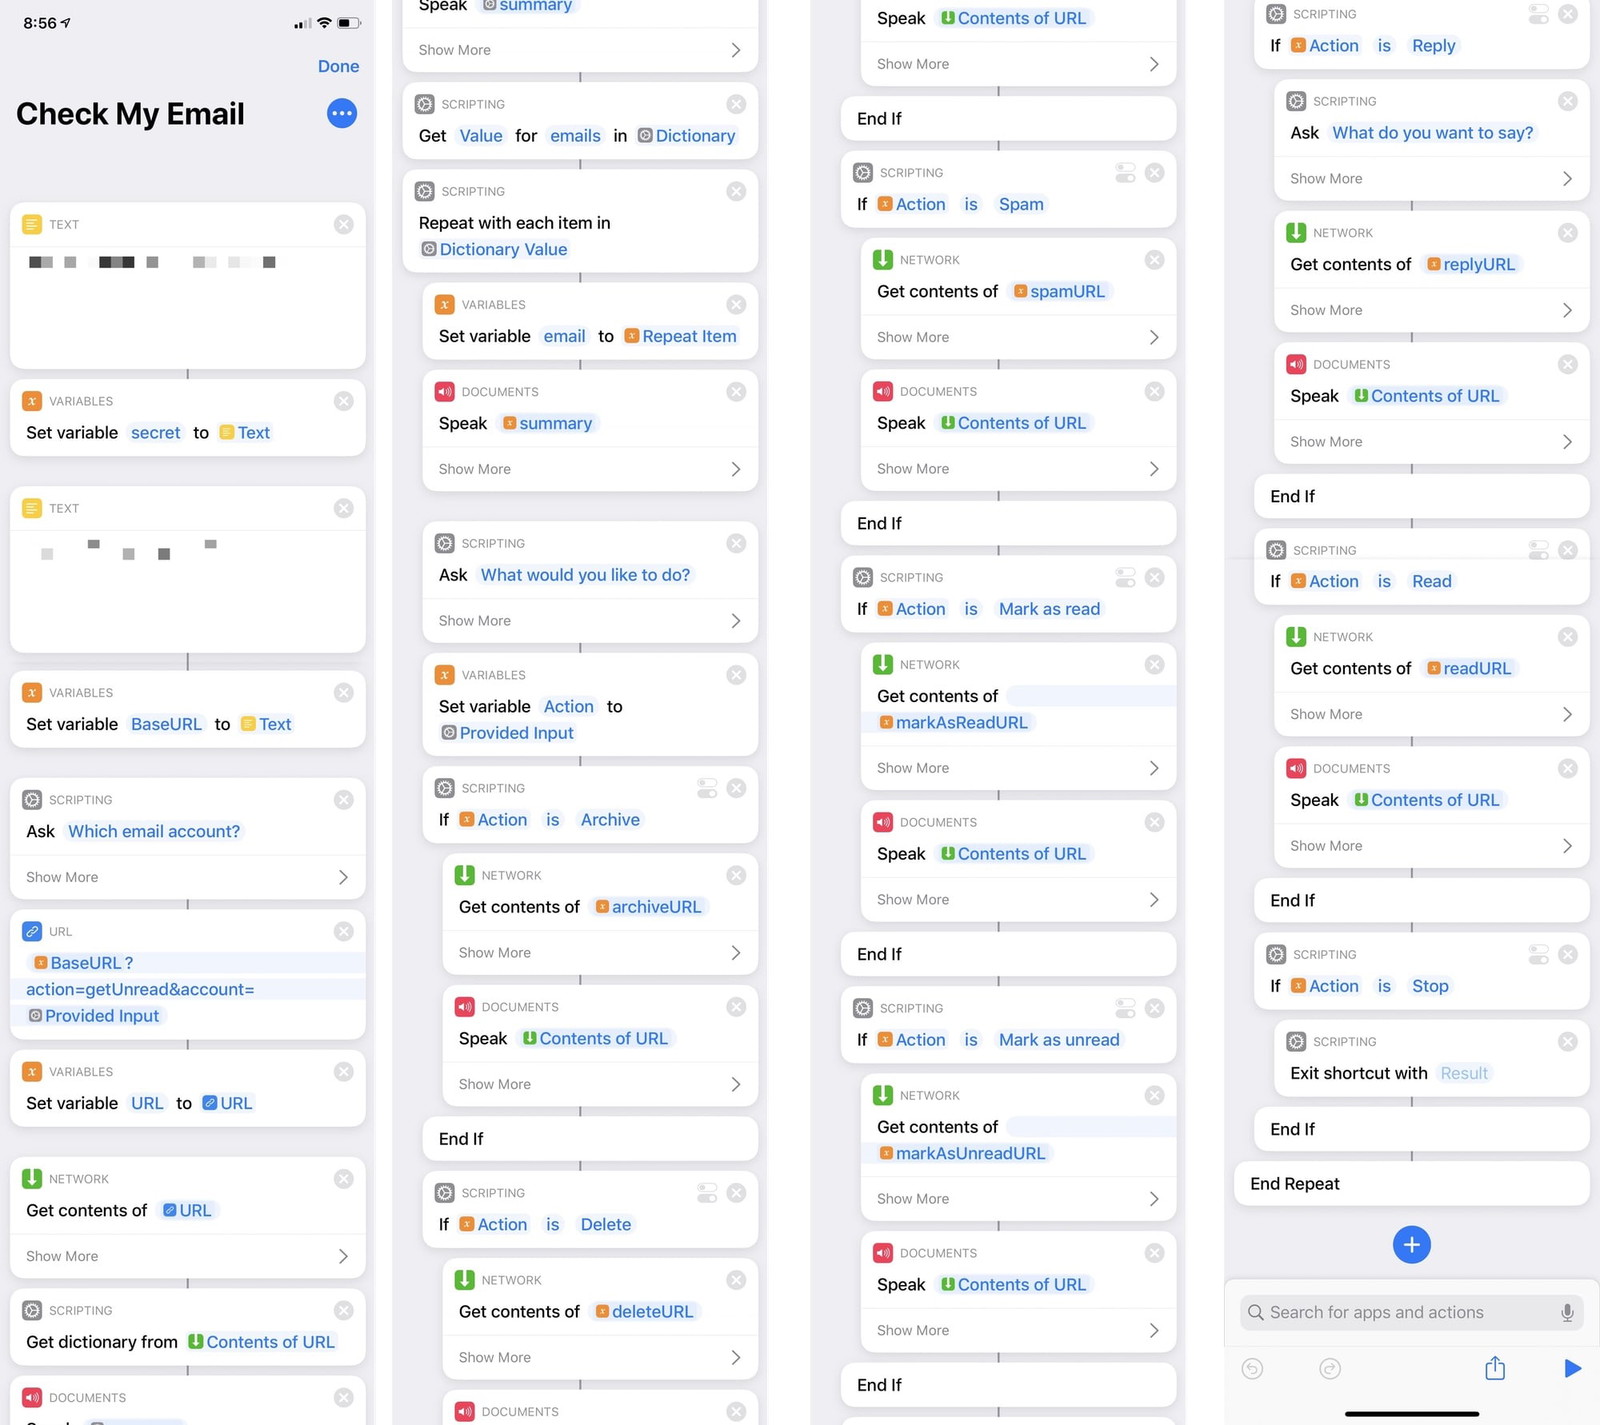
  1. A 49-step Siri Shortcut that you install on your iPhone.
  2. A small PHP script that you can throw onto most any web server that the Shortcut communicates with. Other than two Composer requirements that deal with speaking to email servers, it’s plain, vanilla PHP. It doesn’t even need a database.

When you run the Shortcut, it connects to the PHP script, which fetches your email and returns it in a format optimized for the Shortcut to read, parse, and let you take action on.

Siri will speak a summary of your unread messages and then allow you to take action on each individual email. You can listen to the full email body. Or, you can archive, delete, mark as spam, mark as read or unread, and send a reply.

I’ve been using the script for a week or two and it’s fast, reliable, and awesome. At least with Fastmail. I have no idea how it will perform against a Frankensteined IMAP implementation like Gmail. But I’d love feedback! Also, it doesn’t support Exchange. So sorry. Pull requests are welcome, though!

How does it work in practice? Here’s a demo video…

And here’s another showing CarPlay in action…

Note: In this example I’m propping my iPhone precariously on top of my gear shift against the air vents. I’m just doing this so you can see the status of the emails updating live from the Siri Shortcut, to the server, and back down to my phone’s mail client. My voice commands and Siri’s output are going through CarPlay – not the phone. This all works with your phone happily locked and in your pocket. (And also on your watch and AirPods, too!)

And here’s the ridiculous Shortcut in all its glory.

Of course, you may be thinking: “Hey, you’re an app developer! Why didn’t you write an app to do this?”

I thought about it. I’ve actually written an iOS email client before, so I knew MailCore would be up to the task. And I’ve seen amazingly deep Siri integrations from other iOS developers like OmniFocus.

But I’ve done some basic Siri programming for my clients, and it was a royal pain in the ass to setup and debug. There’s no way I could have prototyped and built this project to the point it’s at in 7h 56m over the course of a weekend like I did. (I know the time down to the minute because Timing.app is amazing.)

And that’s not because of Swift or Xcode, etc. Swift’s static typing would have actually saved my butt a few times when I did some dumb PHP things. It’s all the damn hoops Apple makes you jump through just to run a bespoke app on your own device.

I wanted to build this for myself – not to make money or distribute through the App Store. And being an open source project, I sure wasn’t going to make pro-but-not-actually-developer-users who want to use it deal with certificates, provisioning profiles, etc. This whole Siri Shortcut / PHP script solution is a complete hack, but it’s easier than the alternative. Ok. Rant over.

So, go visit Voxmail on GitHub and give it a try. I’d love your feedback.

And if all of this was somehow already possible natively with Siri and I just wasn’t asking the right questions, boy do I feel dumb.