I May Have Gone Overboard with My Keyboard Shortcuts
The other day a coworker was making fun of me (in a good natured way) after we spent some time coding together and they realized just how many keyboard shortcuts I use. And it wasn’t about me having all the standard macOS shortcuts wired-in as muscle memory or even obscure hotkeys specific to a given app. It was all of the custom, global keyboard shortcuts I use to automate repetitive tasks on my Mac in the hope that what I’m telling my Mac to do with my hands might just barely be fast enough to keep up with what my brain wants it to do.
In my head I think of apps, websites, and folders on my Mac as “places”. I don’t just open an app or visit a website. I go there. For me, much like traveling in real life, getting to my destination as fast as possible is usually the goal. And so the majority of the keyboard shortcuts I use are about launching things on my Mac that would otherwise take too many mouse clicks or key presses.
I live and die by my keyboard. And here are the shortcuts I couldn’t do without.
Controlling windows
Let’s start at the highest level. Everything you do on a Mac takes place inside a window. And constantly having to reposition new widows by delicately dragging their edges and titlebars into place drives me mad. It’s the GUI equivalent of busywork.
I’ve played around with automatic window layout managers on Linux – and even a few that have been ported in spirit to macOS. But they were all a little too fiddly and unforgiving for my taste. (Which is great for some people!) As you’ll see below, while I generally want my windows arranged in an orderly fashion, sometimes I do need to break away from my grid-based system and arrange them freeform like a sane, normal person.
Years and years ago I used and was a huge fan of MercuryMover. But at some point I switched to another app that I no longer remember before finally settling on Magnet in 2012. It’s simple and works great. Here are the keyboard shortcuts I’ve setup in it…
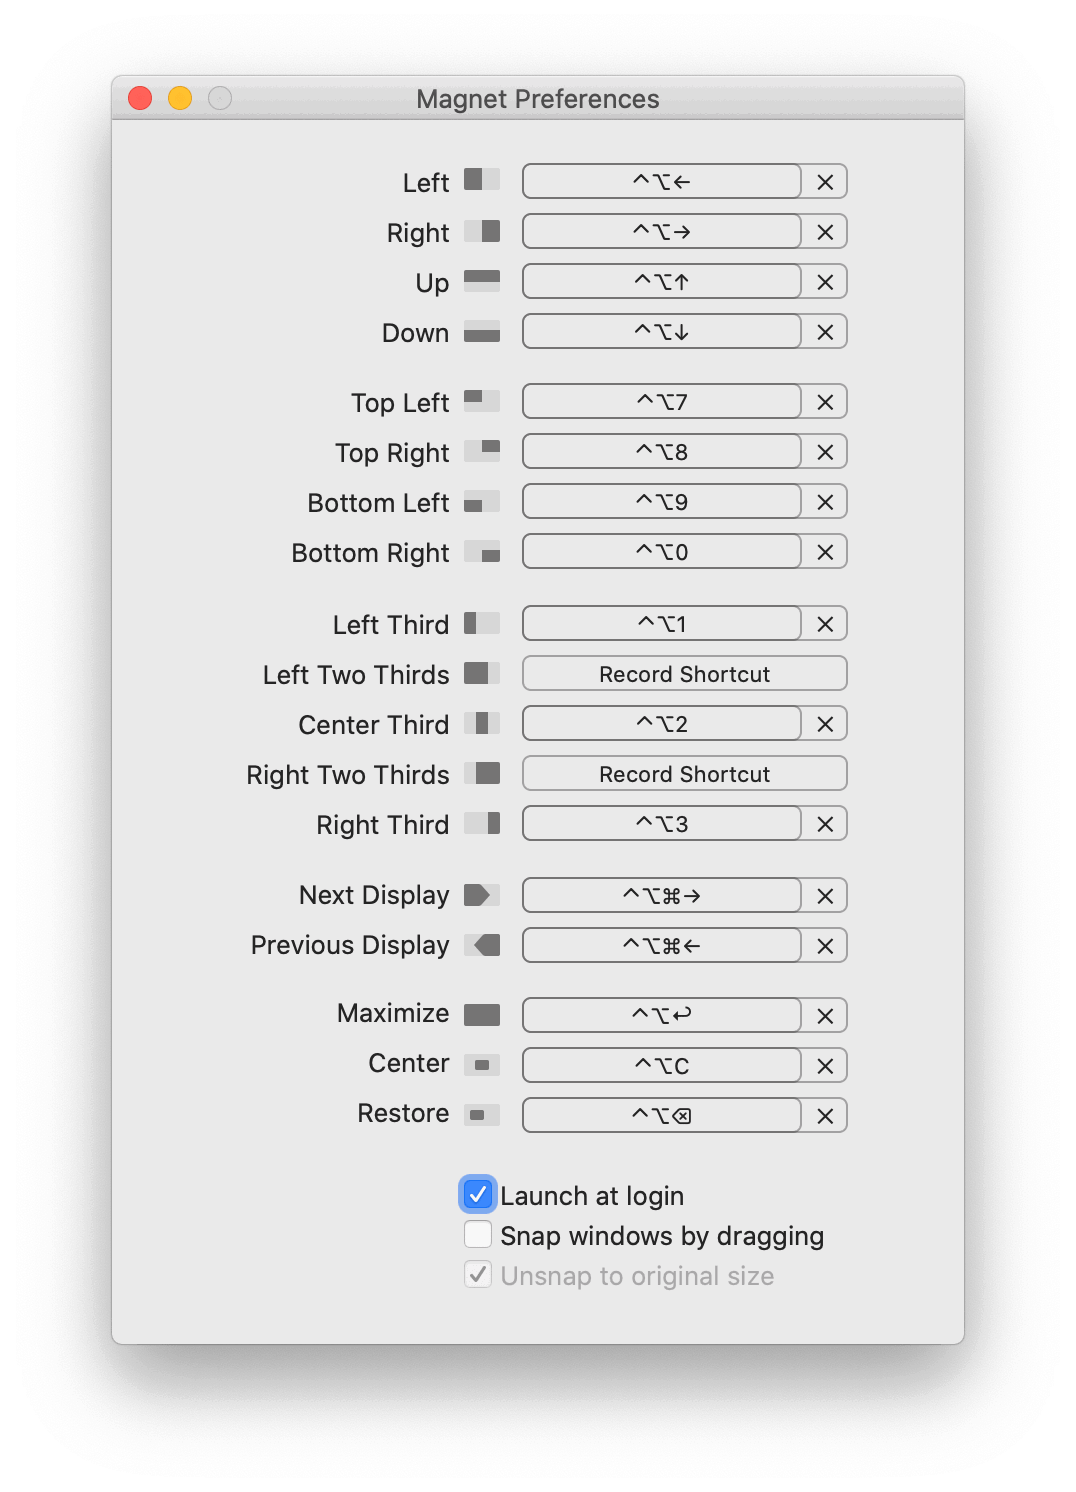
Magnet allows for a fair amount of positioning options without going deep into the weeds. The system I use divides my screen into three arrangements: halves, thirds, and quadrants. (Along with a few miscellaneous commands that I’ll describe.)
At first glance many of my window position shortcuts might seem arbitrary, but they make sense to me. Each one is prefixed with the ^⌥ modifier keys and then a trigger key that sort of mnemonically maps in my head to what the window position should be.
Two Halves
In my head I divide my screen into top / bottom and left / right halves, which I position windows with using…
- Left half of screen
^⌥← - Right half of screen
^⌥→ - Top half of screen
^⌥↑ - Bottom half of screen
^⌥↓
Three Thirds
Here’s how I see my screen in the thirds layout:

And I use these shortcuts to position my windows…
- Left third of screen
^⌥1 - Center third of screen
^⌥2 - Right third of screen
^⌥3
Four Quadrants
And similarly, I also visualize my screen like this:

- Top left of screen
^⌥7 - Top right of screen
^⌥8 - Bottom left of screen
^⌥9 - Bottom right of screen
^⌥0
Second screen support
Magnet works great in that the window position commands apply to the screen that the window is currently on. But if you want to quickly send a window to the next or previous screen, you can do that, too.
- Send to screen on the left
^⌥⌘← - Send to screen on the right
^⌥⌘→
Miscellaneous window positioning commands
And here are the remaining miscellaneous commands I use for a few special window positions.
- Full screen
^⌥⏎: This does exactly what you’d expect. It makes the window fill the entire screen, but, crucially, does not activate macOS’ fullscreen mode for that app. It just makes the window as large as it can be. - Center on screen
^⌥C: This takes the active window and centers it horizontally and vertically on the screen without adjusting its size. - Undo
^⌥⌫: If you use Magnet to position a window using one of the above commands, this hotkey will restore the window to its previous size and position.
And, finally…
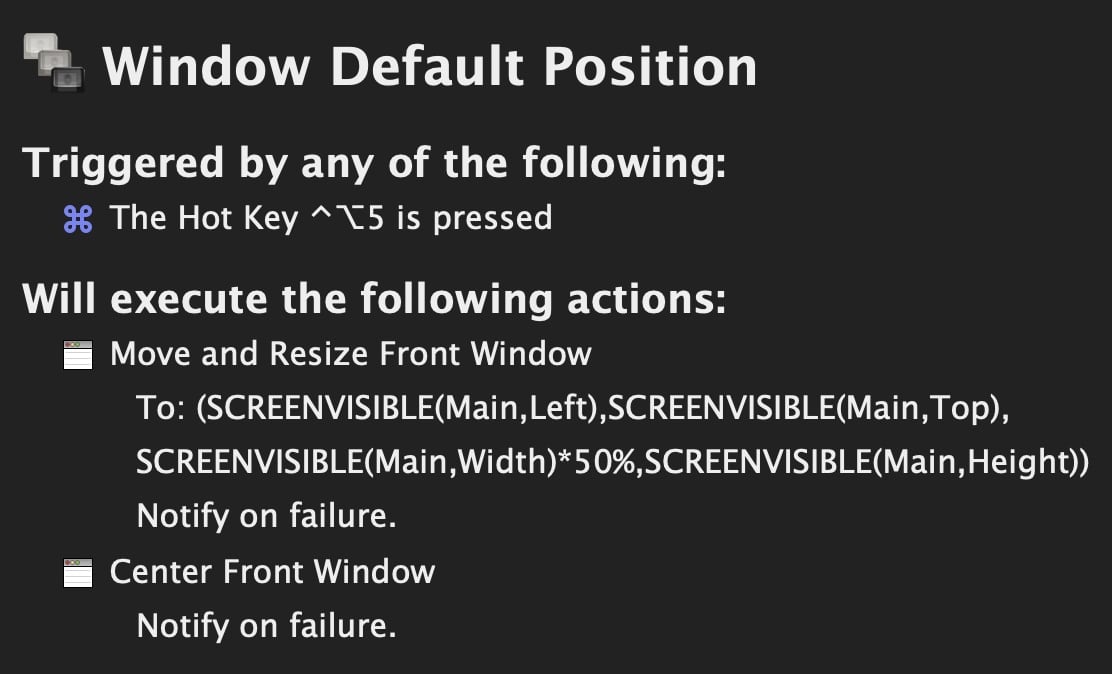
- Default position
^⌥5: This is a hotkey controlled by KeyboardMaestro – not Magnet. It sizes the window to be as tall as possible and 50% of the screen width, and then centers it on screen. I call this my “default window position”. I often use it when I want to bring my focus to a specific task. (For the curious: I chose “5” as the trigger key because the “5” key is phsyically in the middle of the keyboard between the 1-3 and 7-0 keys I use with my other window shortcuts.)
Here’s the macro in KeyboardMaestro:
Launching Apps
Next up are what I call my “launchers”. They quickly bring up the apps I use most often. Nearly all of them are built, again, using KeyboardMaestro.
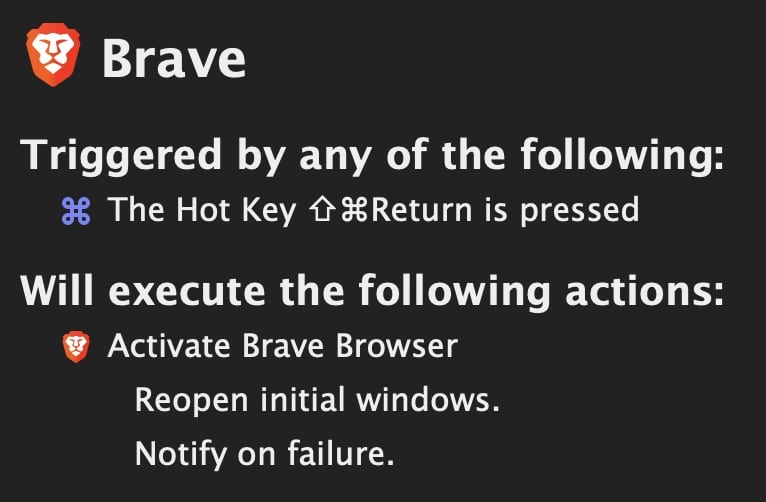
- Web browser
⇧⌘⏎: Like most people, I’m constantly opening my web browser. This hotkey will launch Brave if it’s not already open. If it is running, it will bring its windows to the front. And if no windows are open, it will make a new one.
Even more apps with dedicated hotkeys…
- Open SnippetsLab
⇧⌘F7 - Open Dash
⇧⌘F10 - Open Bear and create a new note:
⇧⌘F11 - Open Drafts
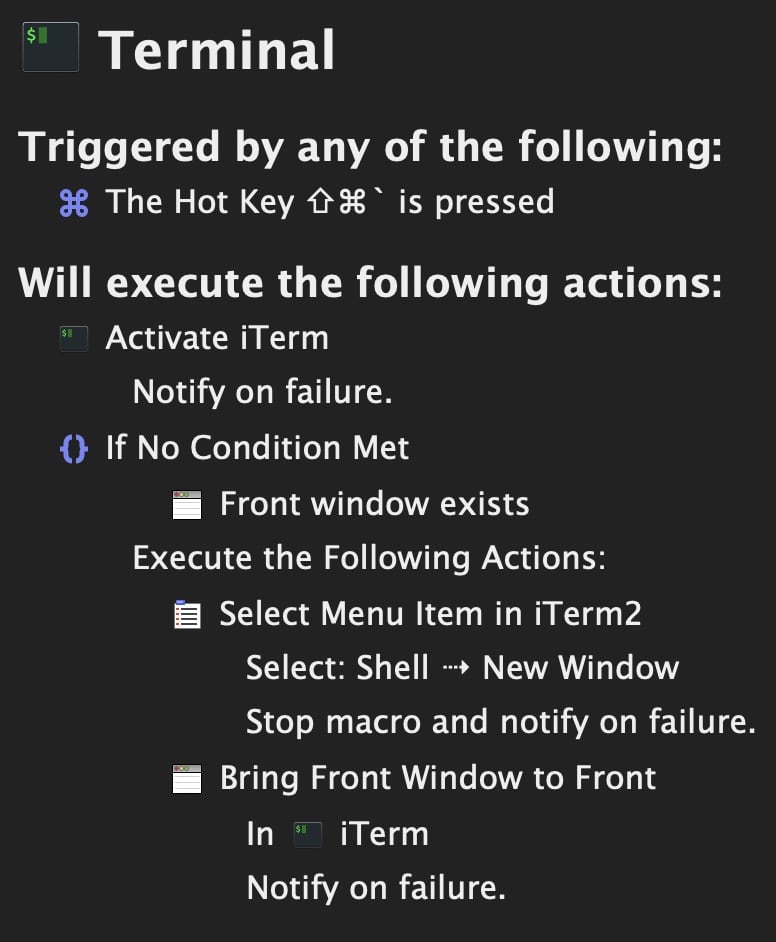
⇧⌘F12 - Open iTerm
⇧⌘: This one is slightly interesting as I needed a way to either bring iTerm to the front or open a new window if one didn’t exist. For some reason the app didn’t follow the standard new window behavior, so I had to script around it.
1Password
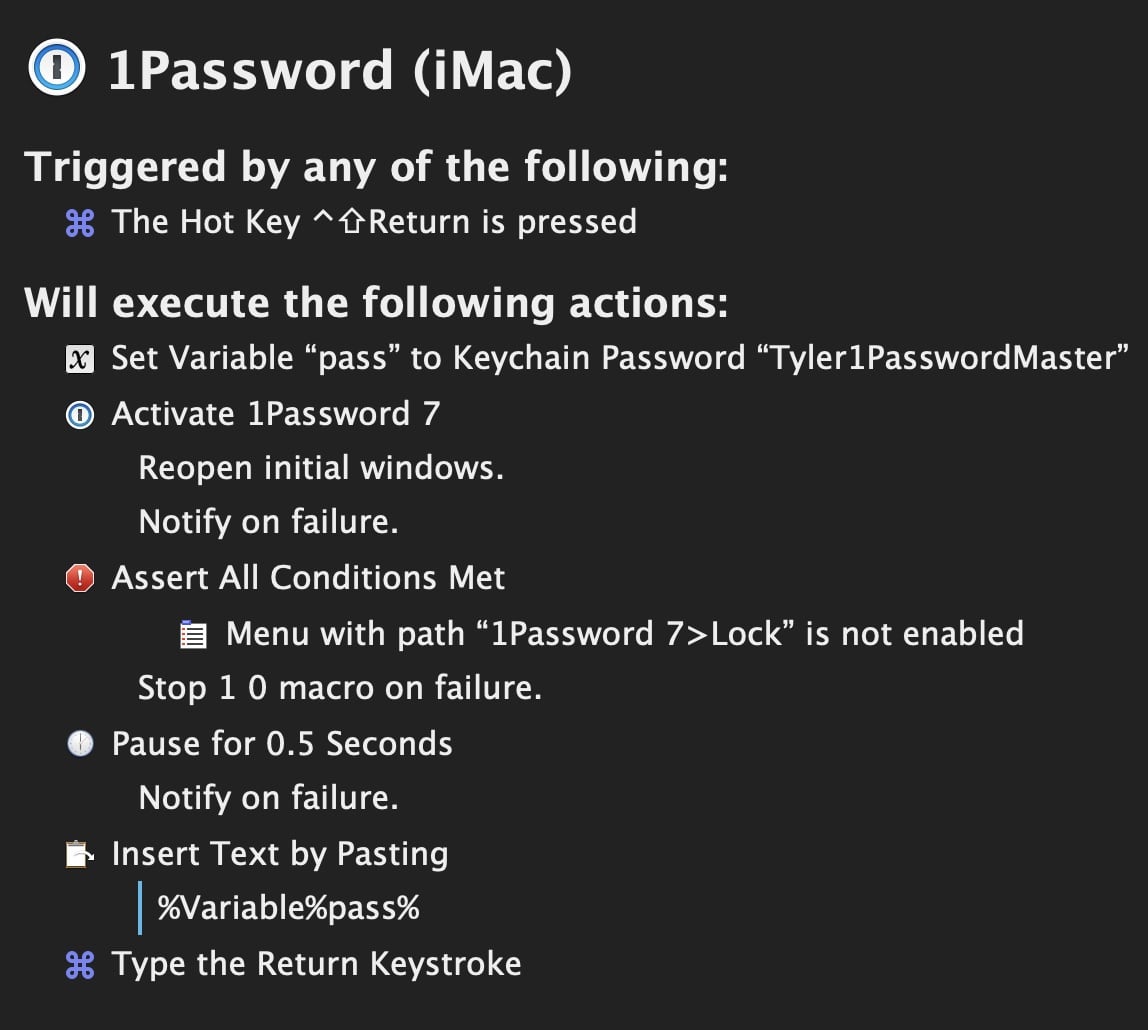
I trigger 1Password with ^⇧⏎ and am very happy with how this macro turned out.
I take security seriously and so when I’m out and about with my laptop, I want 1Password to automatically lock itself after being idle, etc. I’m more than happy to have to enter my long, master password to unlock it. But when I’m at home working on my iMac that never leaves my house, I hate having to type in that password over and over again.
So, the macro I use to launch 1Password is actually two macros with the same hotkey. However, one is only activated when I’m at home and the other when I’m using a laptop. They both launch 1Password, but the iMac specific one then fetches my master password out of the system keychain and types it into the 1Password window for me. This lets me open and unlock the app with a single hotkey. Some might call this incredibly insecure, but I call it a small security trade-off for extra convenience 🙂
Here’s the iMac macro…
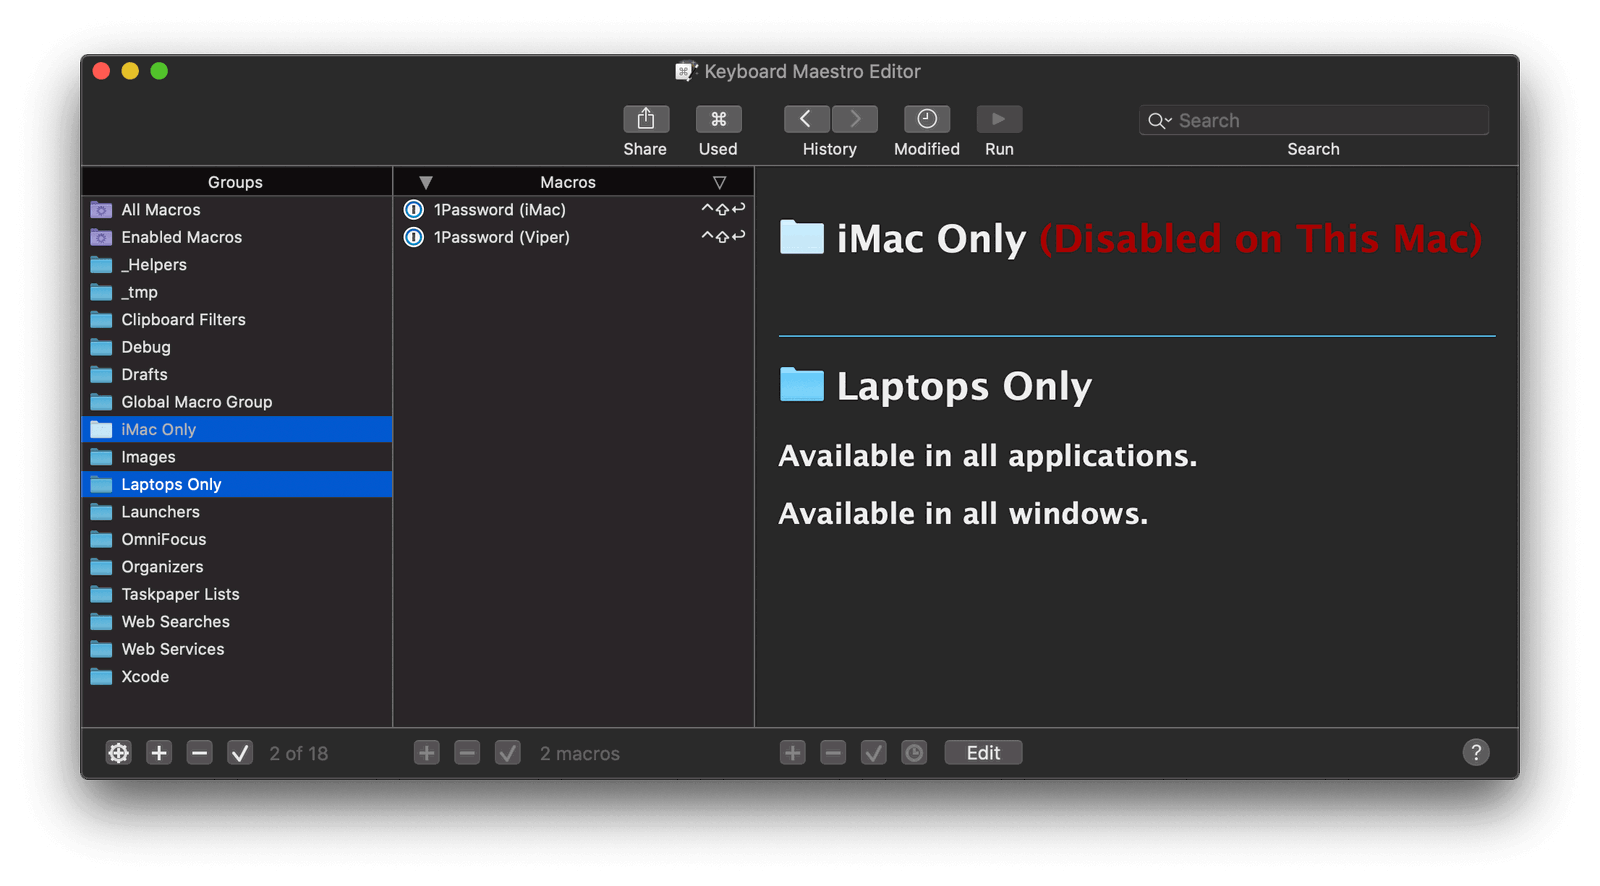
And I make use of KeyboardMaestro‘s ability to disable certain groups of macros based on what computer you’re using. In this case, you can see that I’m writing this post on my laptop right now, and the iMac group is disabled.
(I wanted to include a video of this macro in action, but in the end I decided it was too much trouble because I would have had to blur out all of my data in 1Password once that window opened.)
My final two launcher commands deal with navigating the Finder.
The first is one I wrote about recently that lets me quickly select and open my favorite folders with ⇧⌘9.
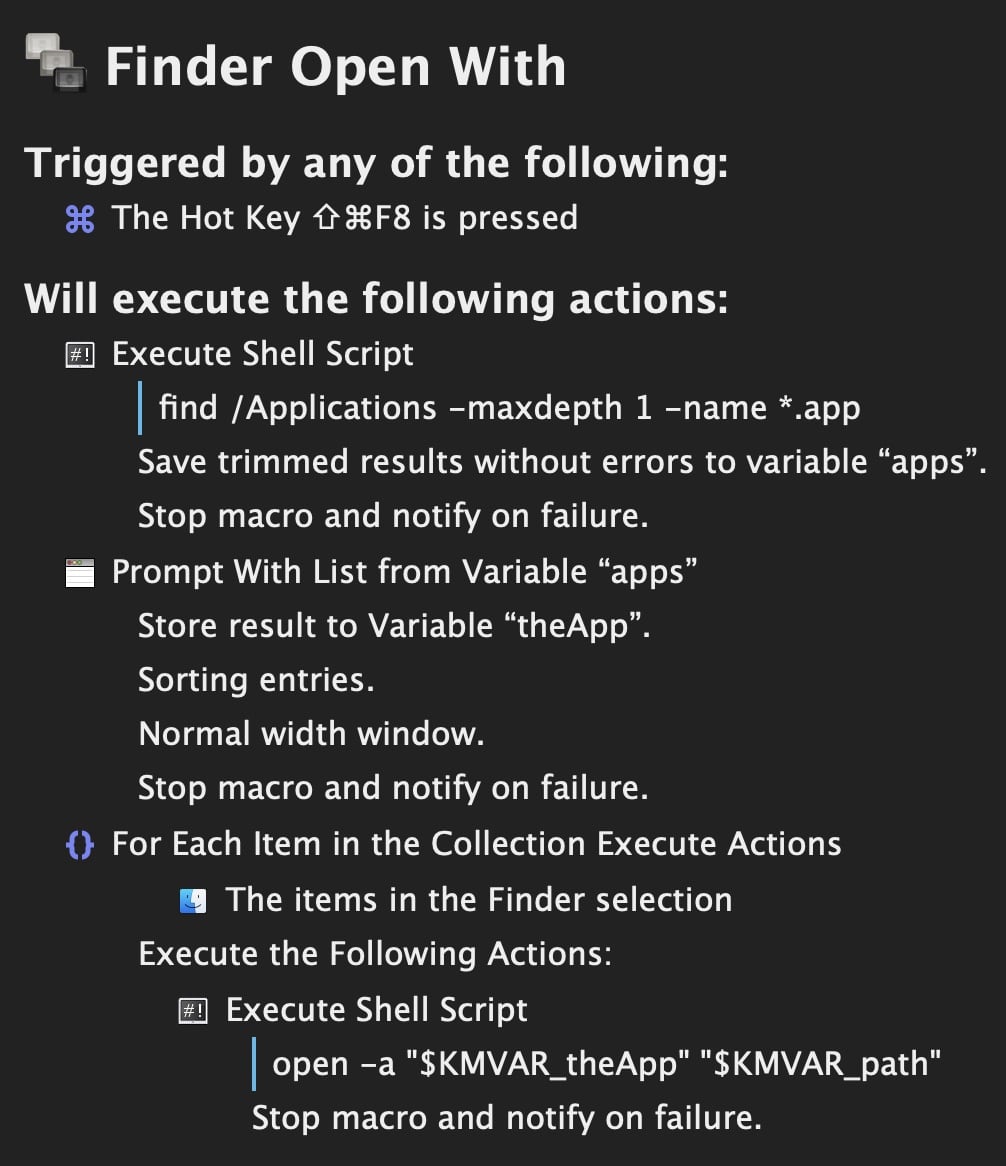
The other is probably my most used of any shortcut. Pressing ⇧⌘8 will prompt me to type the name of an application on my Mac. I can then arrow down the list of matching names and press return to select it. Then, KeyboardMeastro will open the selected Finder items (can be one file or multiple files) with that app.
Example: Often I’ll have a bunch of images selected in Finder. By default, ⌘↓ will open them with Preview. But I can just as easily hit ⇧⌘8 to open them in Acorn. Or, I might want to make a quick edit to a source code file but don’t want to wait for Xcode to spin up. Again, with ⇧⌘8 I can immediately open it in TextMate instead.
I know there are probably a million other ways to accomplish this – I think Alfred probably does it somehow – but it was faster for me to quickly write this script a couple years ago then dig around a for a specific app to do the job. Here’s what it looks like in action…
And the macro…
In / Out
These next commands are all about data. Getting data into some apps and out of others.
First, there is, of course, my beloved OmniFocus‘ quick entry window shortcut key ^⌥␣ which immediately brings up a floating window to jot down whatever task just came to mind, and then just as quickly disappears so I can get on with my work.
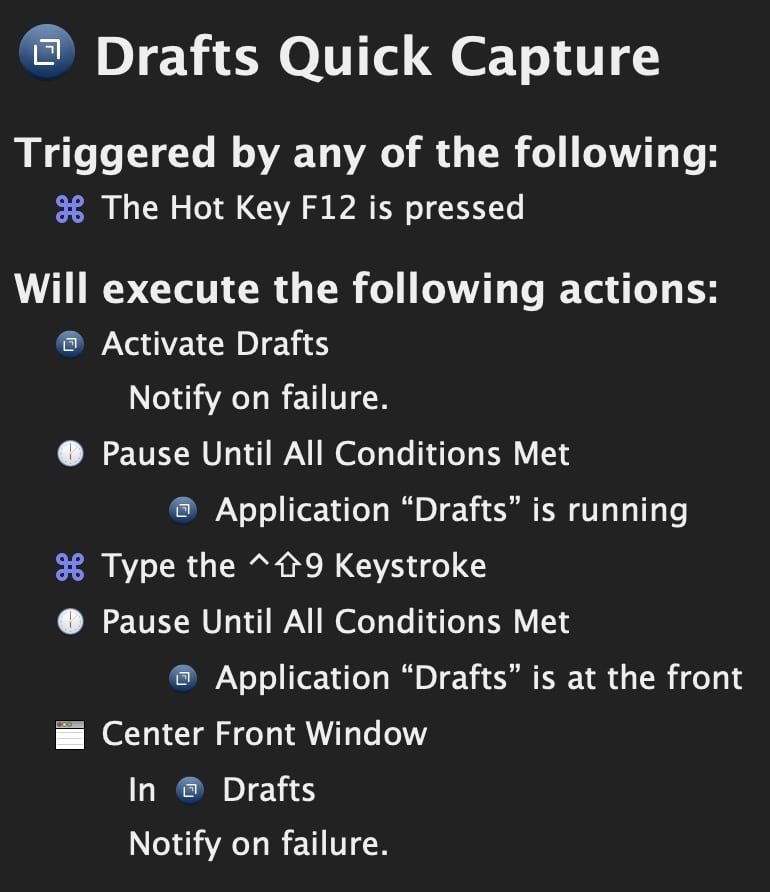
I use F12 for creating a new note in Drafts. I could use Drafts‘ native hotkey support, but by going through KeyboardMaestro I get the option of launching Drafts if it’s not currently running. That’s just one less point of friction to worry about. (If there’s already a way to do this with Drafts itself, I missed it. Sorry, Greg!)
I use Pastebot to manage and sync my clipboard and so should you. The system paste hotkey is ⌘V, so naturally my shortcut for opening Pastebot’s history window is ⇧⌘V.
And, finally, I have tons and tons of other macros that I don’t use everyday or that simply don’t warrant a dedicated hotkey. However, pressing ⌘⇧ will open KeyboardMaestro‘s macro search window. I can then just start typing the name of the one I’m searching for and then press ⏎ to run it.
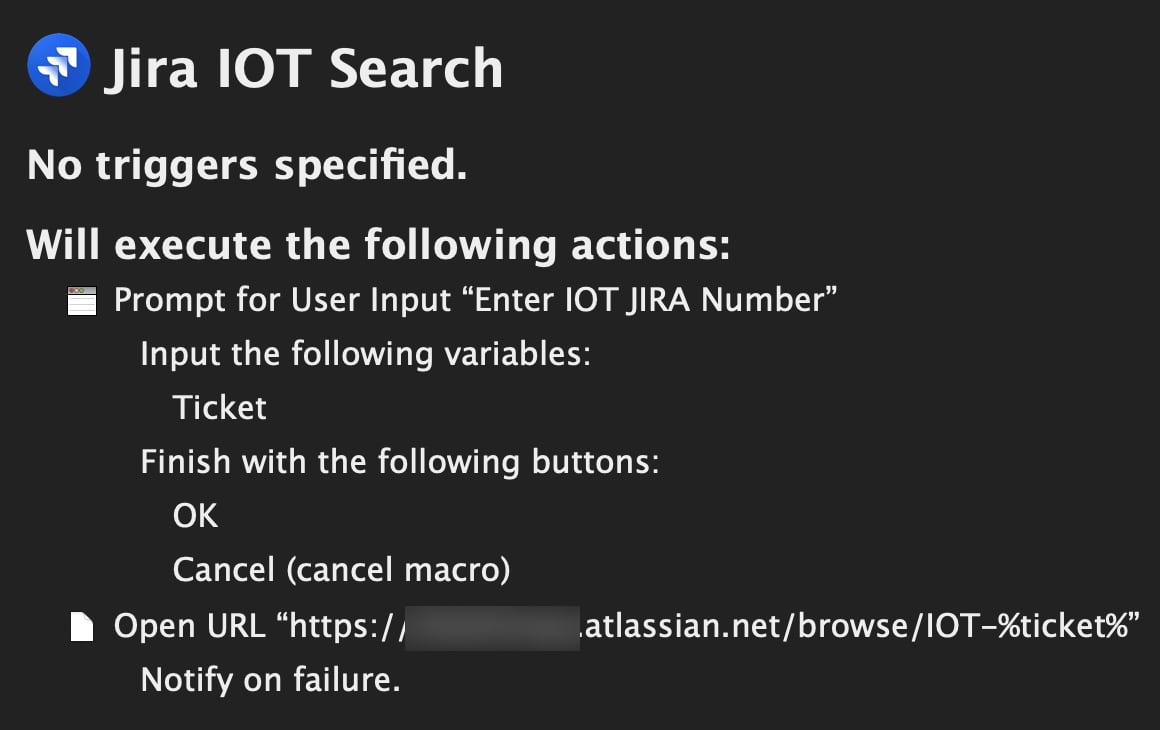
Lastly in the launcher category is my Jira ticket opener hotkey. If you’re lucky enough to use Jira everyday, then you know it’s considered a dumpster fire by everyone who doesn’t just use it to generate reports. And navigating to a specific ticket – especially if you don’t already have a browser window open and loaded up on the appropriate page – is often a 10 to 15 second journey done tens if not sometimes a hundred times a day.
Using the macro search shortcut above (⇧⌘), I can then type jira⏎ to open a textfield that prompts me to enter the numeric portion of the ticket number. Press ⏎ again and KeyboardMaestro opens a new browser window (or tab) directly onto that ticket’s detail page.
Sure, it still takes forever for atlassian.net to load, but it’s way faster than going to an intermediate page first, then needing to click into a search field, and then wait for an awful AJAX request to hydrate the data I’m actually interested in.
(Oh. And the first time my coworker saw me execute that macro, they said “Of course. You of all people would have a hotkey for Jira.” ?)
Miscellaneous Shortcuts
I’ll call out just a few others. The first are a few hotkeys I use for performing various tasks in Xcode. And the last is an amazingly useful macro that I just wish I were smart enough to have come up with on my own.
Xcode
If you use Xcode, there’s no need for me to explain how useful it is to have a lightning fast way to blow away your DerivedData folder.
Along those same lines, I also have a similar macro that wipes out all of the ~/Library/Application Support and ~/Library/Preferences files and folders for the apps I’m working on. This is super useful for resetting data when you’re testing sync logic or when you’re iterating on database schemas.
Next, long-time readers of this blog will probably realize I’m quite insane and particular about my computing habits. (So will those of you who have made it this far in this blog post.) I especially like Xcode arranged in a certain way when I’m writing code vs debugging / running an app.
When I launch an app, I let Xcode do it’s normal behaviors to show the console, swap the sidebar to a different view, etc. But when I’m done testing, I want a quick way to get back to my coding mode. I’ve assigned ⇧⌘8 to be my Xcode “cleanup” macro.
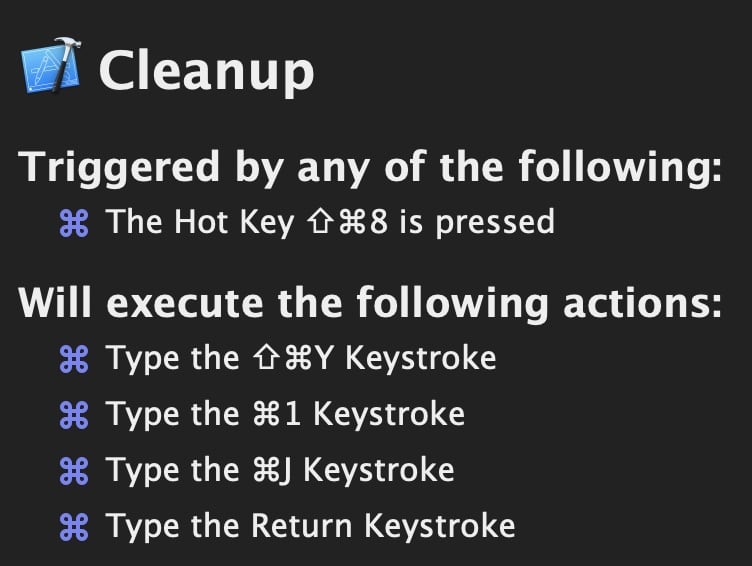
In case you don’t have every Xcode shortcut memorized like I do, that does the following:
⇧⌘YClose the bottom console pane⌘1Swap the sidebar to show my project’s file structure⌘JOpen the window pane selector (what is this thing actually called?)⏎Select the main editing pane so I can start typing
Basically, the macro maximizes the visible space for the text editor, shows me my most used sidebar view, and makes the editor the first responder so I don’t have to manually give it focus to start typing. Here it is in action…
Last on the list of my Xcode shortcuts is one I simply refer to as “FML”, which I launch with ⇧⌘R. (The meaning of that abbreviation is an exercise for the reader.)
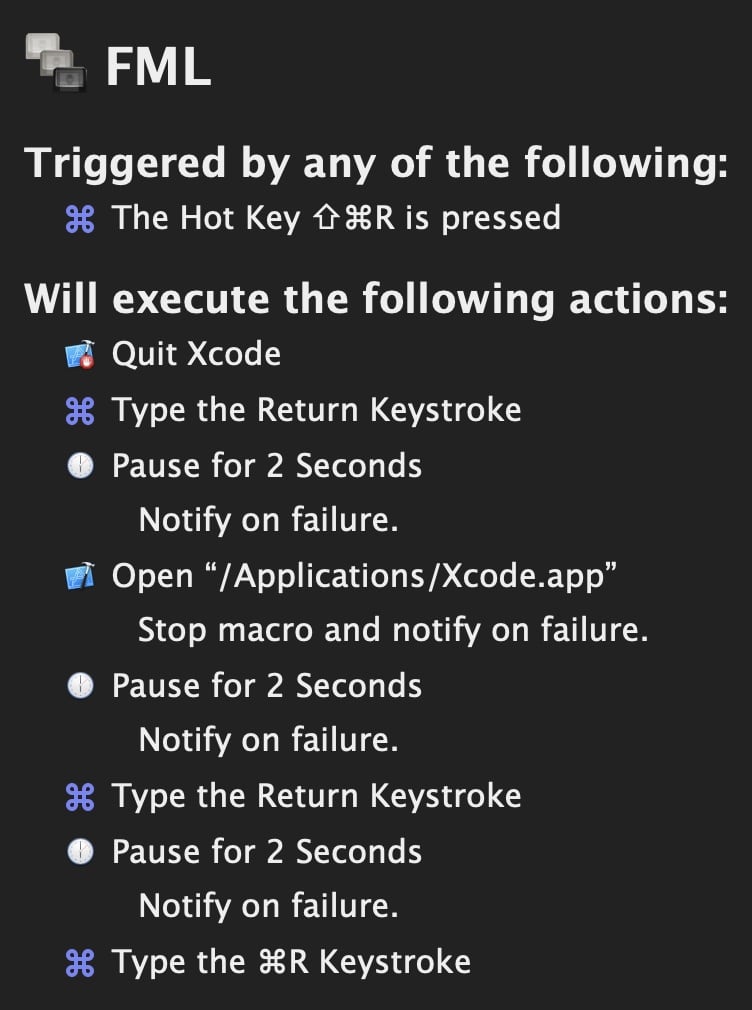
So, so, so many times I’ll try to build and run my latest code changes and Swift and/or Xcode (I’m not sure where to draw the line or what is actually responsible) will vomit into my error logs and refuse to build. I can even do a ⇧⌘K to clean the build folder or, if all else fails, use my earlier macro to wipe out DerivedData. And, yet, still no luck building code that I ? know is fine.
But if I simply quit and relaunch Xcode – and make no code changes – my project will build and run.
This macro automates that process of quitting Xcode, pausing, opening it again, then opening the most recent project, and building. Voilà!
And, finally…
(And I do really mean finally this time.)
This macro takes advantage of KeyboardMaestro‘s text snippet expansion capabilities. If I type the phrase xfinder, KM will replace it with the full path of the selected item in the Finder.
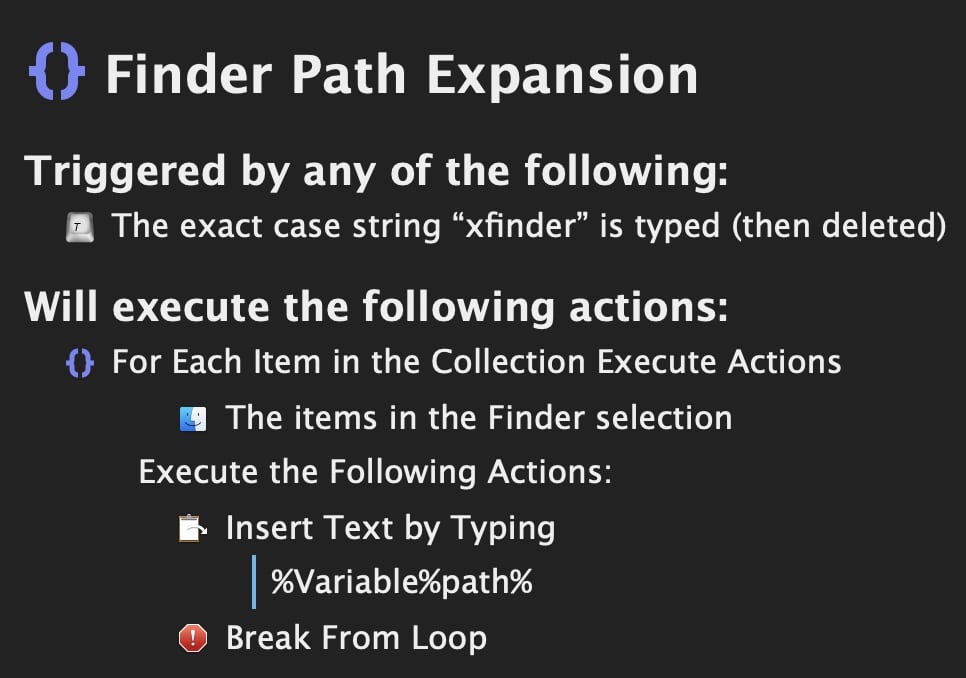
I really wish I could remember where I came across this brilliant trick. It seemed like black magic the first time I read about it.
⌘Q
So, yeah. After writing all of the above, I’m now thinking maybe this post should have been titled A Love Letter to KeybaordMaestro.
That app, along with Magnet, are indispensable to my daily workflow. Many of the shortcuts I highlighted are extremely niche and built to suit my own, weird way of doing things. But hopefully, even if you don’t find any of them specifically useful, they do give you inspiration for ways you can remove all the little papercuts and friction you run into everyday.